Microsoft Teams Setup Guide
Below is a step by step guide showing by way of an example customer how you would setup your company with Microsoft Teams and then configure your phone numbers to route into your Teams environment
NOTE: This is an example scenario only and your individual circumstances and requirements could be very different.The example guide below has the following characteristics:
- User Name: Hero User
- Company Name: Hero Ltd
- Domain Name: herointernet.nz
- User Count: 3 users
- Email migration: No
- DNS Management: External (not managed by Microsoft)
- Online Services: Non selected during setup
- Microsoft License: Office 365 E5
- Phone Numbers Required: 3 Local numbers
Pre-requisites - Before you Start
You will need the Skype for Business Powershell environment installed before you can run the Powershell commands later in the guide:
Follow the guides below for instructions on how to setup Skype for Business and Windows Powershell
Setup Guide: https://docs.microsoft.com/en-us/SkypeForBusiness/set-up-your-computer-for-windows-powershell/set-up-your-computer-for-windows-powershell
Overview: https://docs.microsoft.com/en-us/microsoftteams/teams-powershell-overview
Install Link for Skype for Business Online, Windows PowerShell Module
https://www.microsoft.com/en-us/download/details.aspx?id=39366
Useful Guide for Installation of the Teams Environment
https://social.technet.microsoft.com/wiki/contents/articles/52052.microsoft-teams-administration-powershell-admin-center.aspx
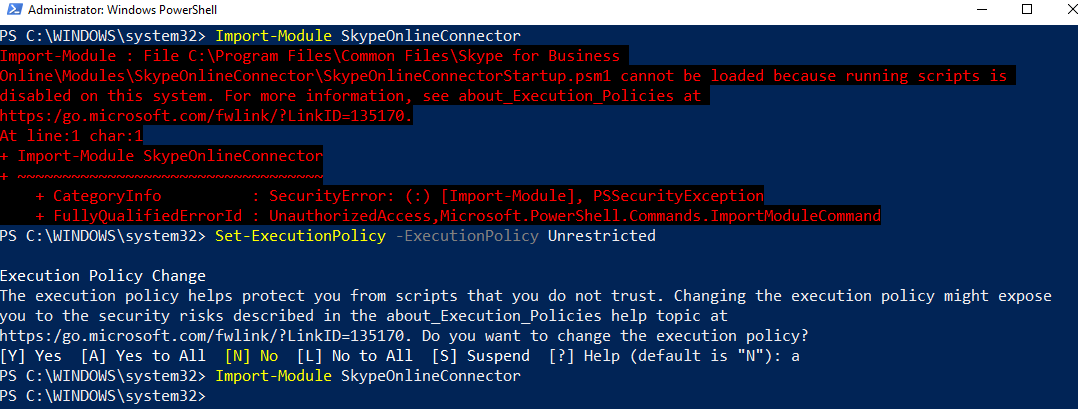
Once these packages are installed and your Power Shell environment is ready you will need to do the following:
- Start Power Shell as Administrator (or with Administrator Priveleges)
- Run the following commands in Power Shell:
Install-Module -Name MicrosoftTeams- NuGet Provider is required to continue. Confirm by pressing 'Y'
- Untrusted Repository. Confirm by pressing 'A'
- Download and install SkypeOnlinePowerShell.exe from the following link if you have not done this already
https://www.microsoft.com/en-us/download/details.aspx?id=39366- Restart Power Shell and run as Administrator
- Change execution policy by typing the following command in Power Shell
Set-ExecutionPolicy -ExecutionPolicy Unrestricted- For the Execution Policy change confirm by pressing 'A'. (Click here for additional information)
- Now run the following commands in Power Shell replacing <youradminemail> with your Administrator Email in Office 365:
Import-Module SkypeOnlineConnector $acctName="<youradminemail>"
$sfbSession = New-CsOnlineSession -UserName $acctName
Import-Module MicrosoftTeams
Import-Module SkypeOnlineConnector
$userCredential = Get-Credential
$sfbSession = New-CsOnlineSession -Credential $userCredential
Import-PSSession $sfbSession
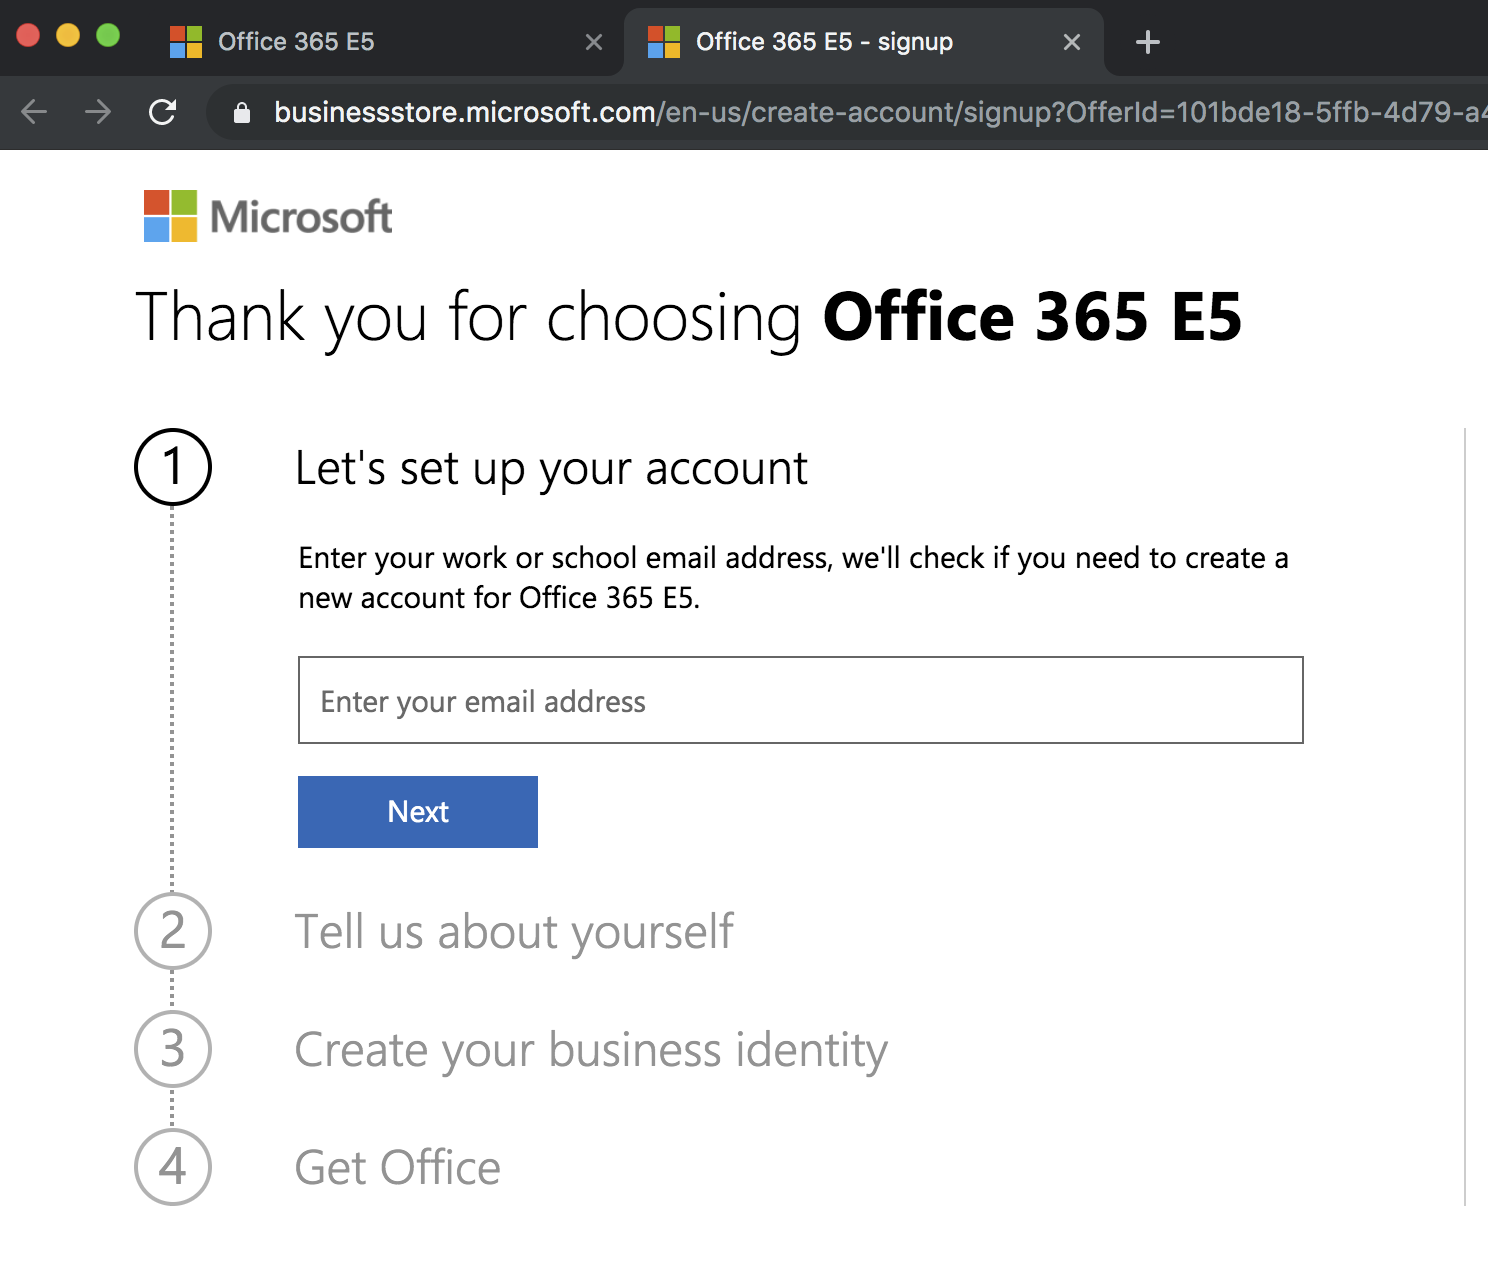
Step 1 - Signup for Office 365
Click here if you have not signed up for Office 365 already or do not have your domain setup with Office 365.
Otherwise you can skip to Step 21 below
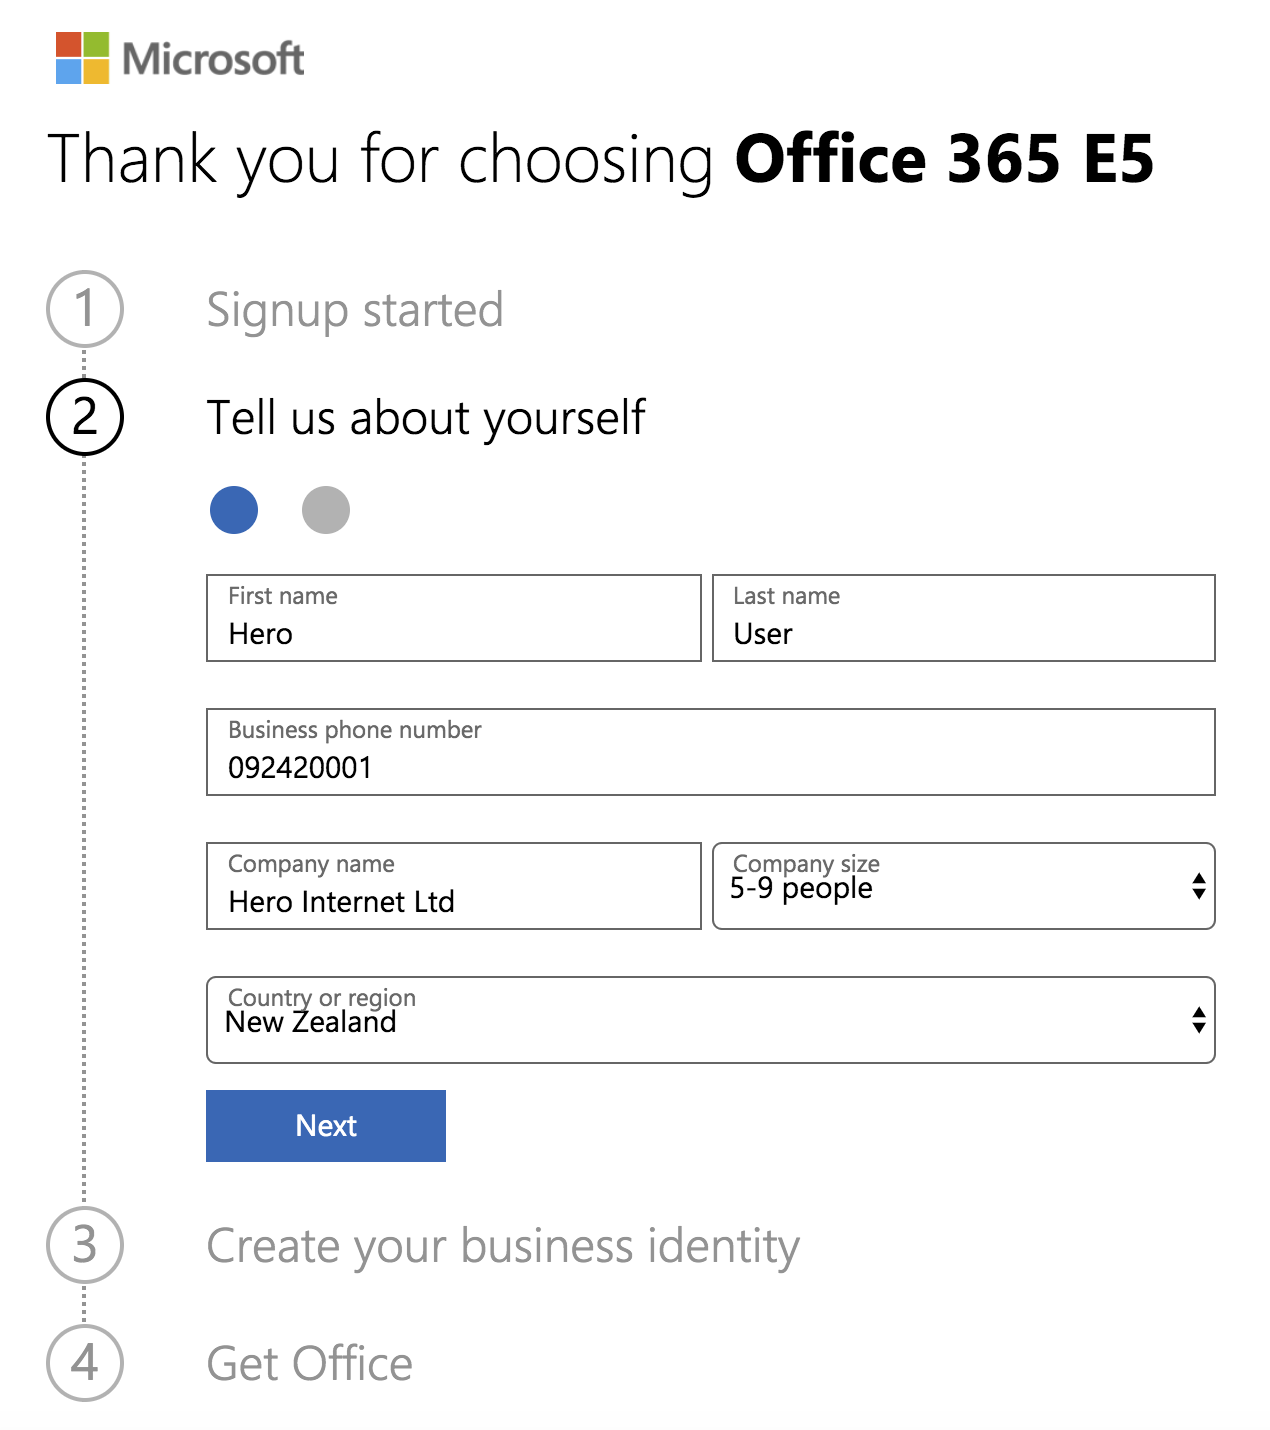
Step 2 - Fill in your personal details
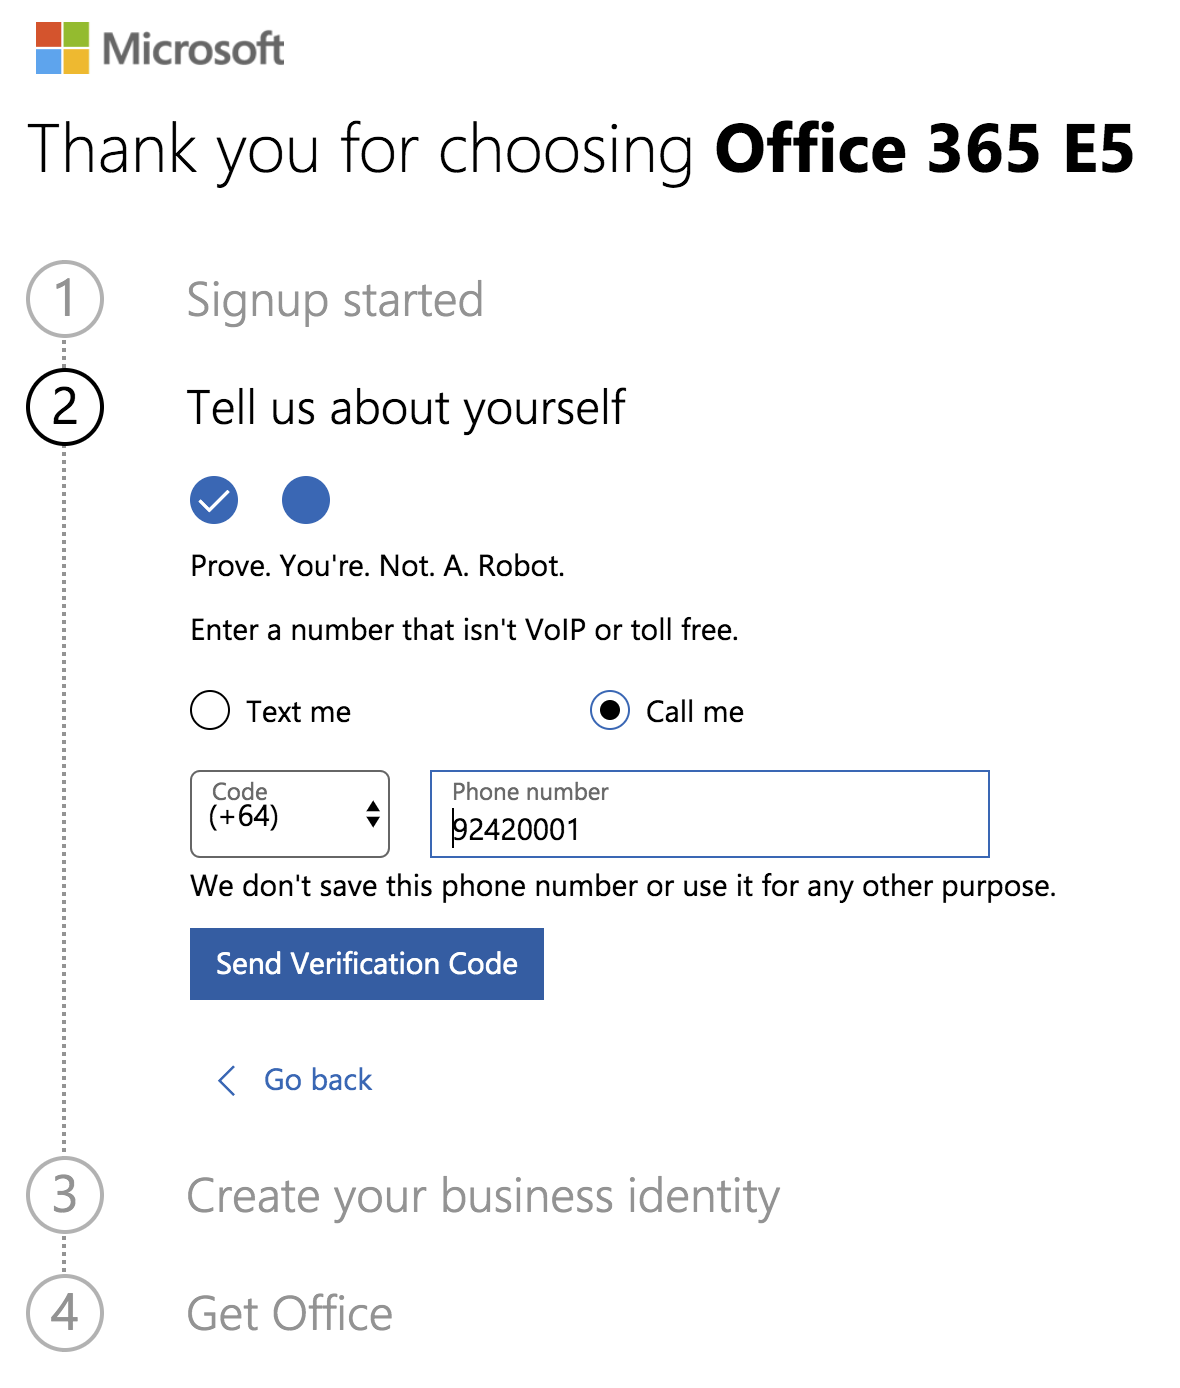
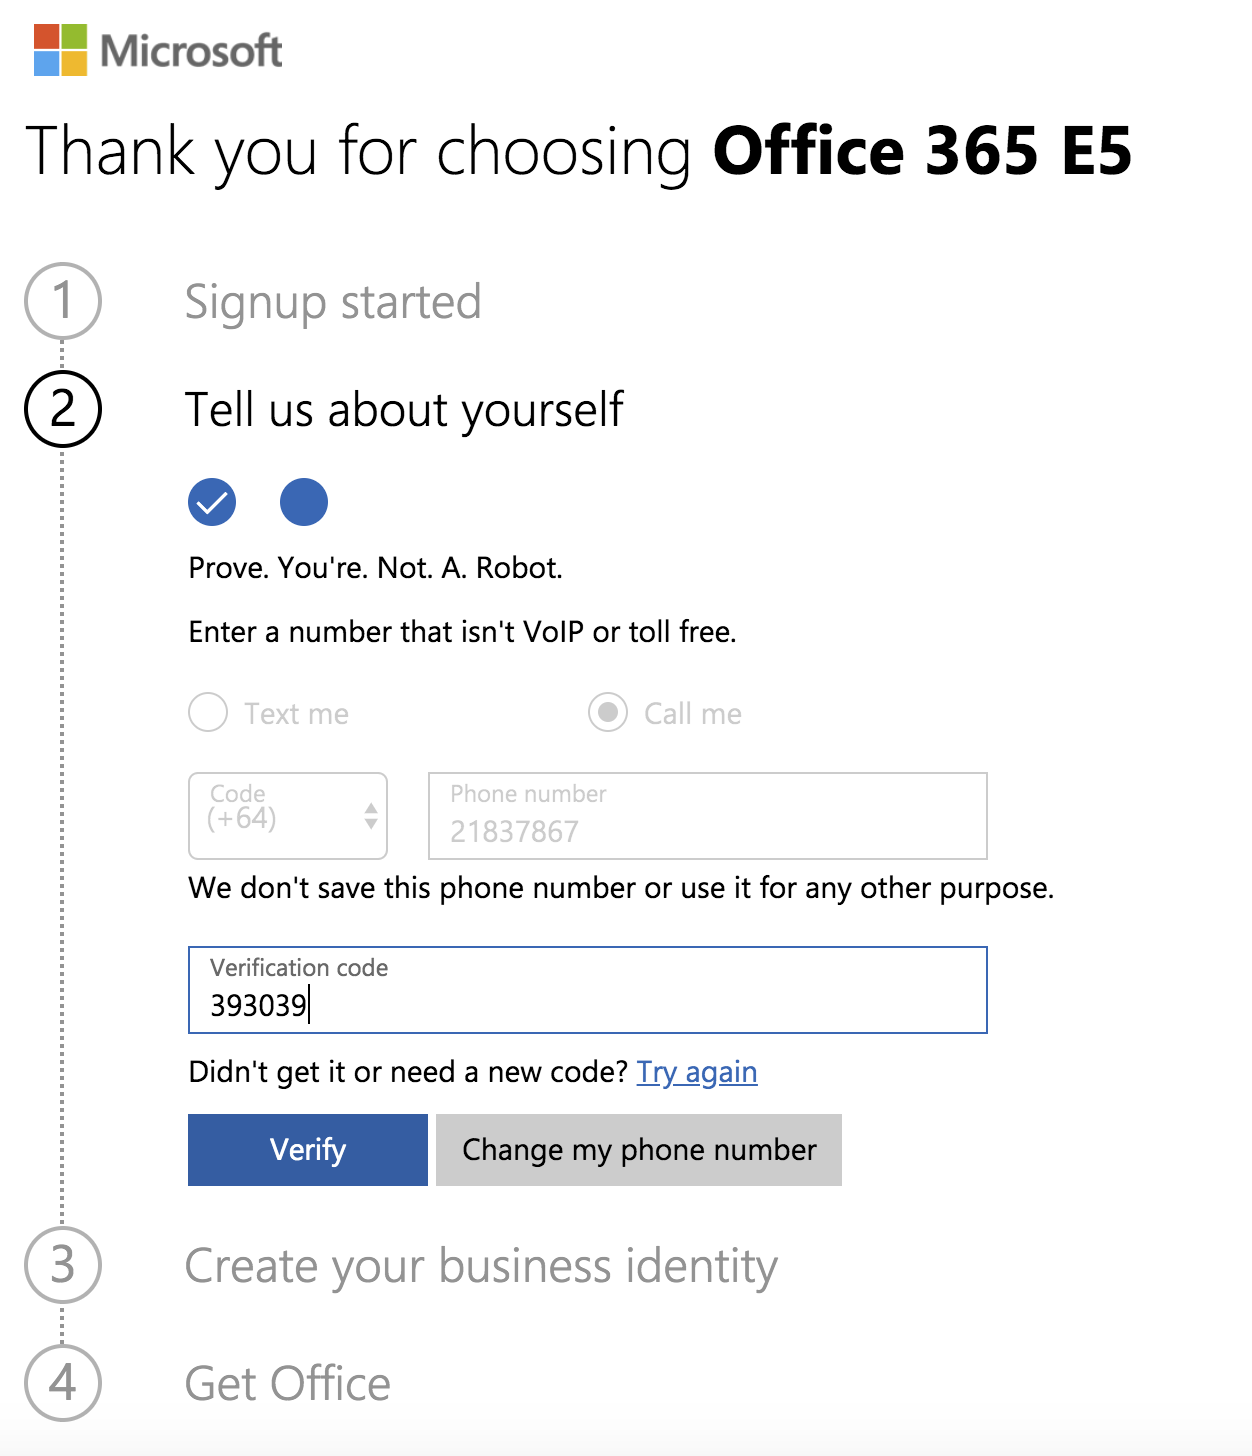
Step 3 - Verify your account by Text or Phone call
Step 4 - Enter your verification code
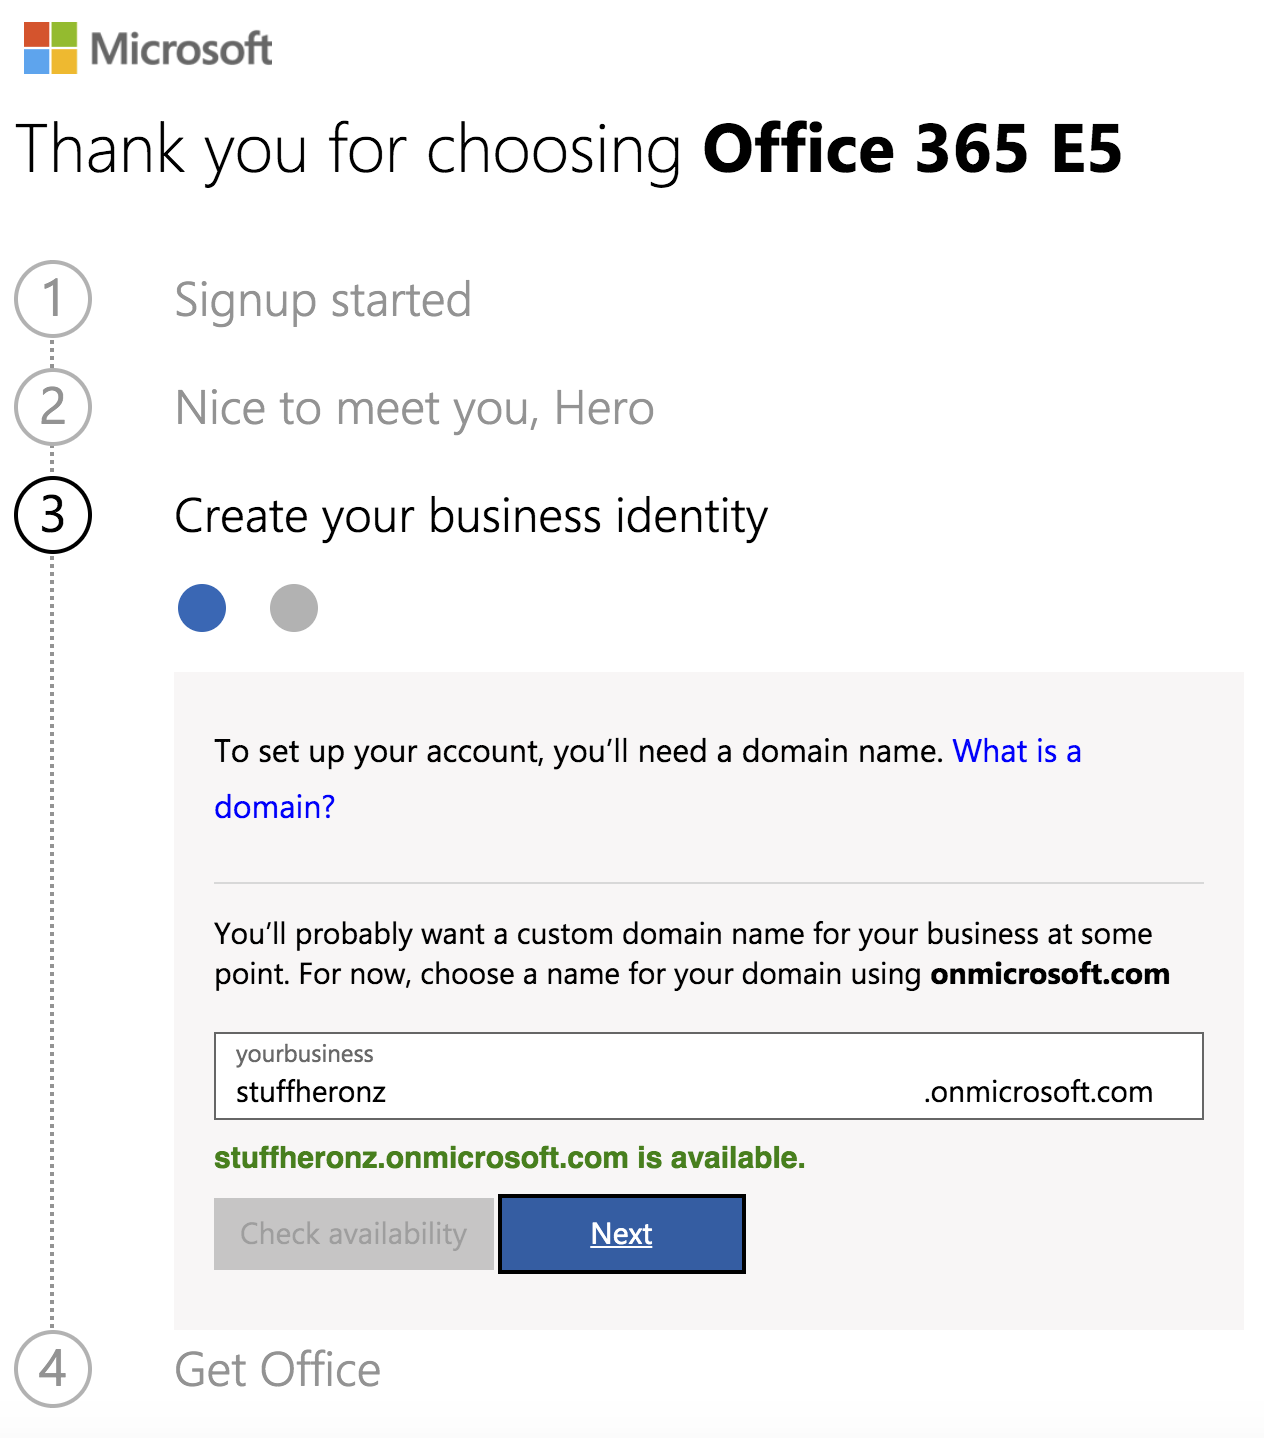
Step 5 - Create a business identity for your business
Step 6 - Check availability of that identity and click Next to continue
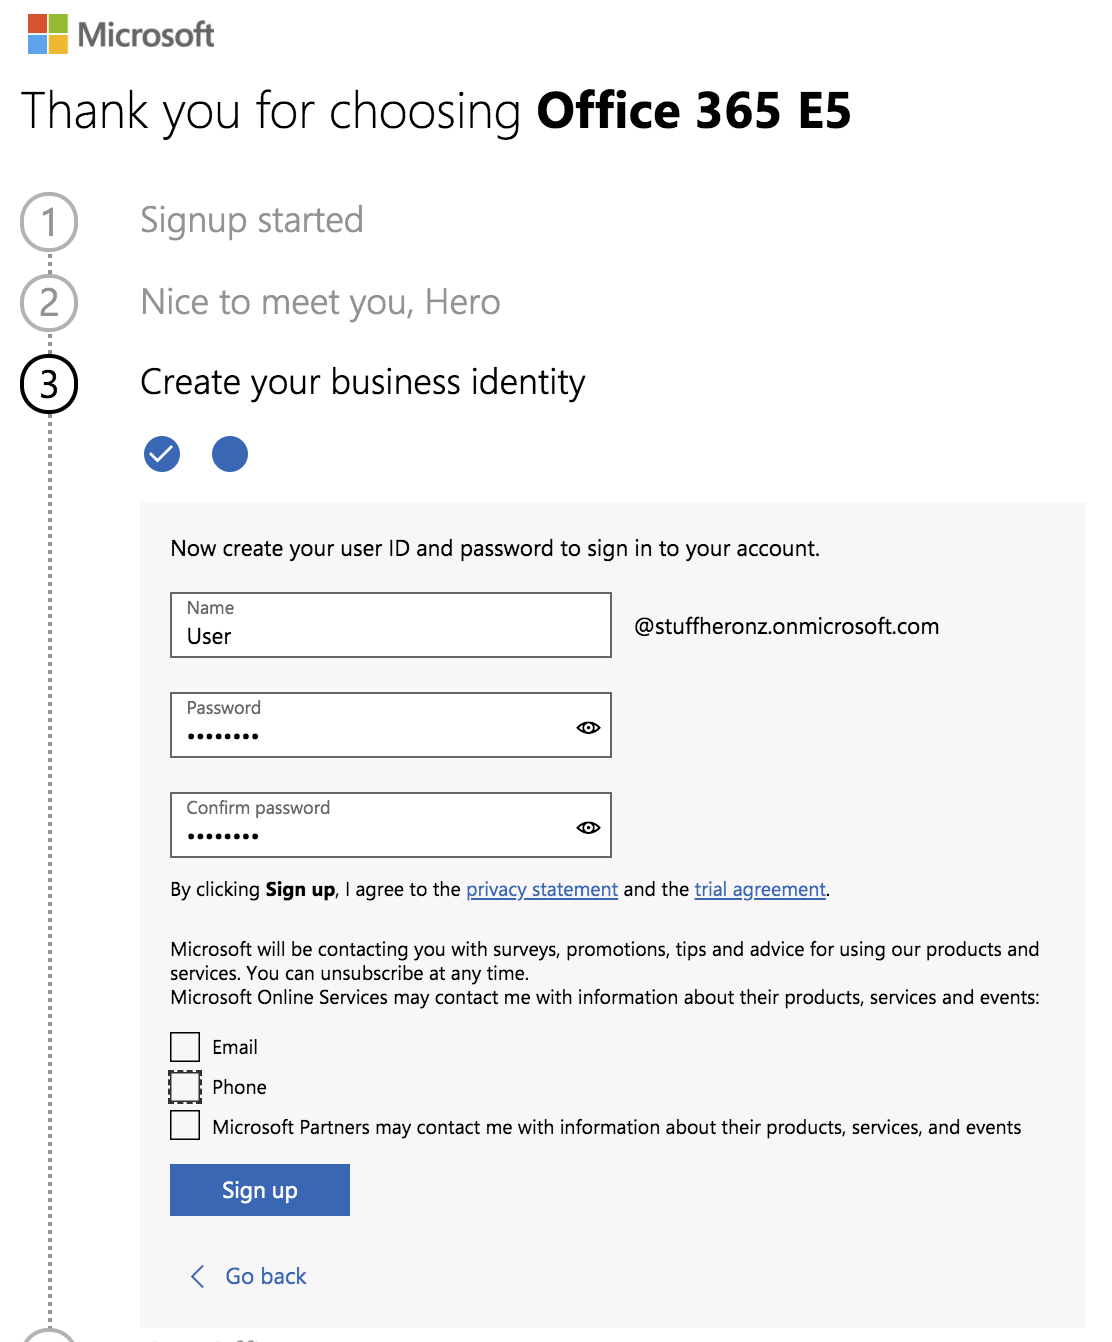
Step 7 - Enter a user ID and password for your Microsoft Account
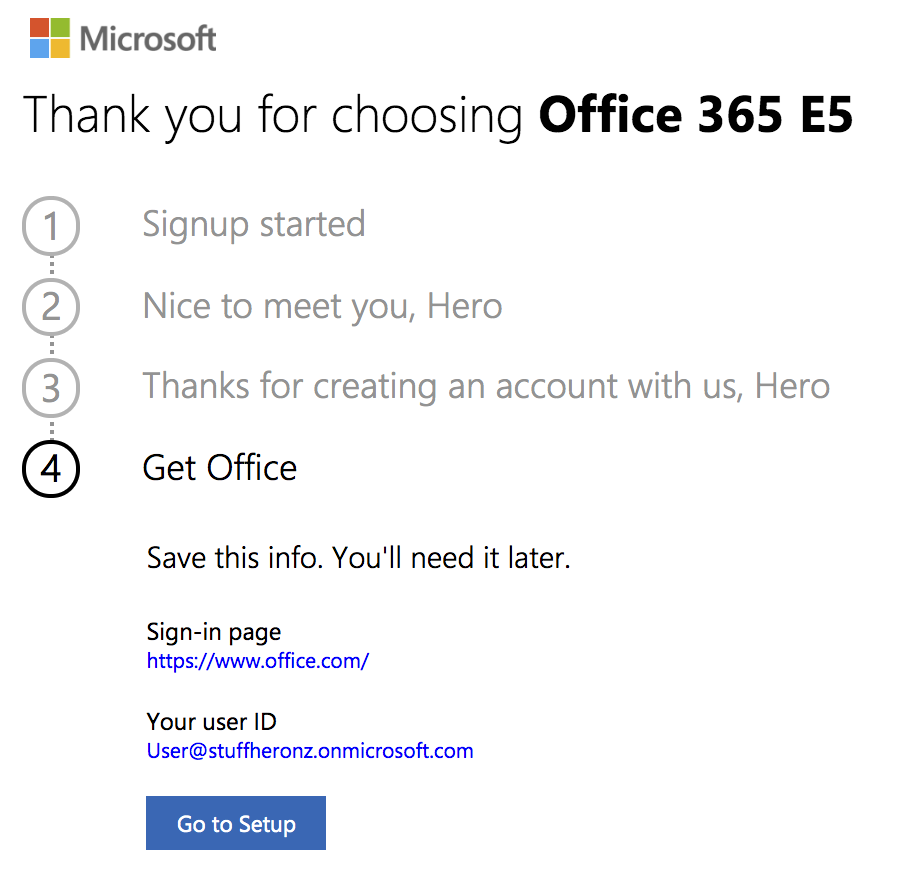
Step 8 - Click on the 'Go to Setup' button when complete
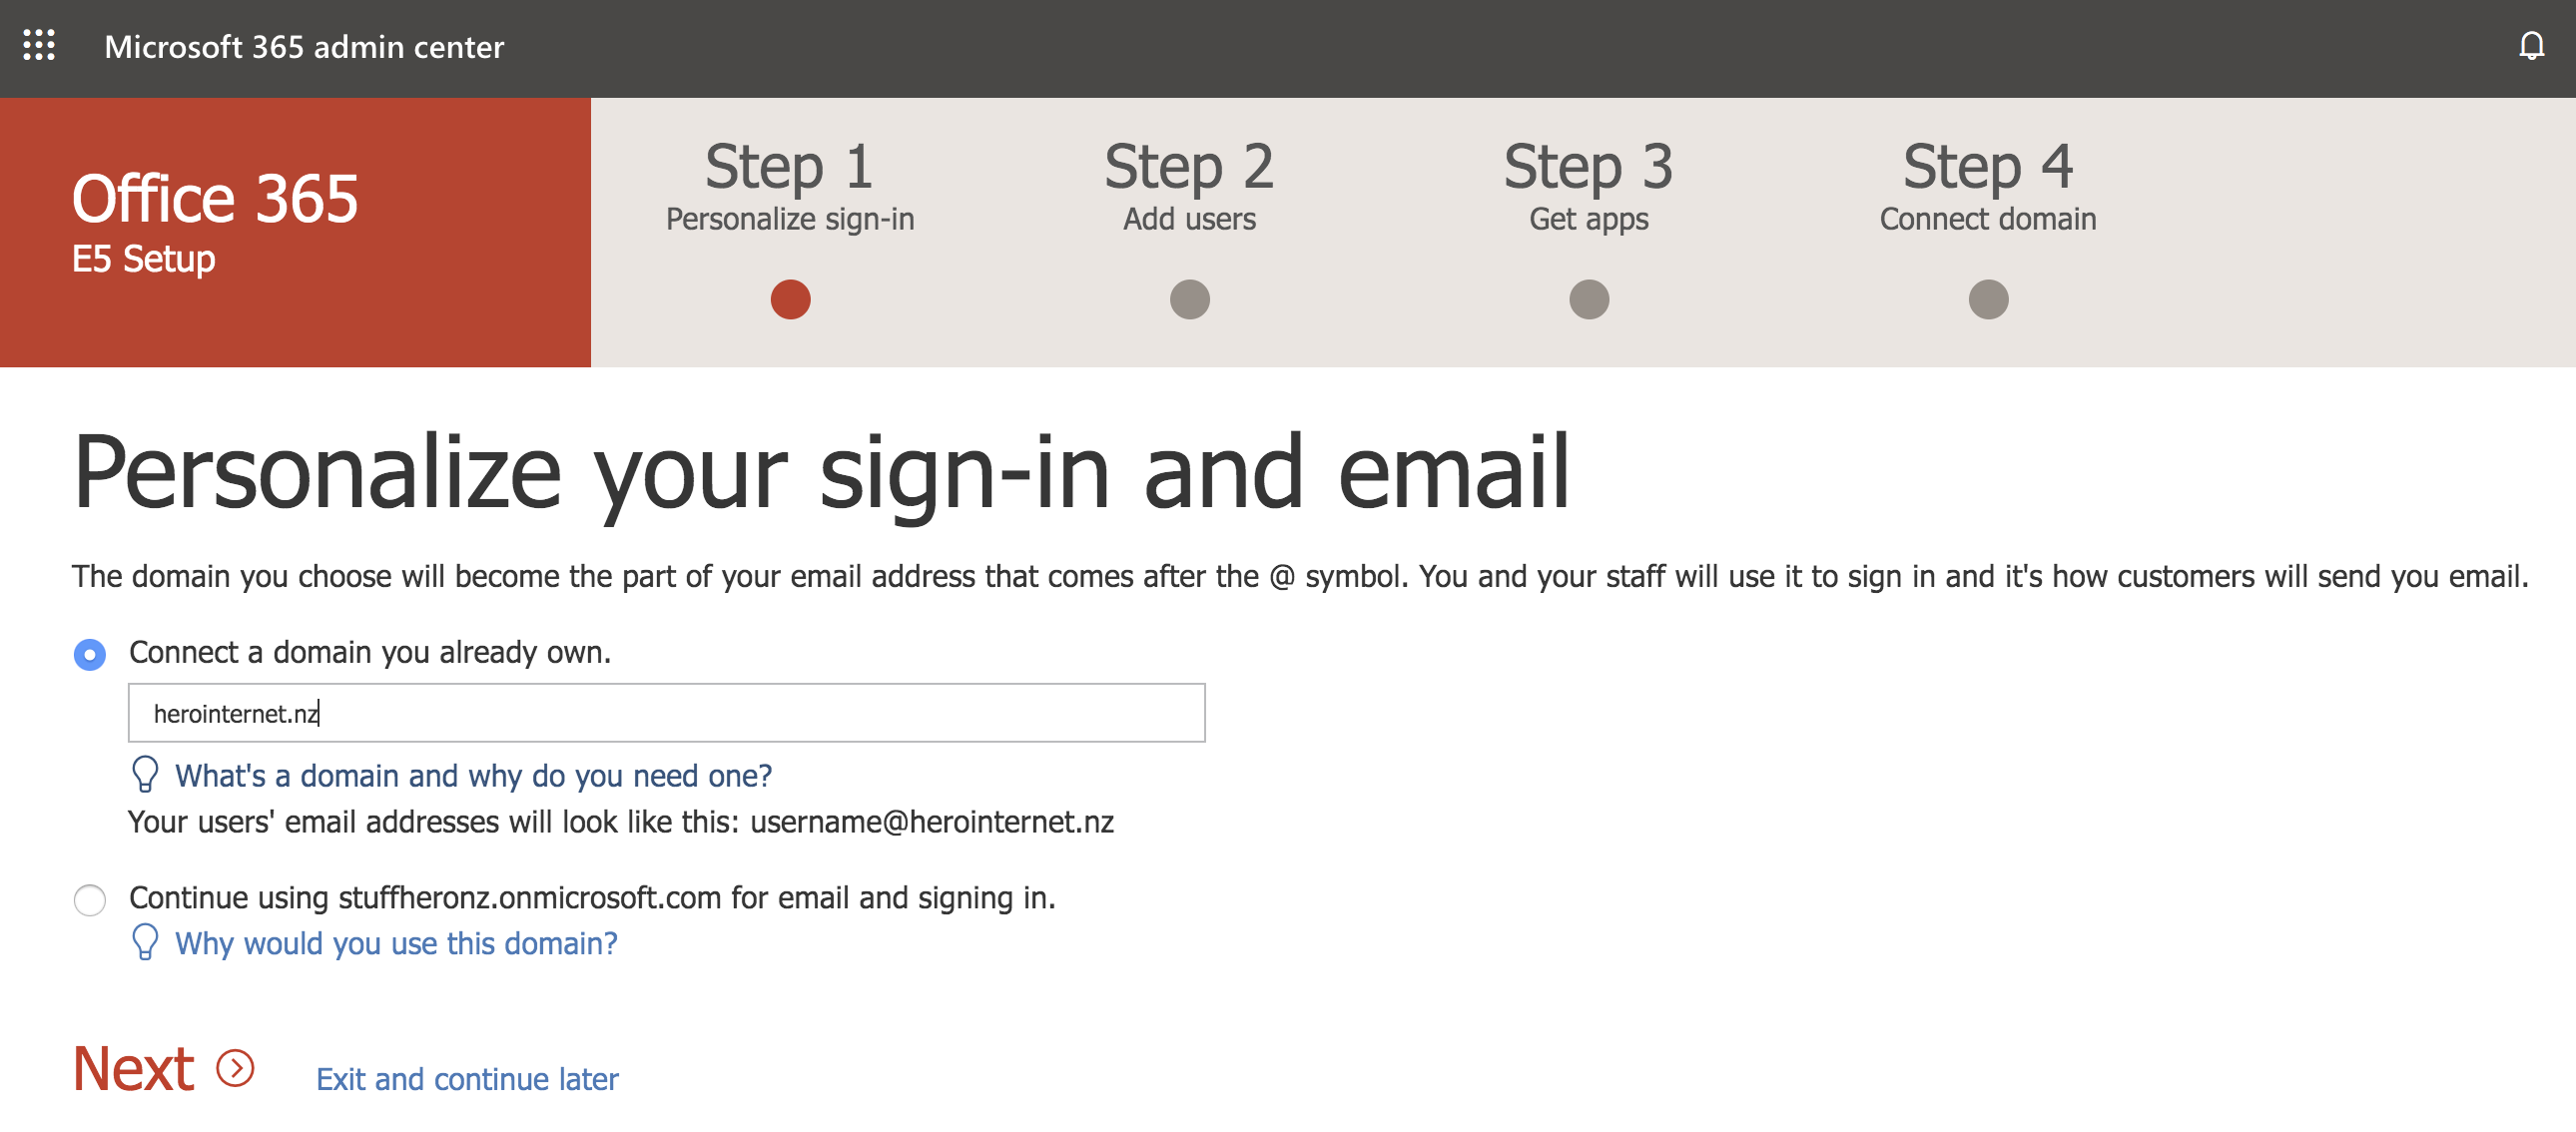
Step 9 - Enter your business domain name that you already own
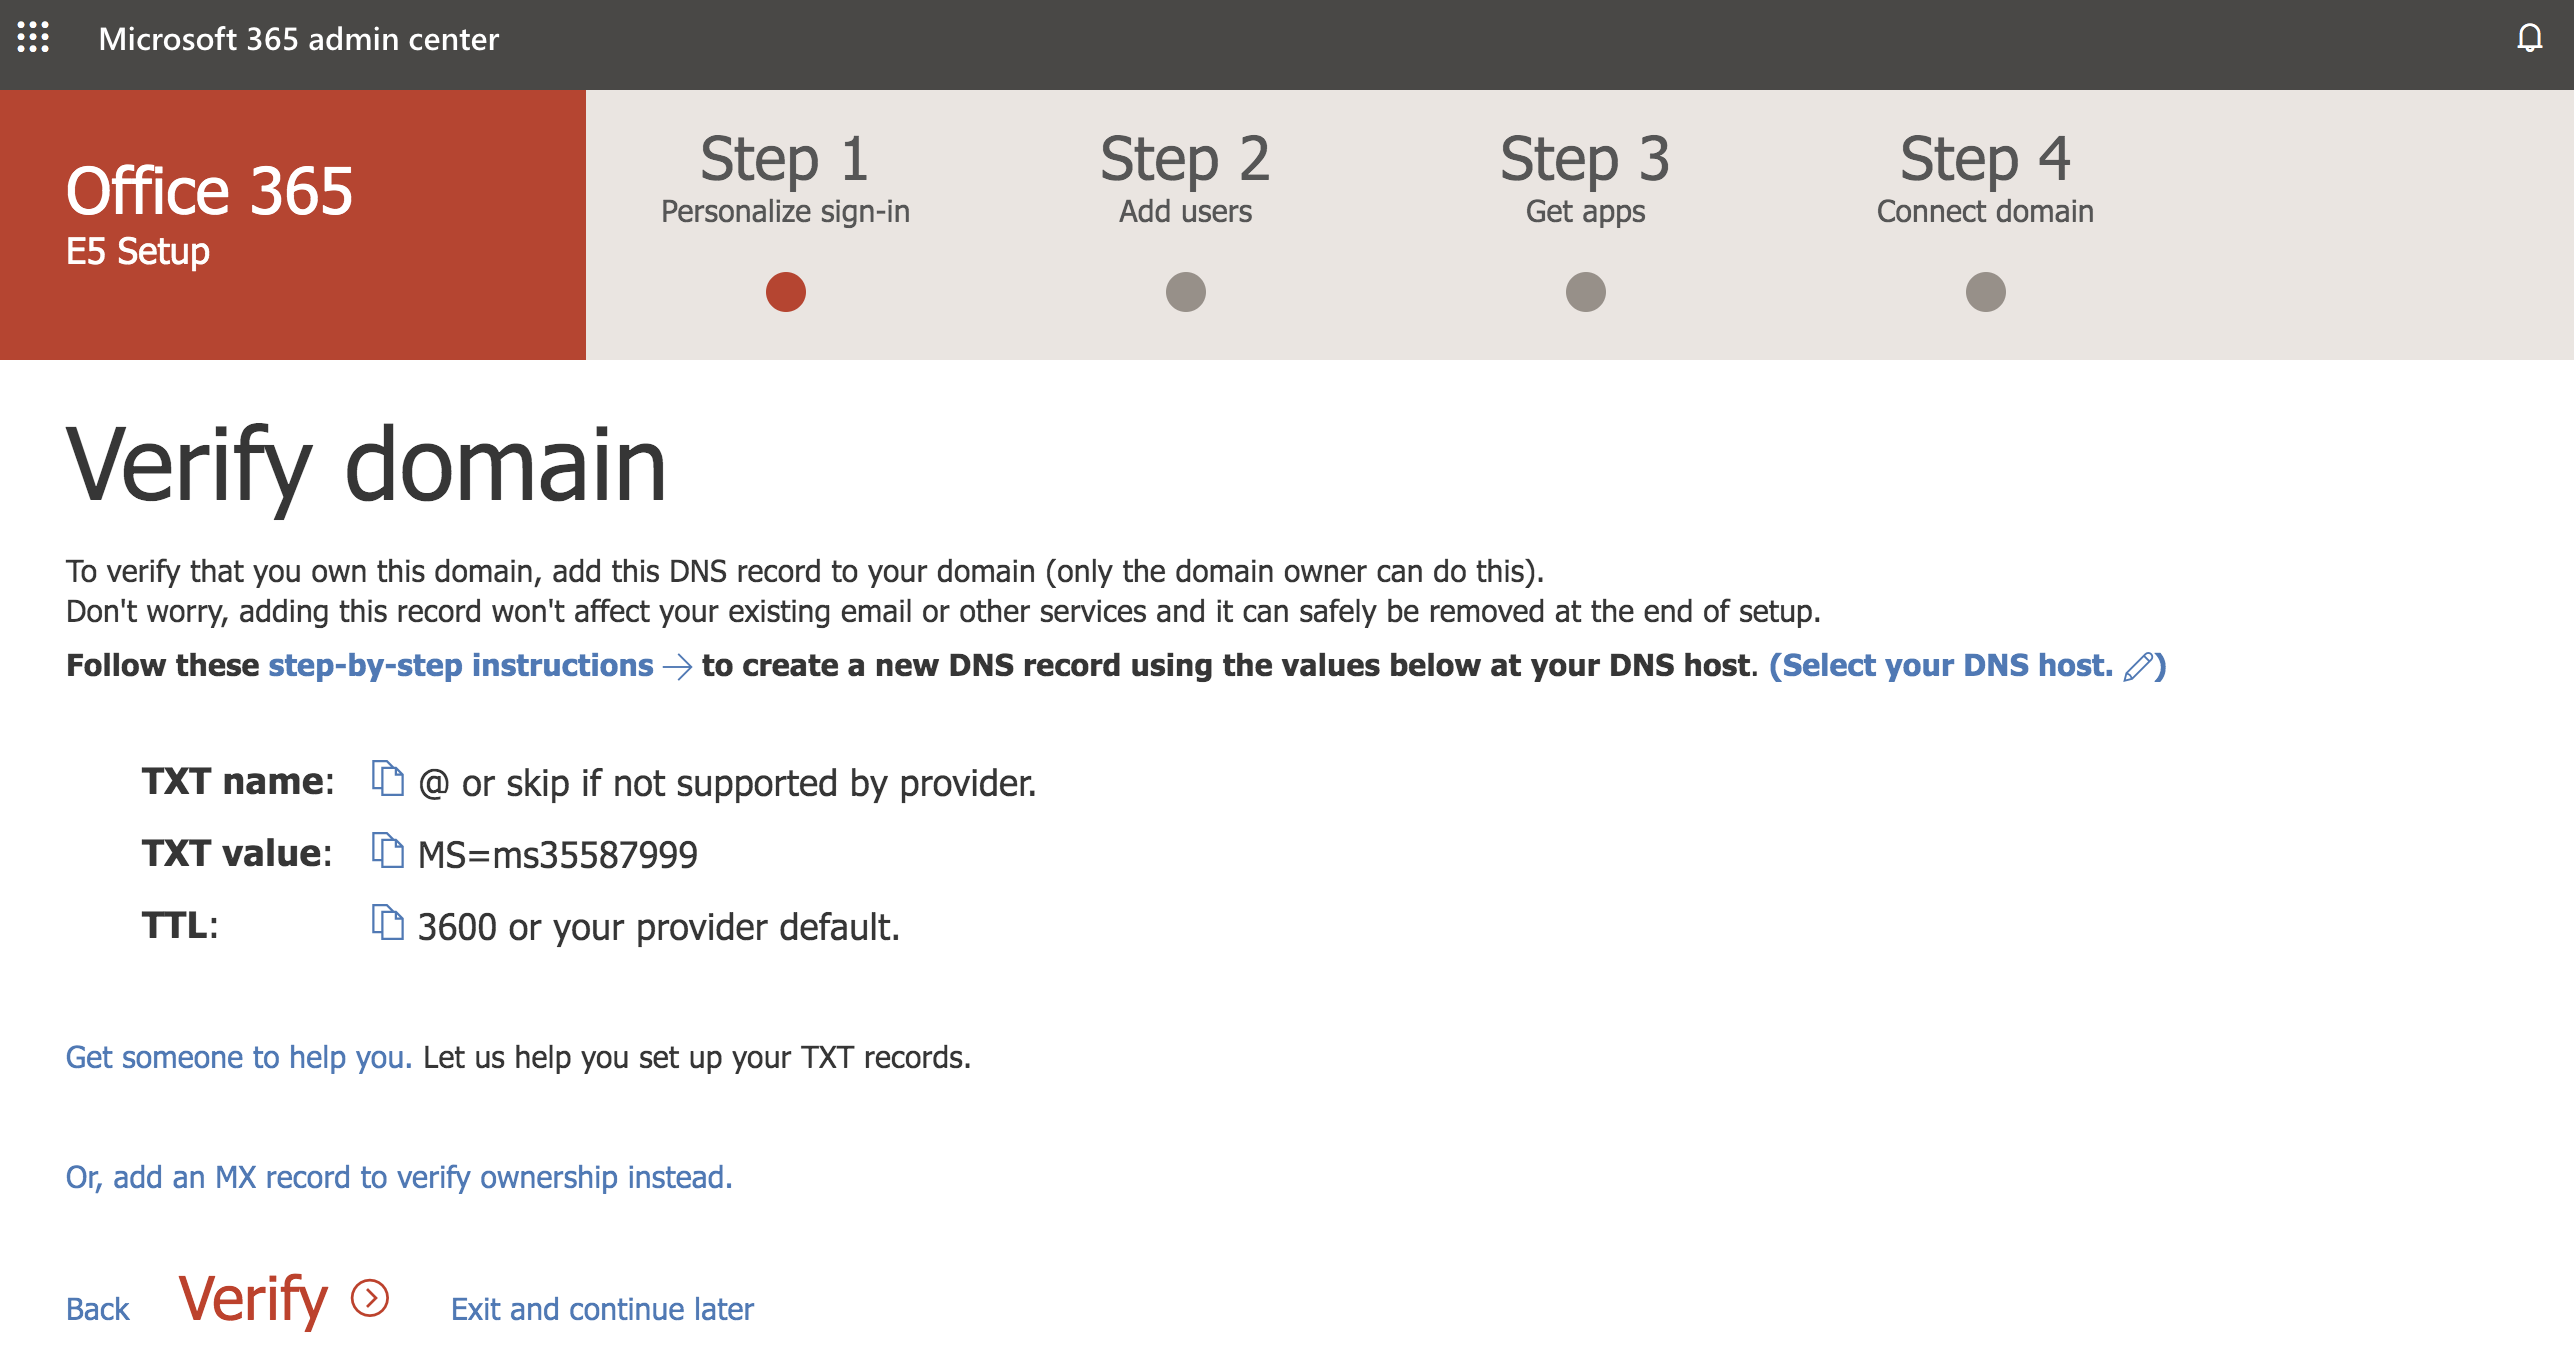
Step 10 - Next you need to verify your domain
This means adding a 'TXT' record to your DNS records under your domain name. If you are unsure about this contact your DNS Hosting Provider.
Step 11 - Below is an example of adding this TXT record to a Zone file:
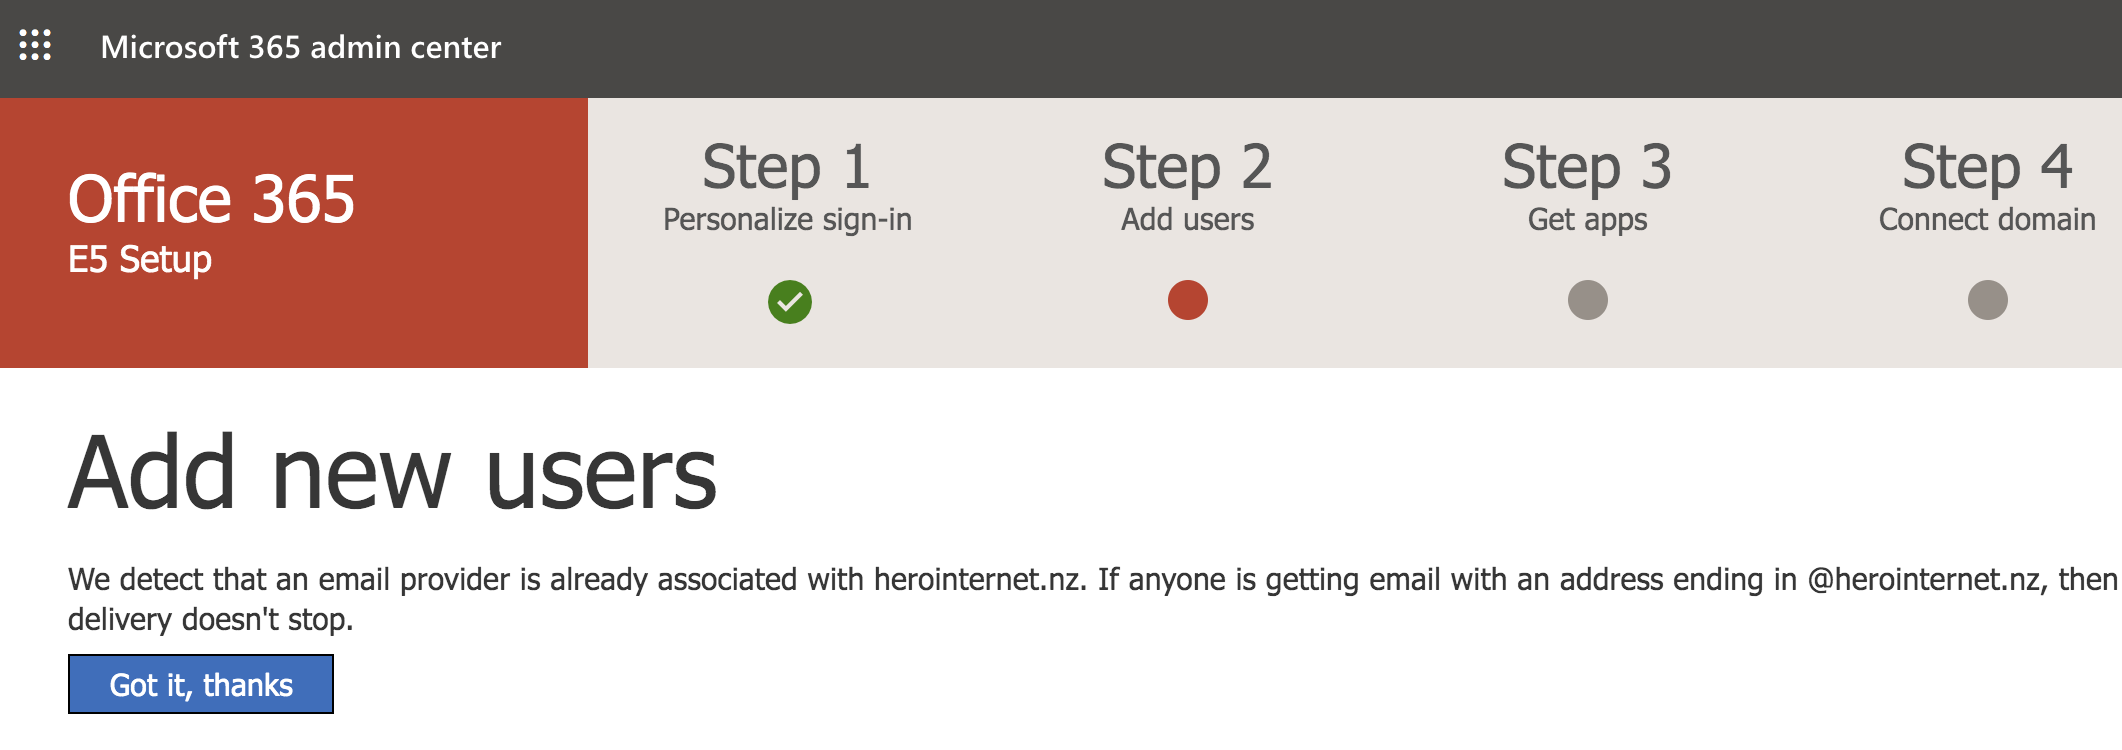
Step 12 - Now add some Users to your organisation
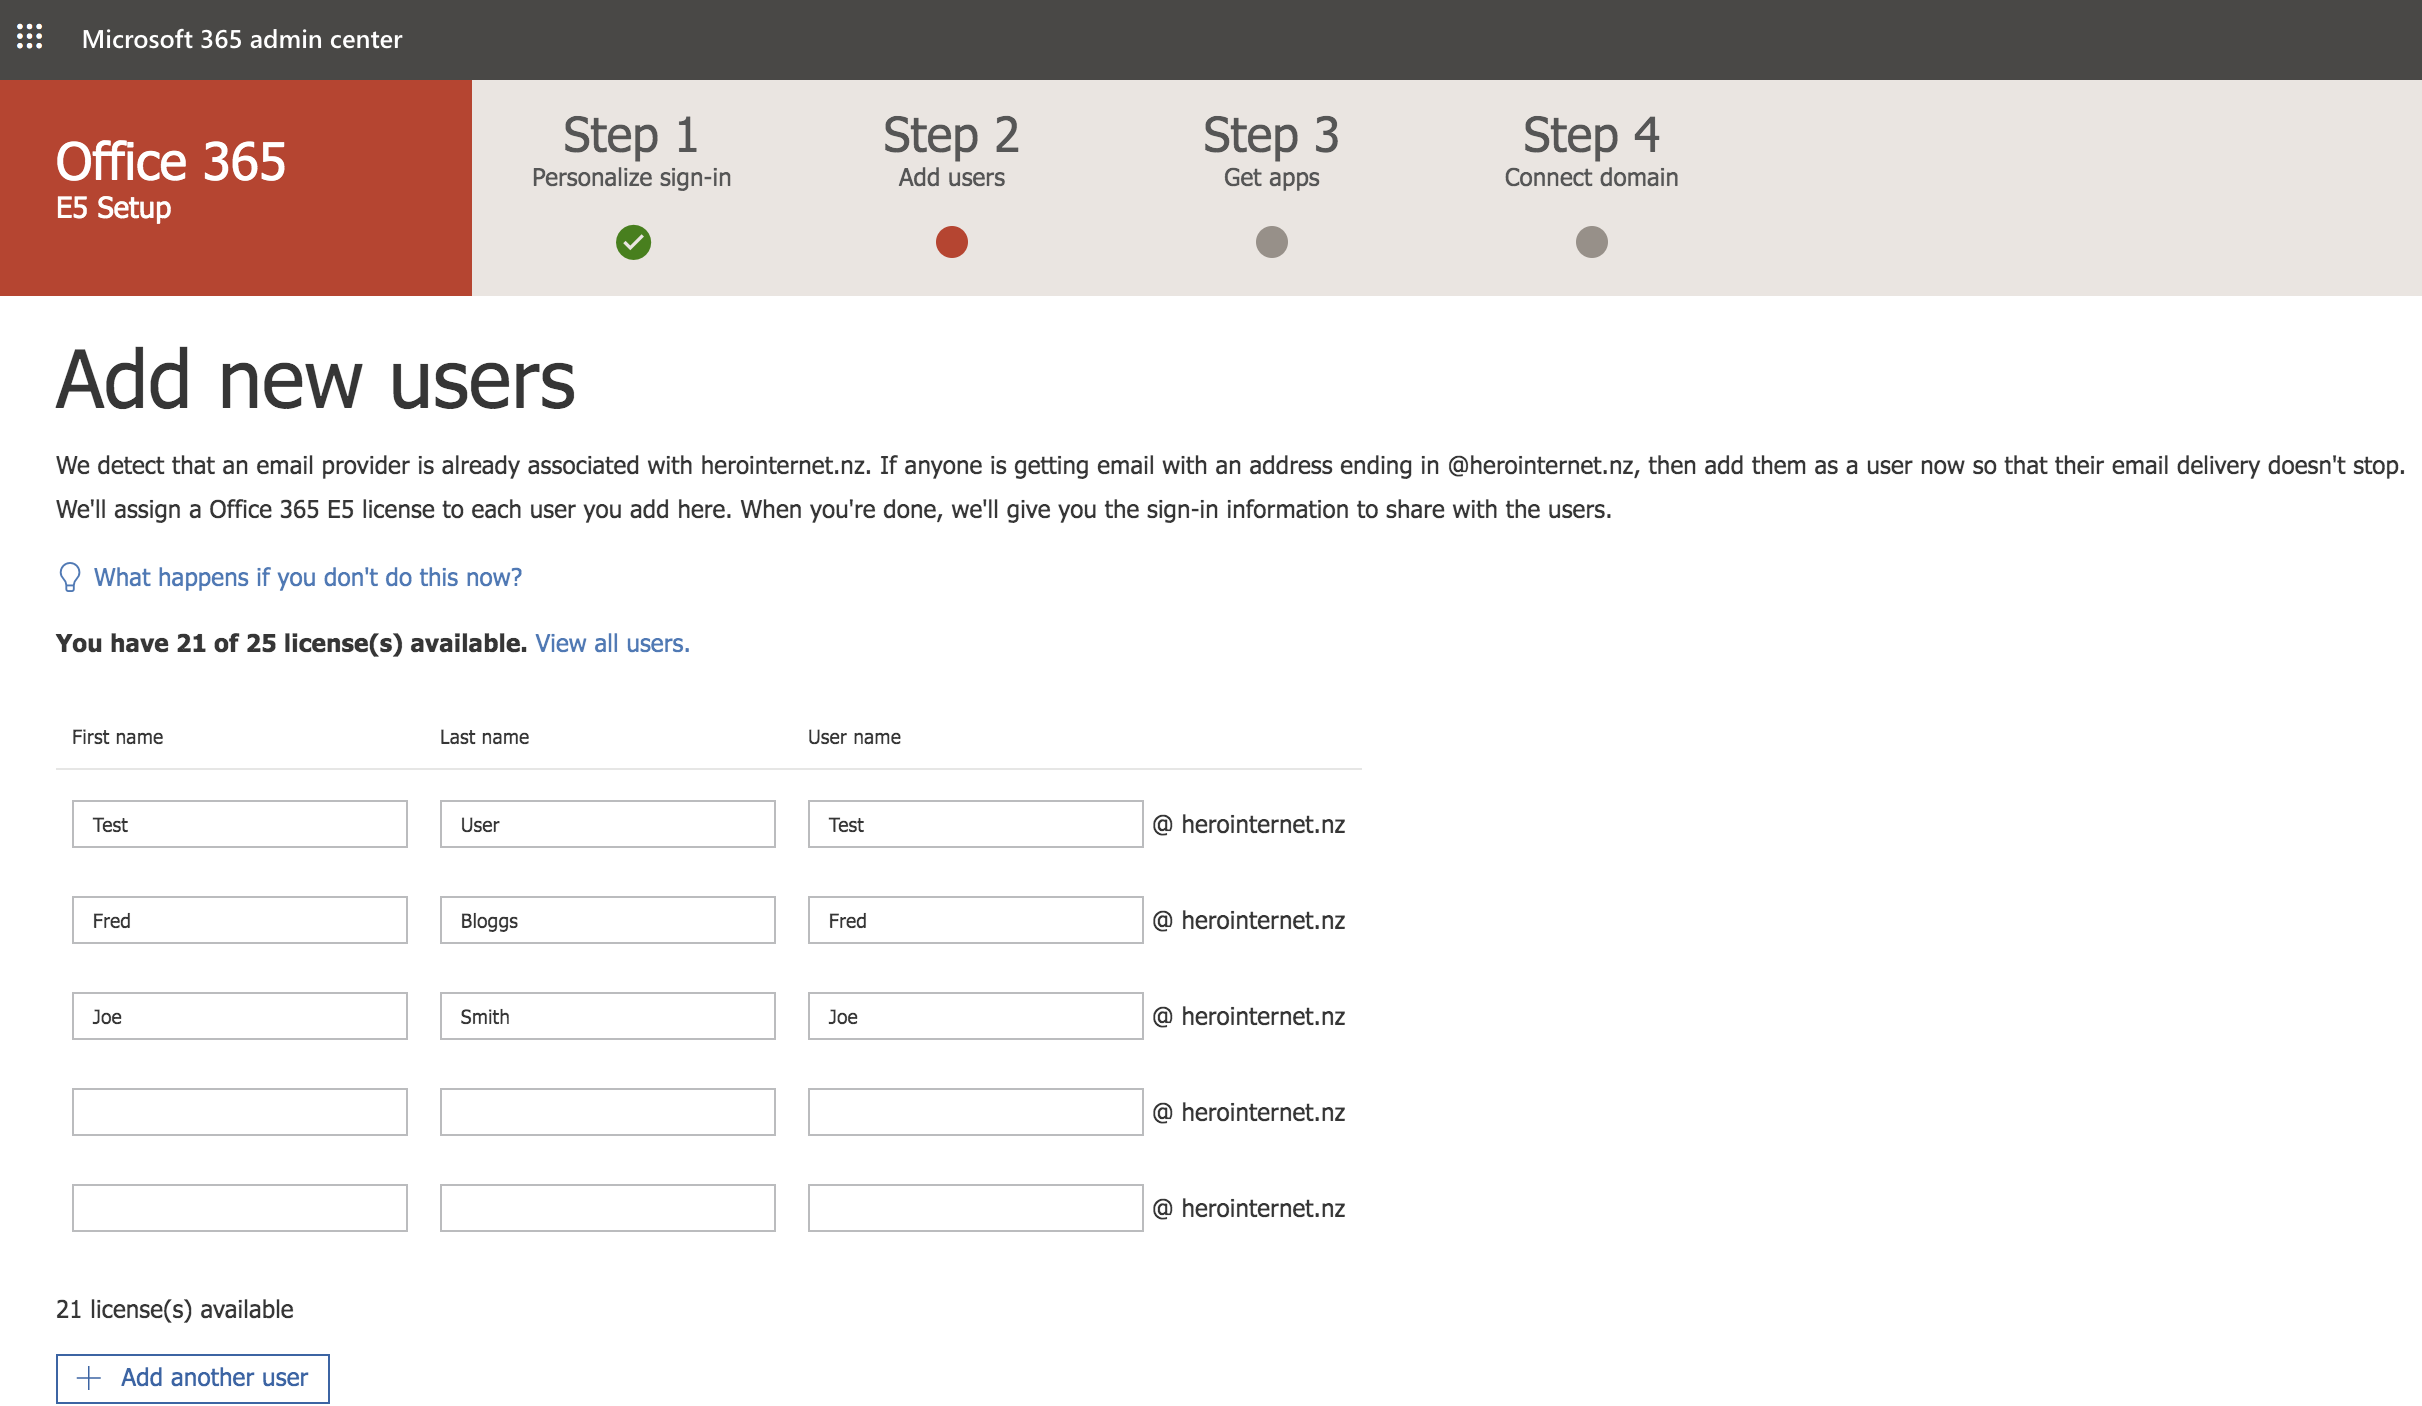
Step 13 - Fill in the user details for each of your users (in this example we have 3 users)
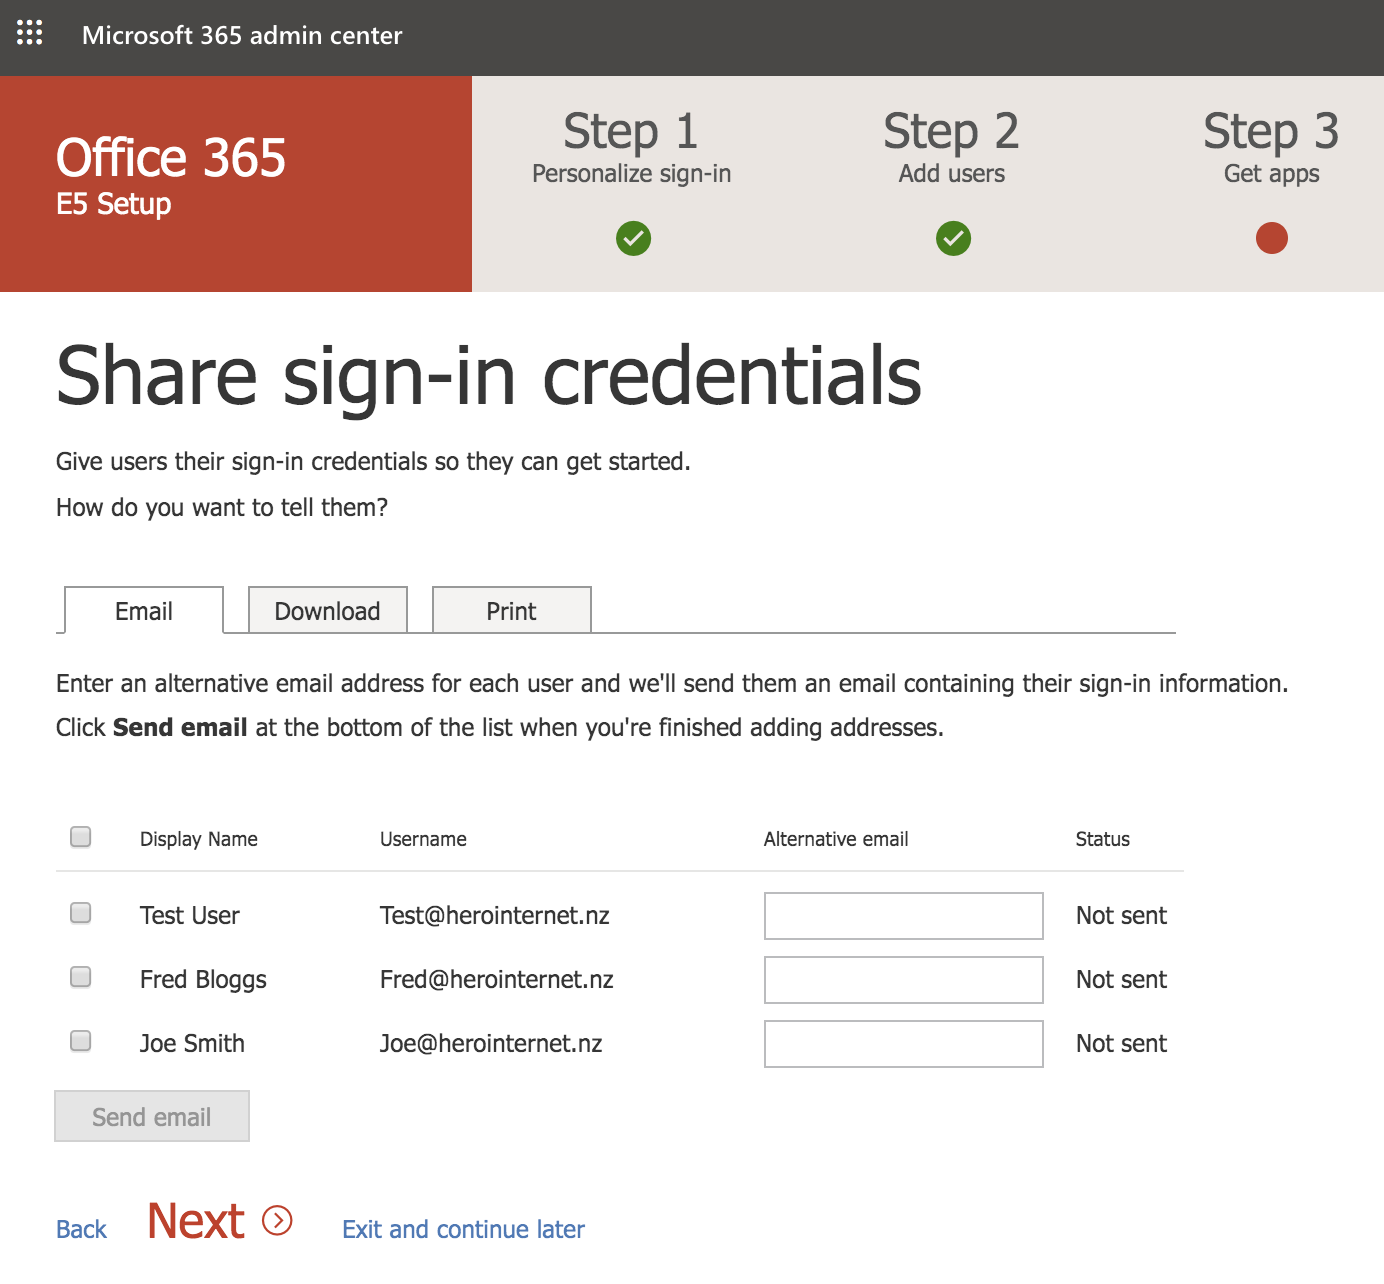
Step 14 - If required fill in alternative email addresses and click Next
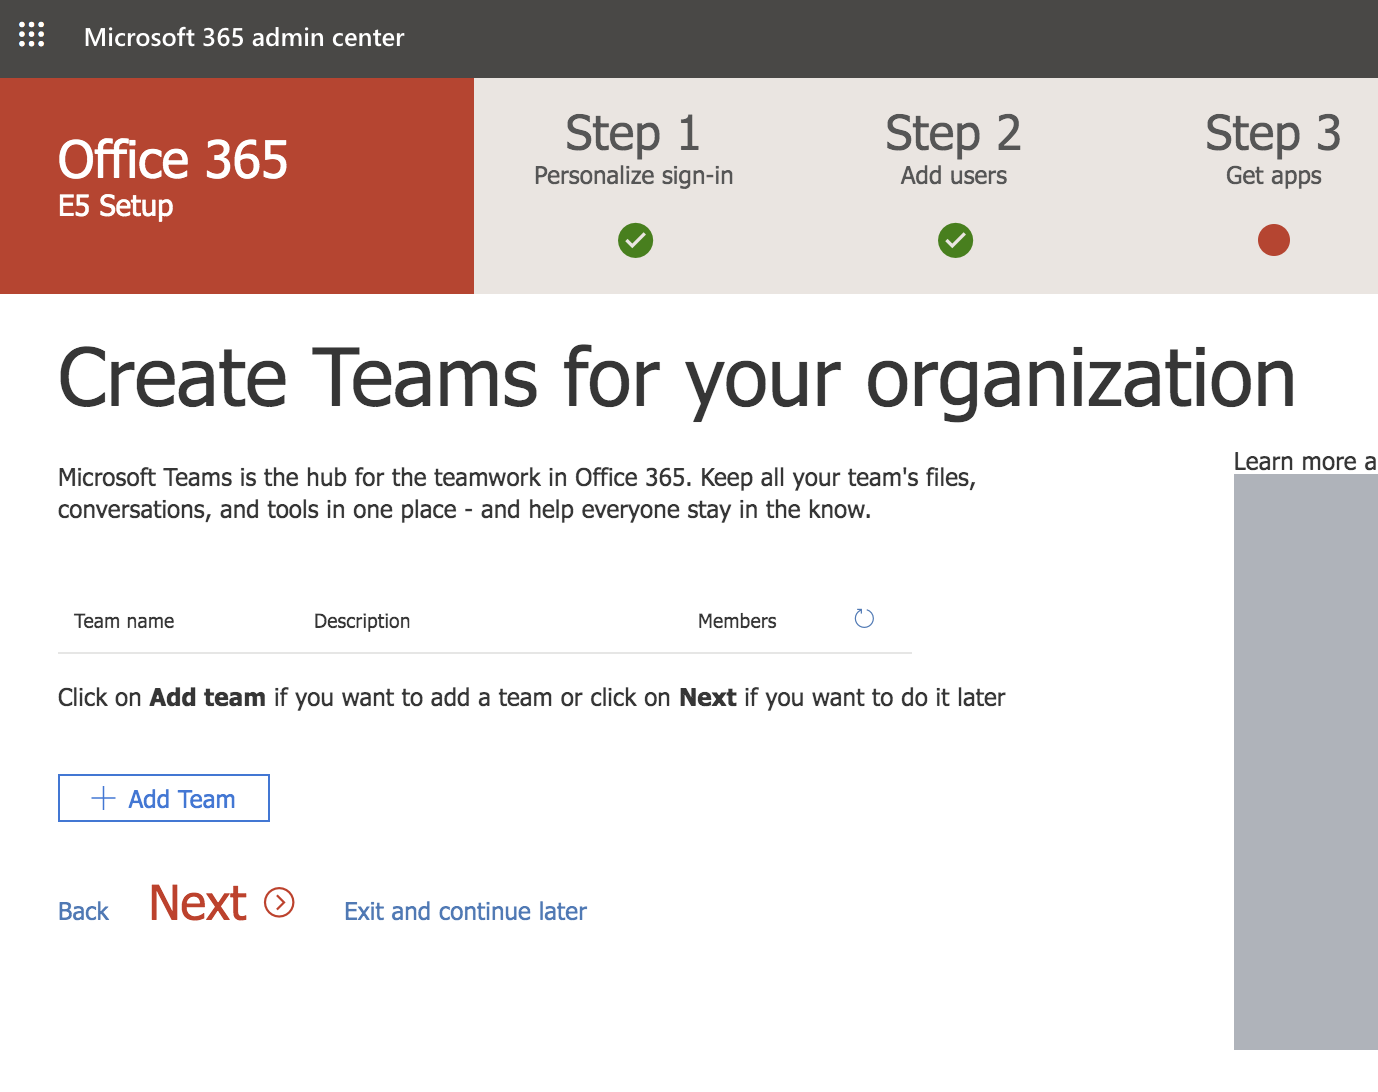
Step 15 - If you want to setup a group (team) now for your users then you can do this otherwise press Next
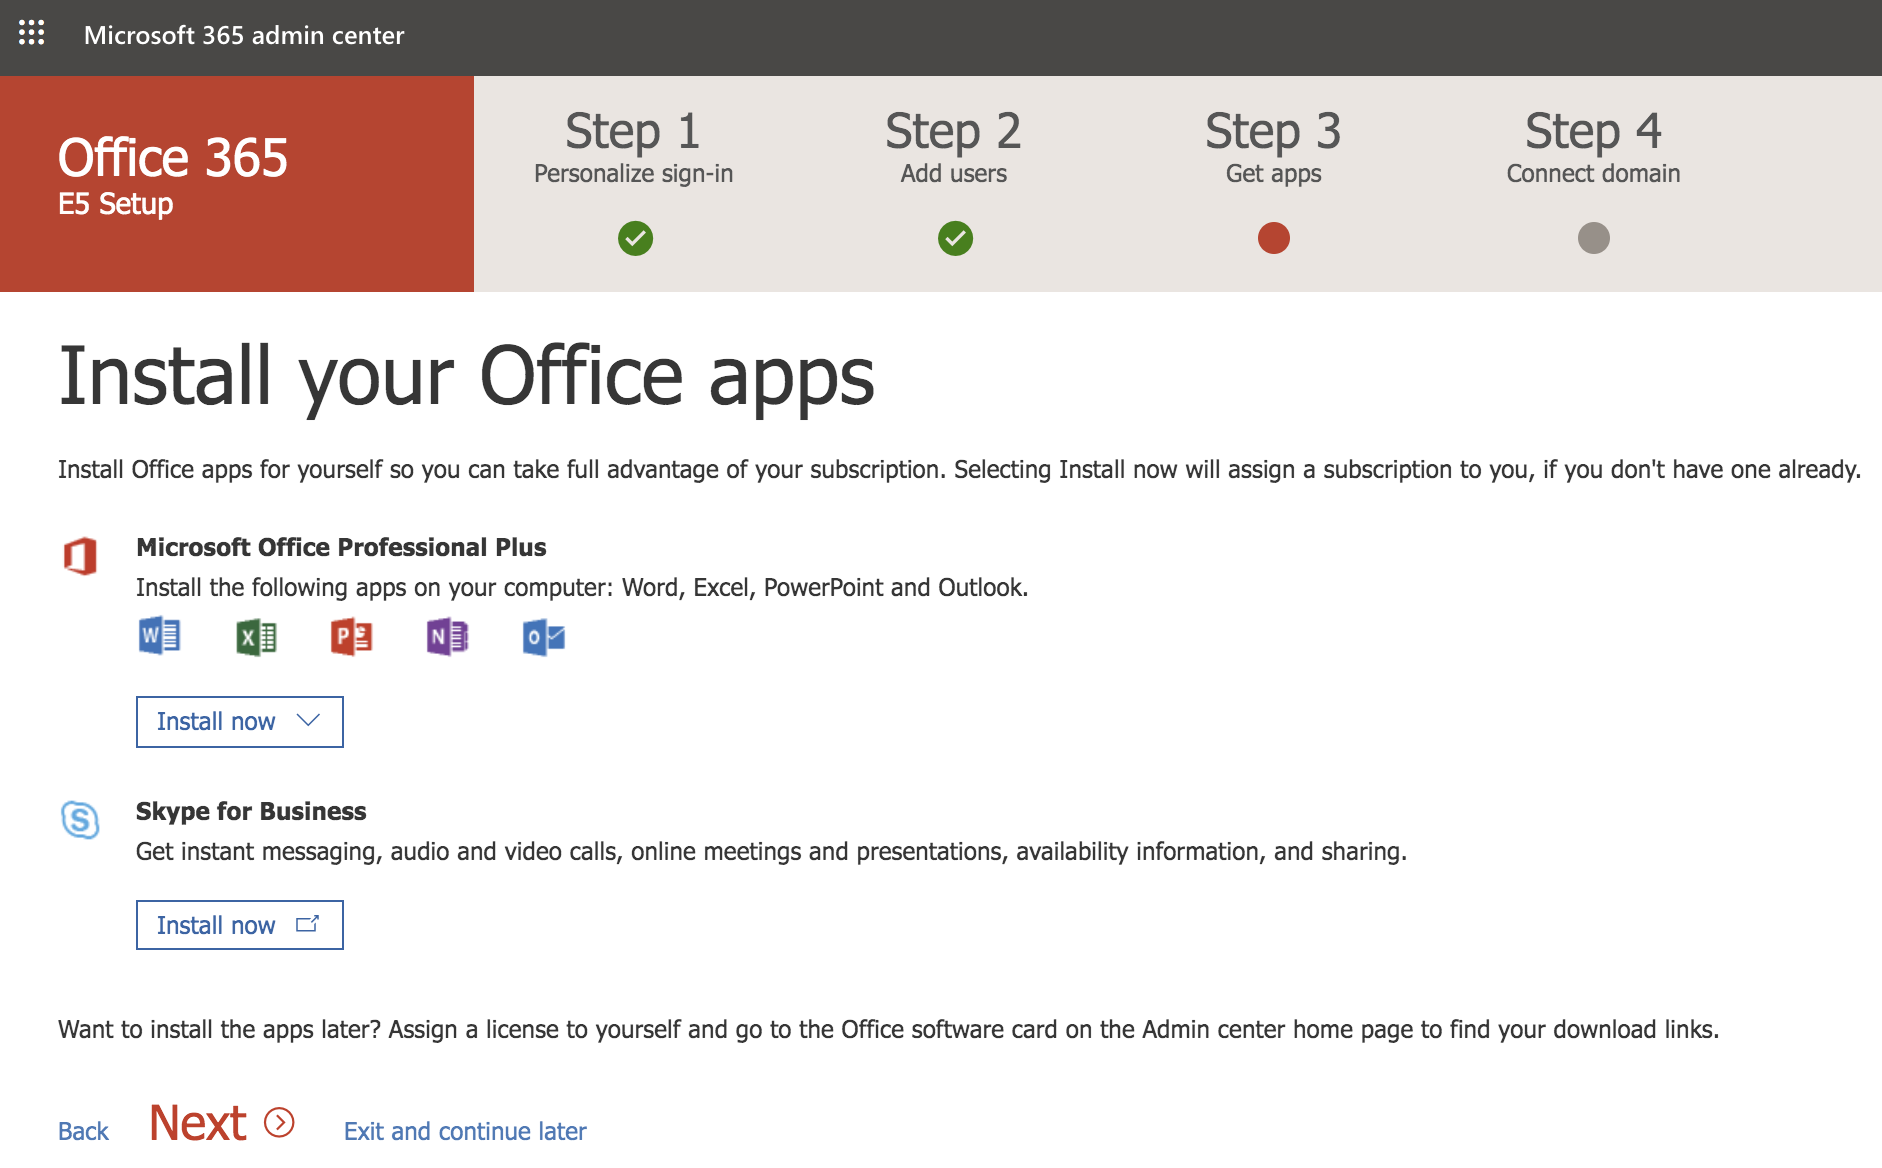
Step 16 - Download any Office Apps you might need, otherwise this can be done later. Click Next
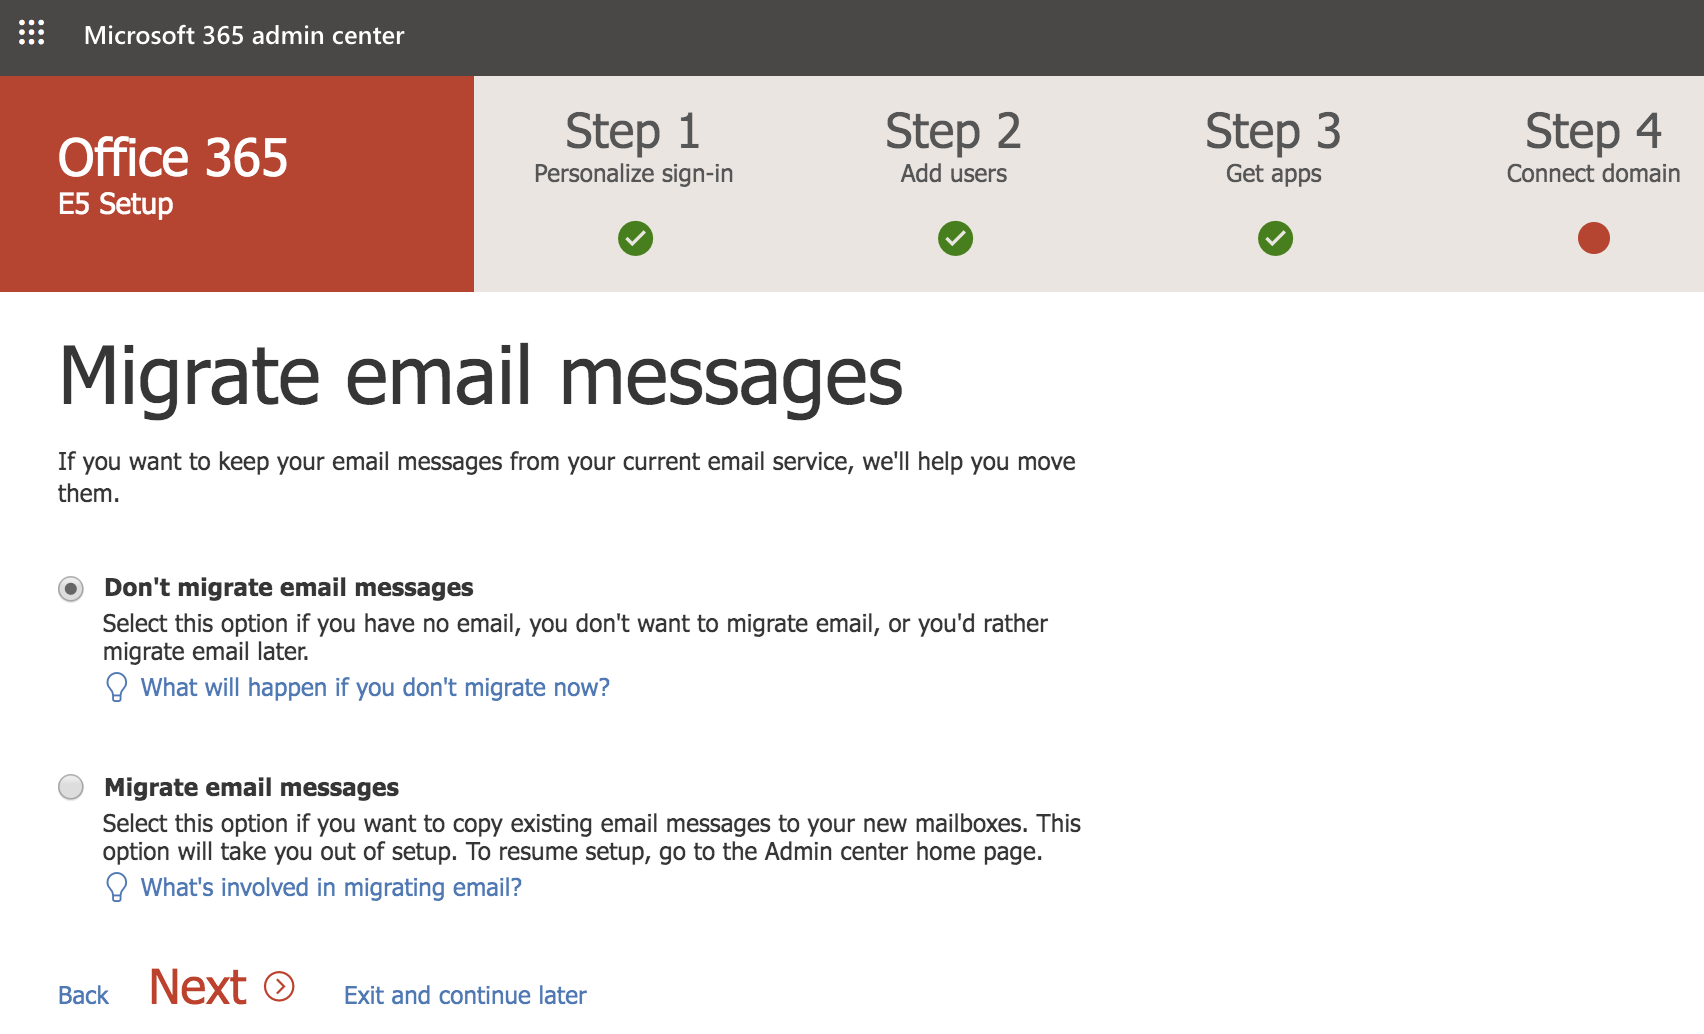
Step 17 - If you need to migrate email from an existing mail service then select this option otherwise Click Next
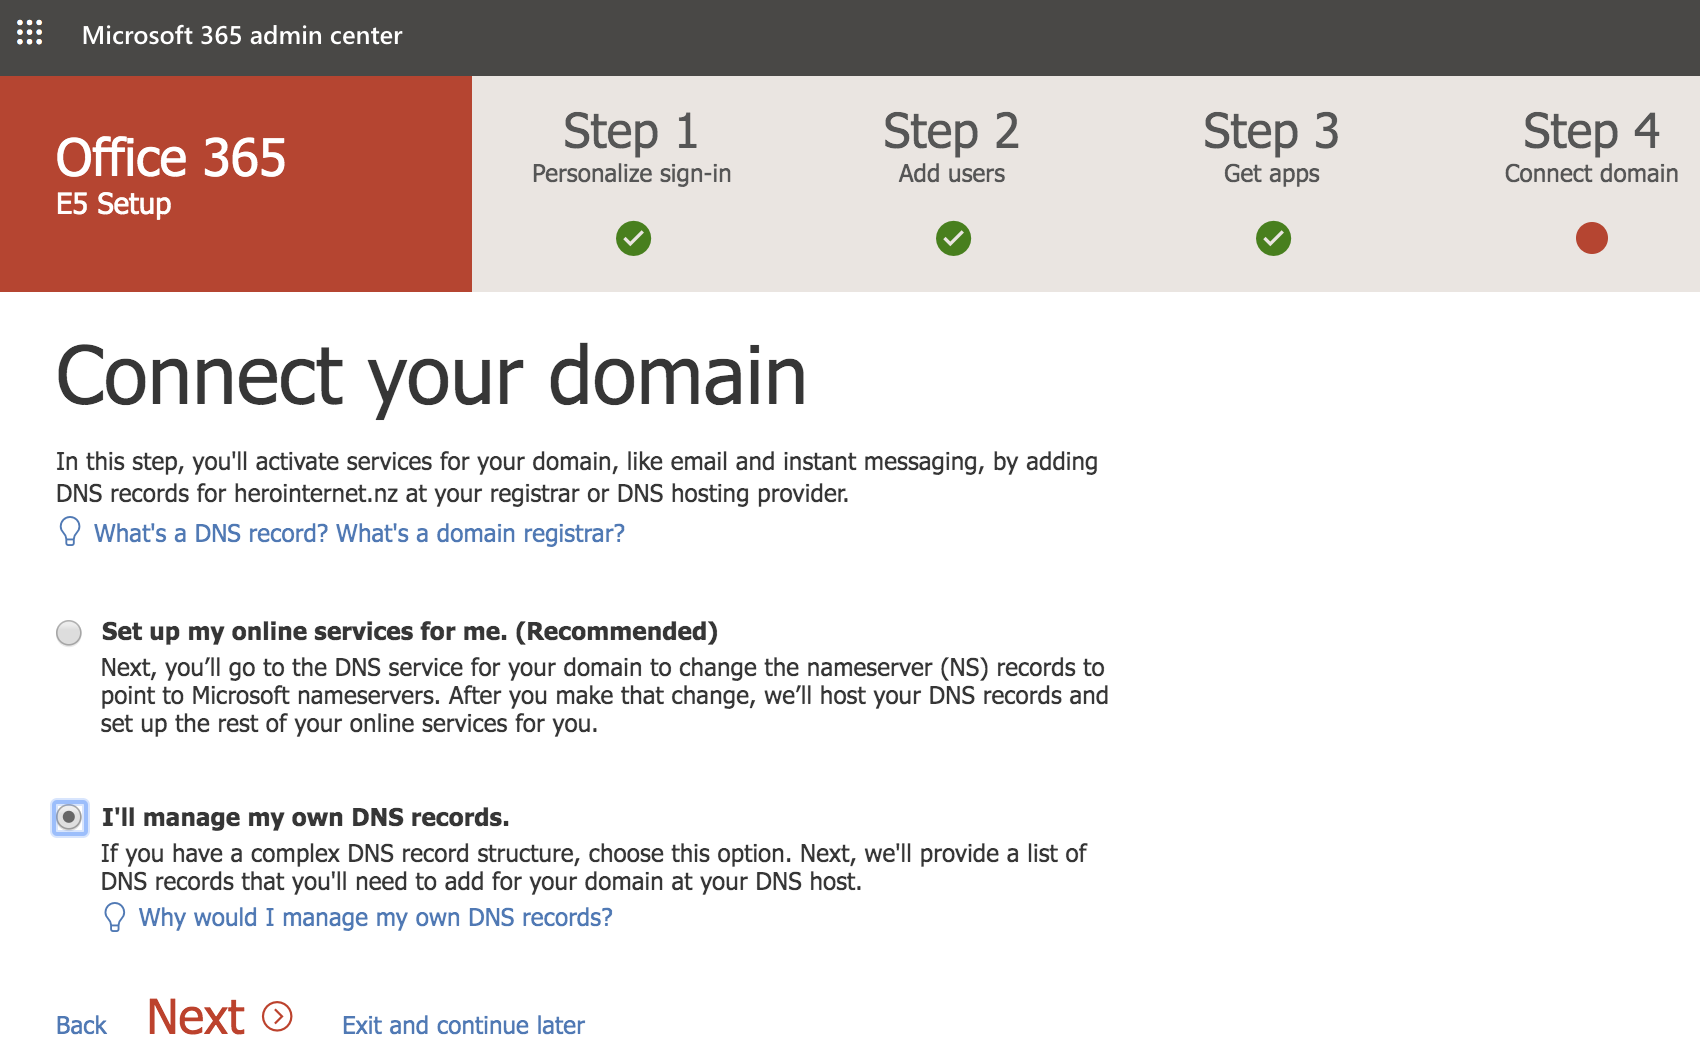
Step 18 - If you want Microsoft to manage your domain then select the first option. In this example we are managing our own DNS records.
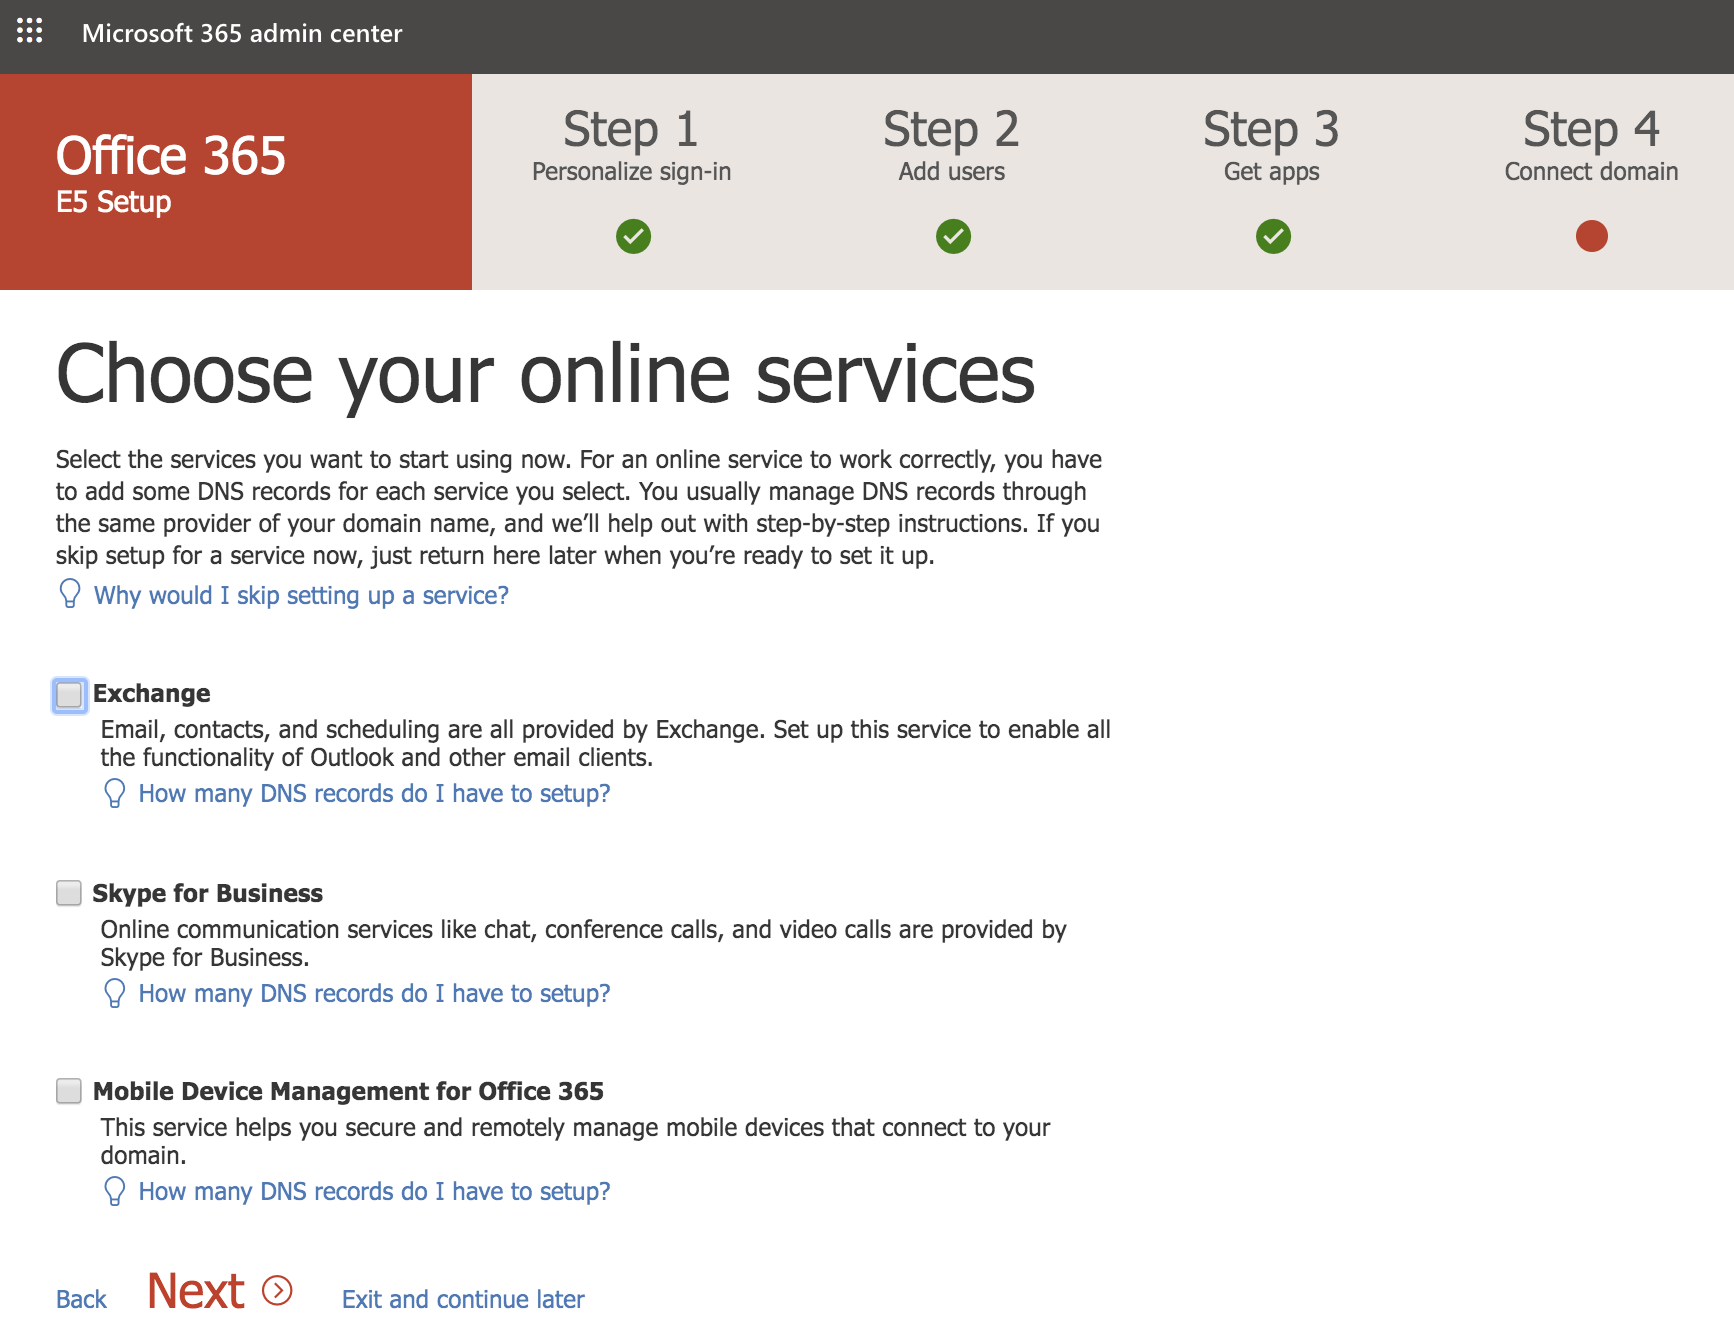
Step 19 - Select the online services you want to use with Microsoft. Again you can do this later if required so you can just click Next.
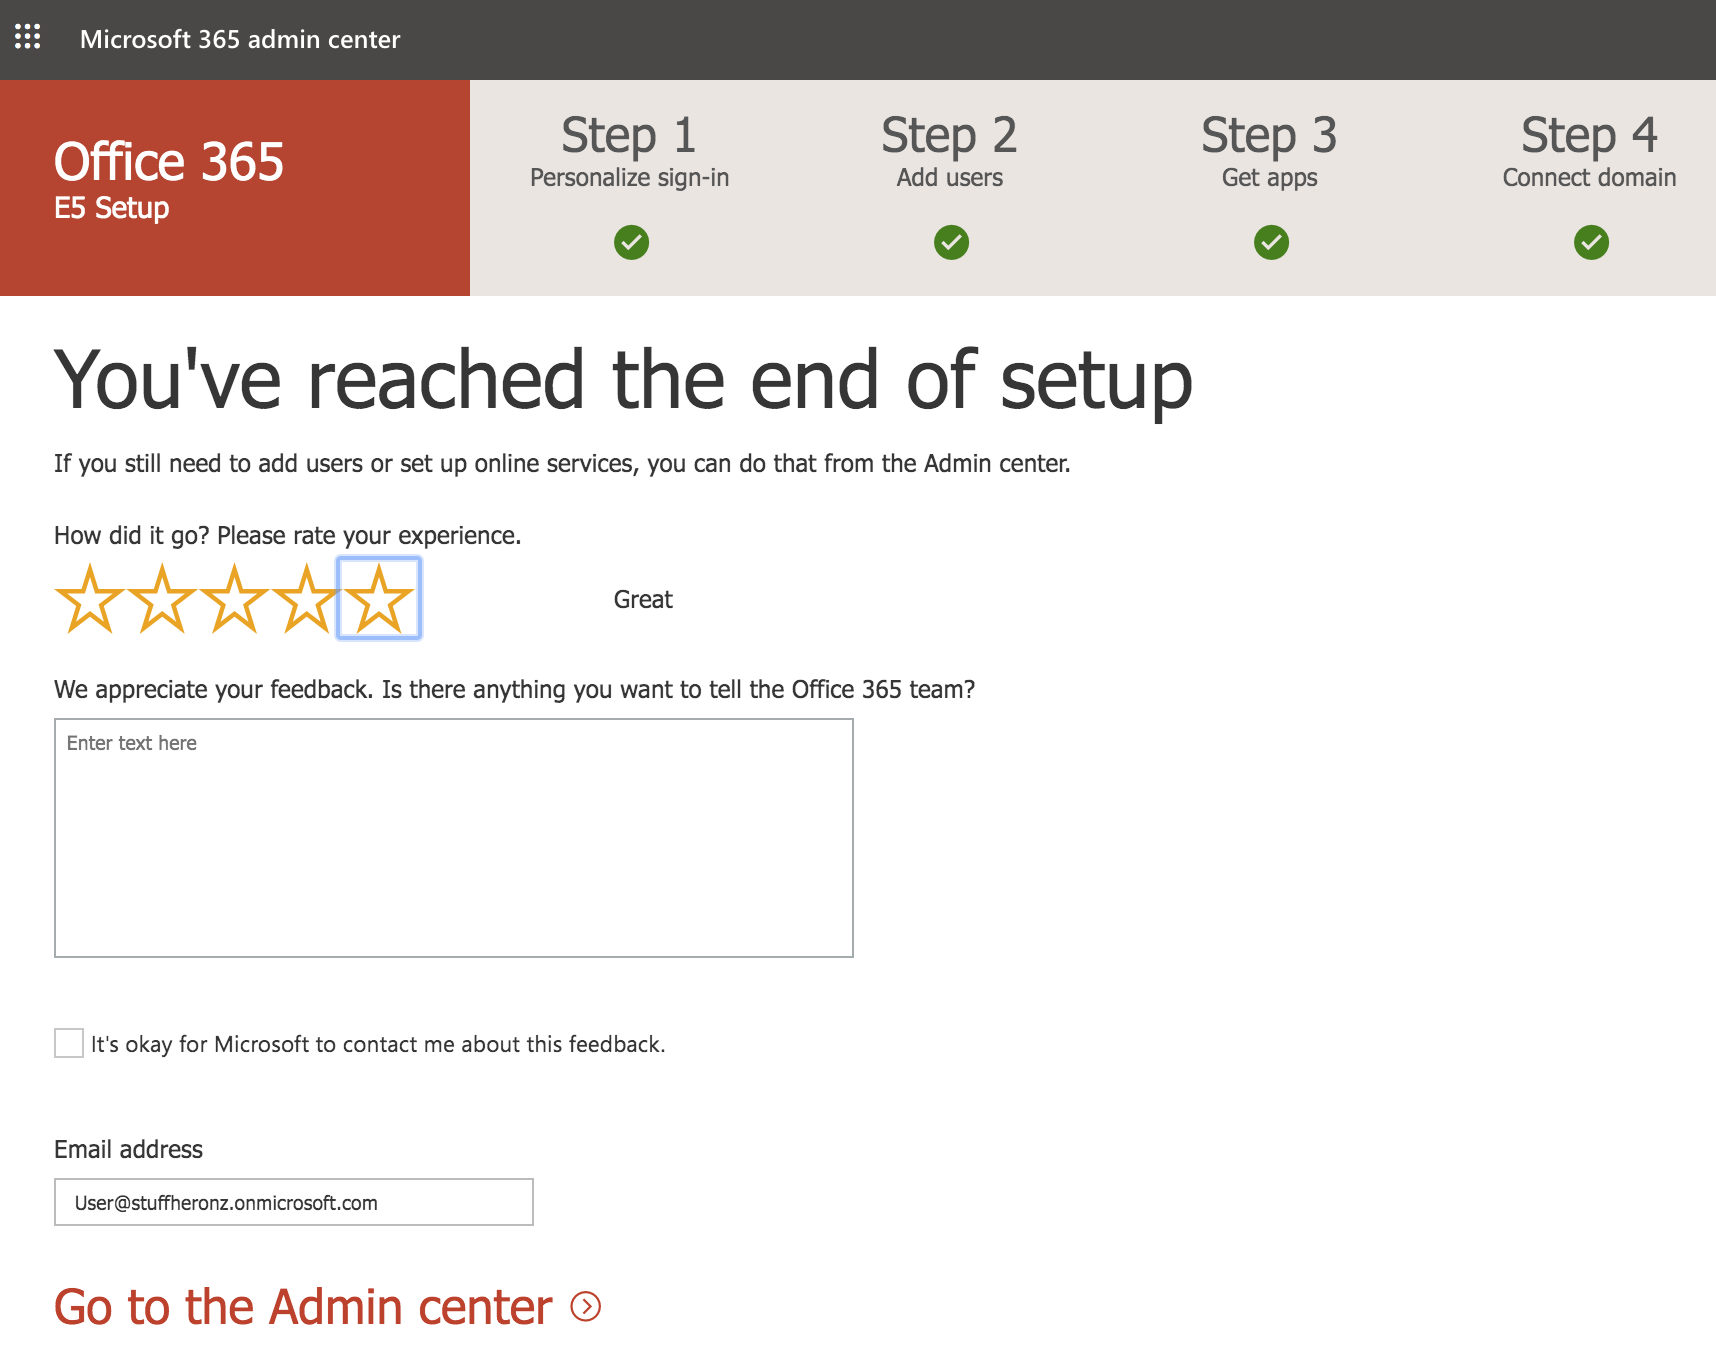
Step 20 - Once you are at the end of the Setup stage you can click the 'Go to the Admin Center' link
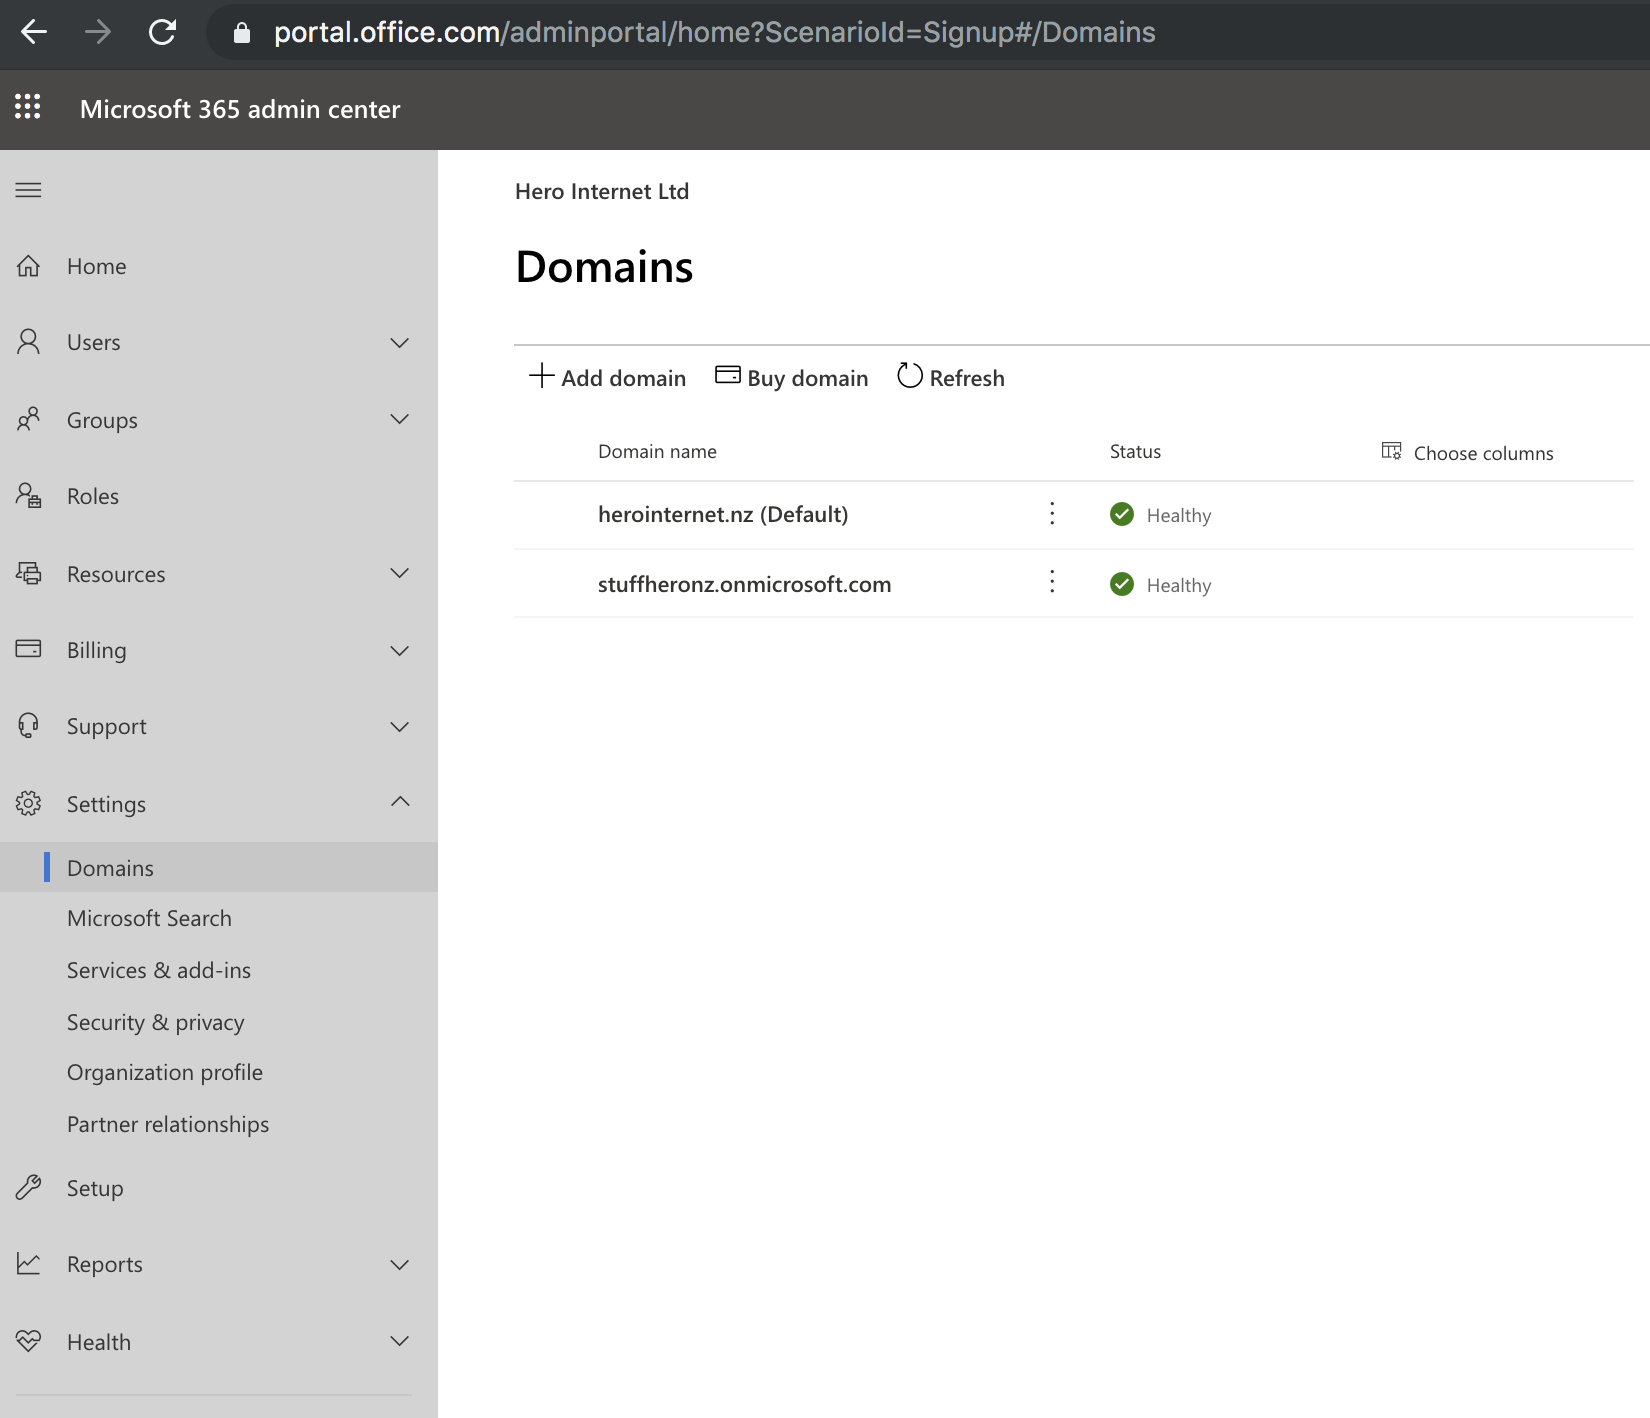
Step 21 - Go to the Admin Center page
Click here to go to the Microsoft 365 Admin Center page
Then click on 'Show All' and then 'Settings' and the Domains sub-menu option.
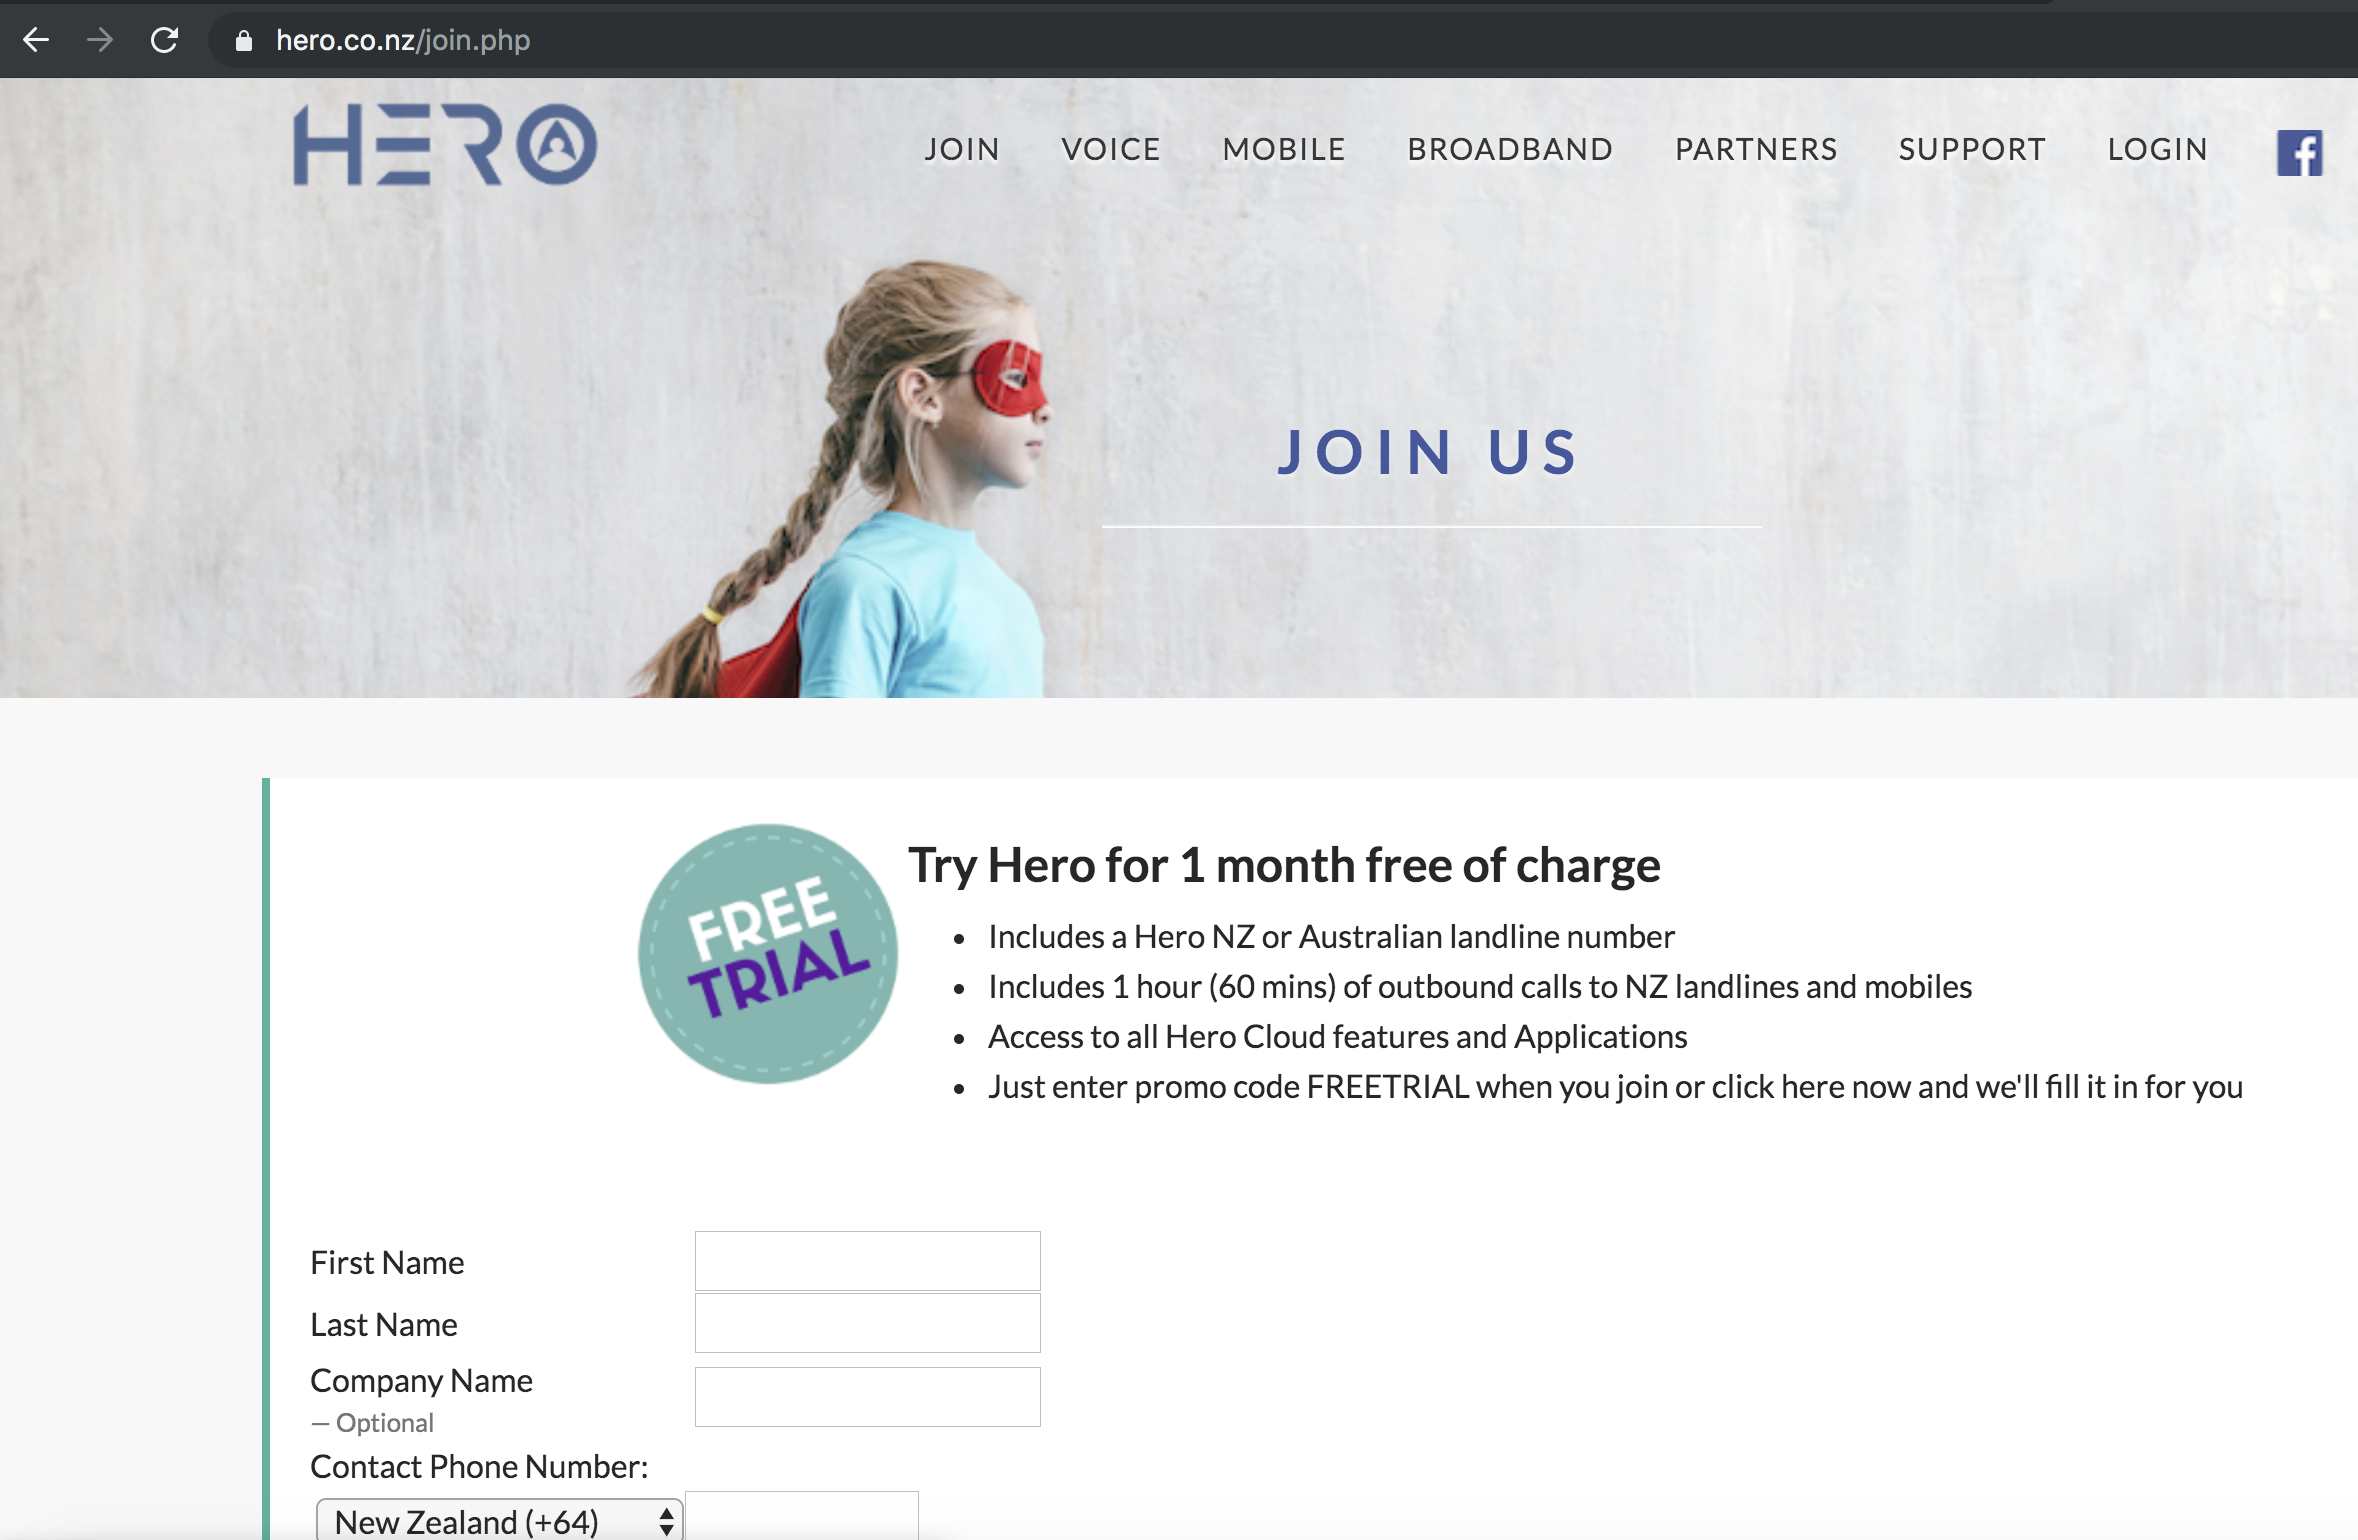
Step 22 - In another browser tab sign up for a Hero account by visiting herotel.uk. If you already have an account skip to Step 26
Step 23 - Click on the Join link at the top of the Hero web site
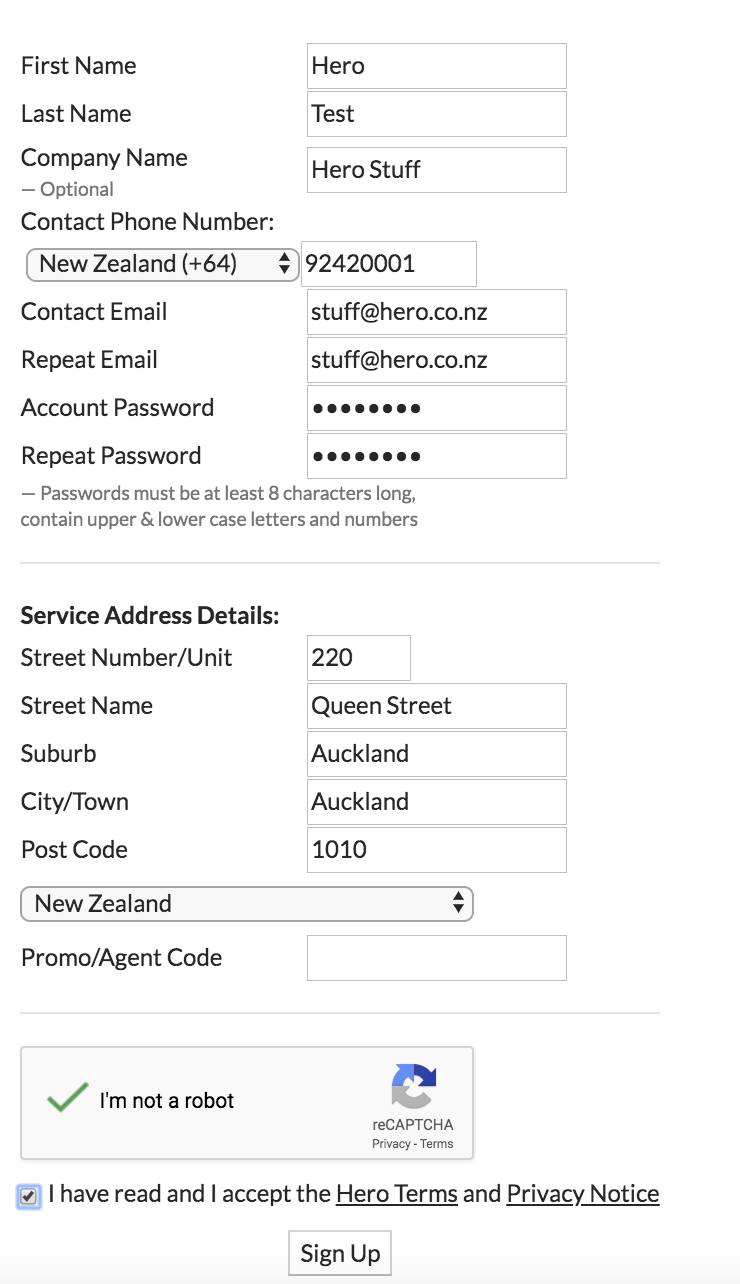
Step 24 - Fill in your details and click on 'Sign Up'
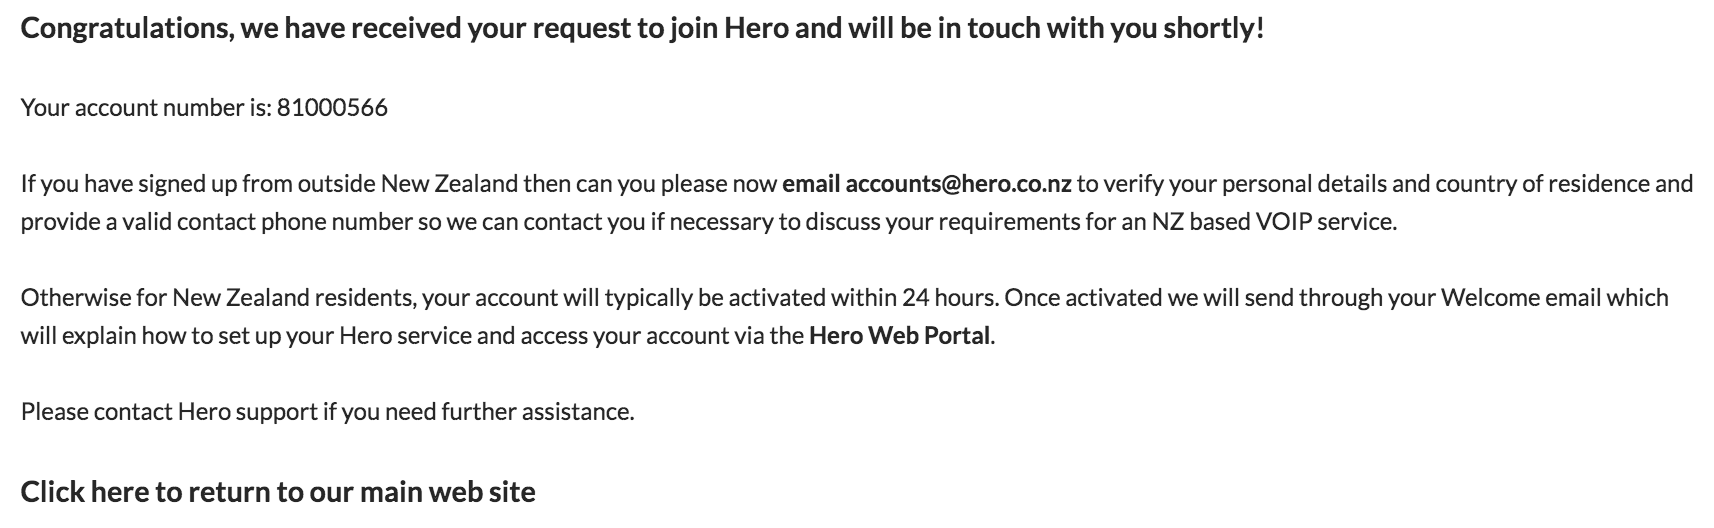
Step 25 - You should receive a confirmation that your account is created. We will activate your account within 1 business day
Step 26 - Once activated Login to your Hero account by clicking here
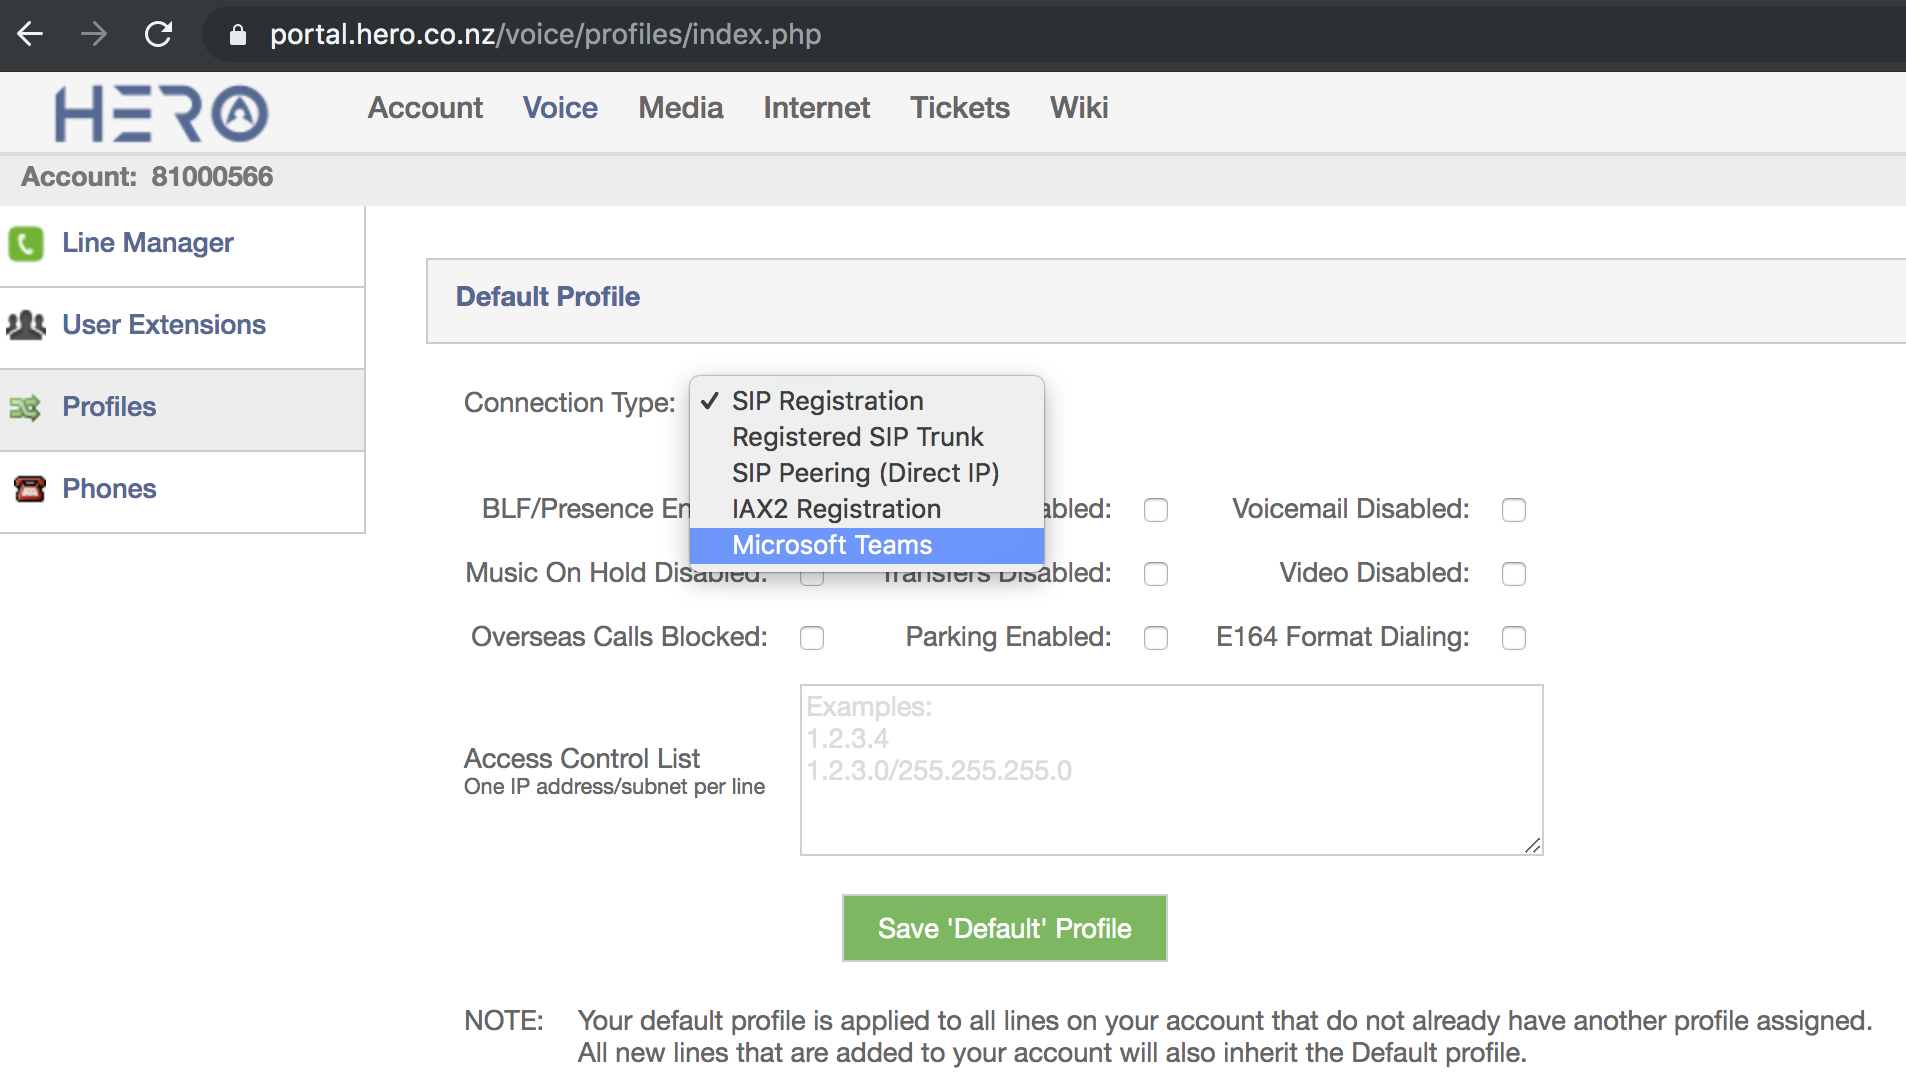
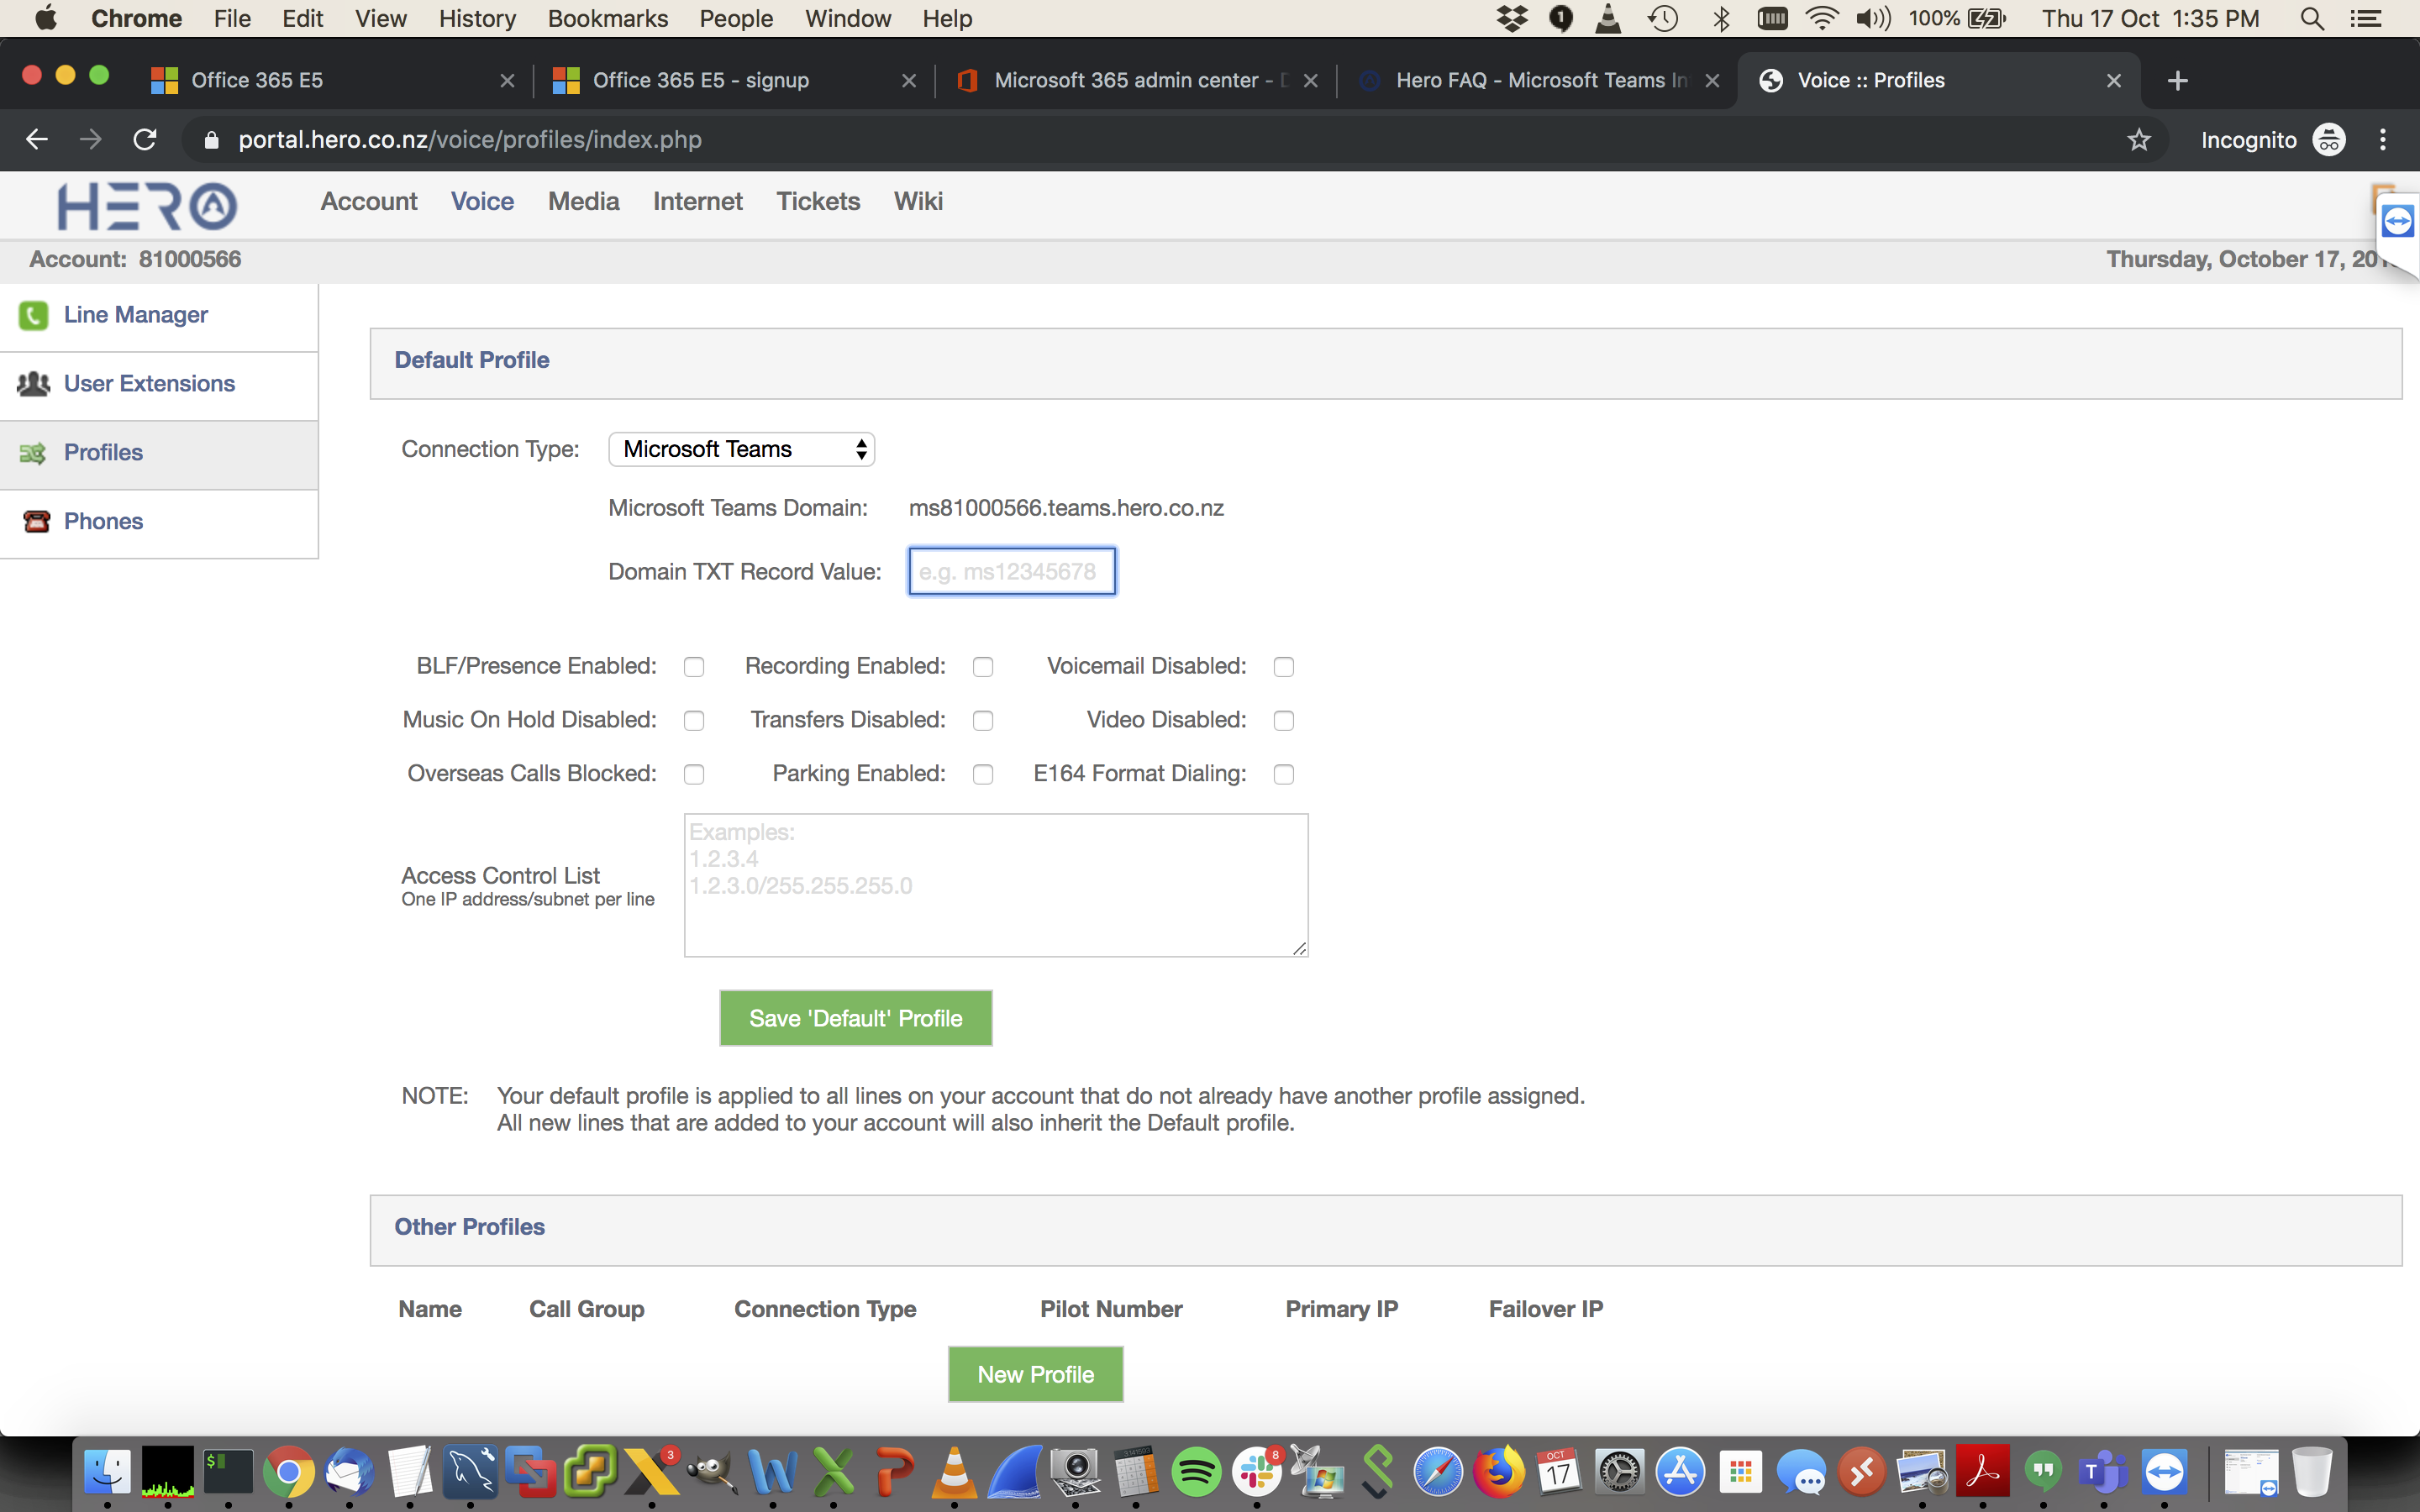
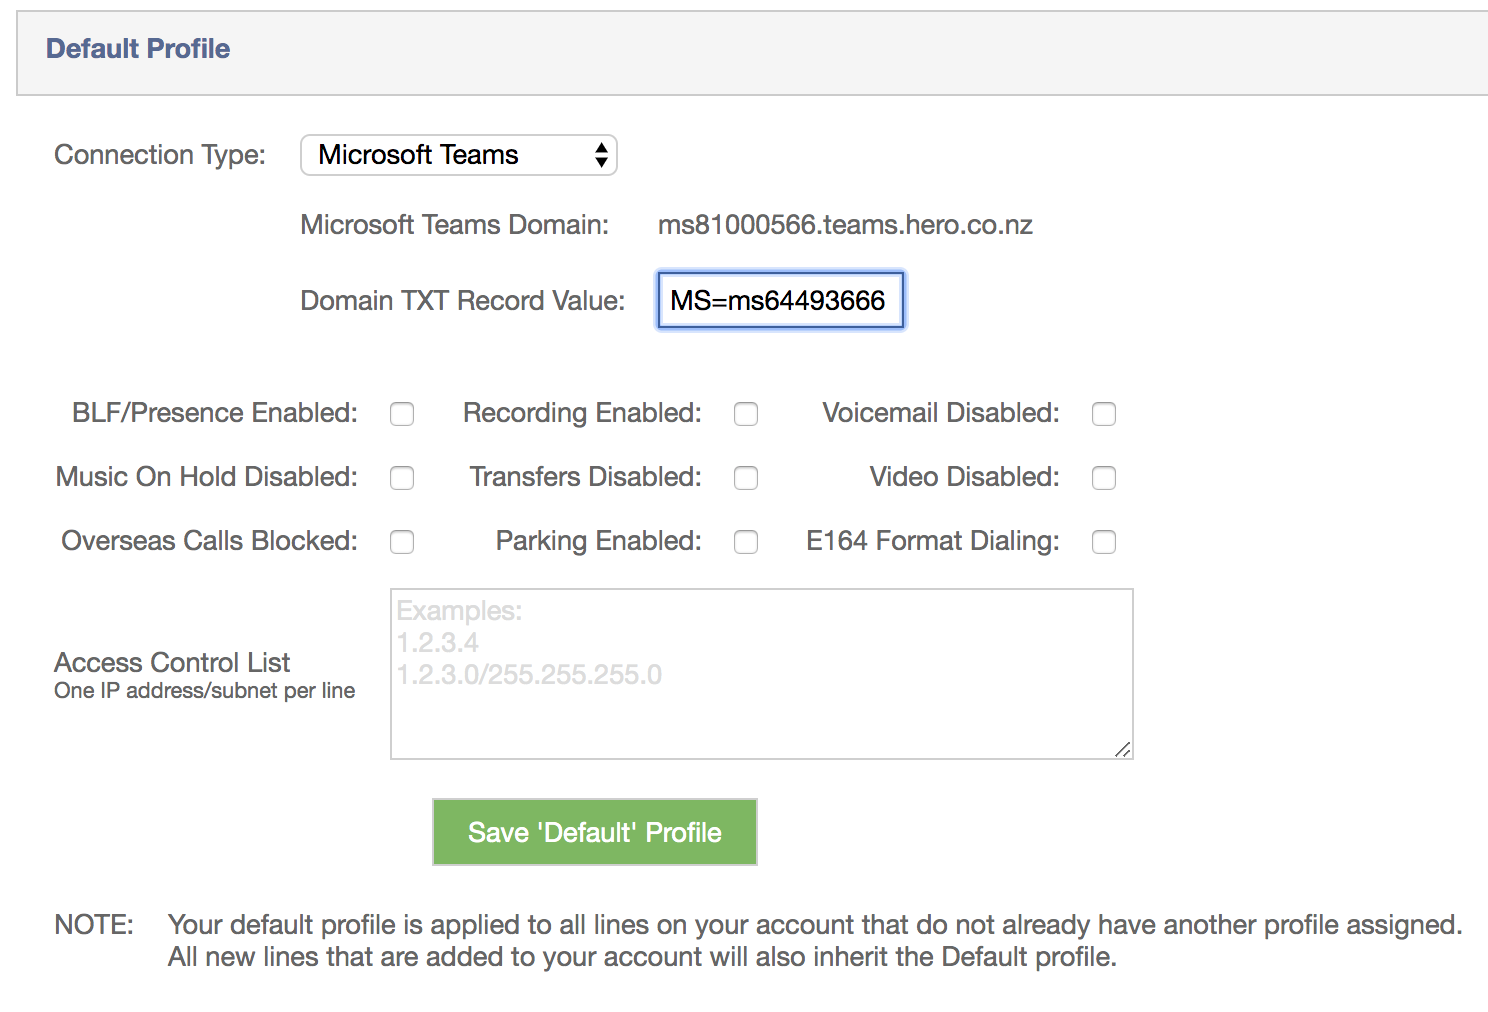
Step 27 - In the Hero customer portal click on the Voice tab and then select 'Profiles' from the left side menu.
If you want to setup all lines on your account to use Microsoft Teams use the default profile otherwise you can create a new profile at the bottom of the page. In the drop down menu for Connection type select 'Microsoft Teams'.
Step 28 - Copy the Microsoft Teams Domain into your clipboard (it will be something like ms81xxxxxx.sbc.msteams.uk)
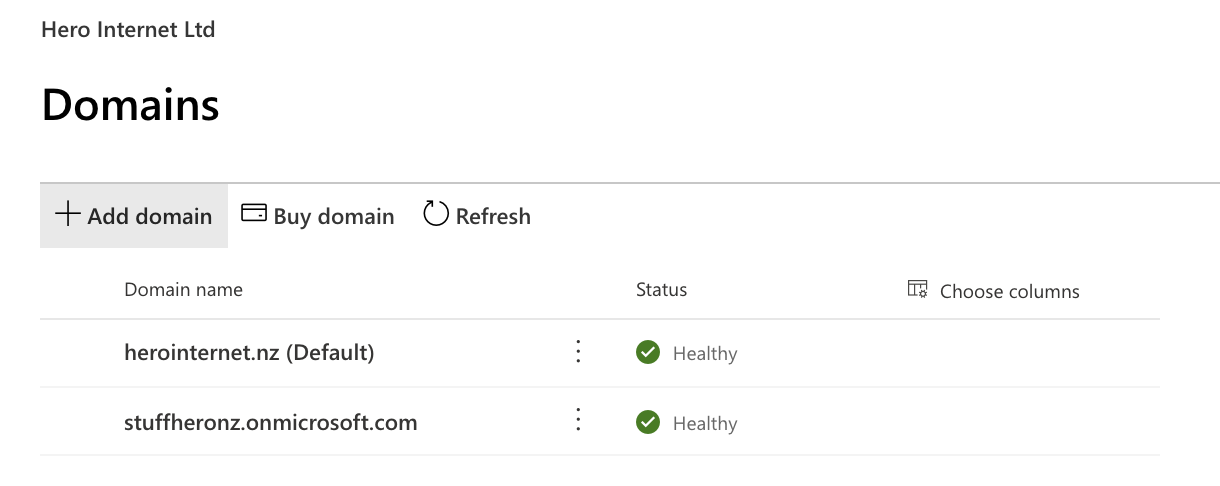
Step 29 - In the Domains page back in the Admin Center (under Settings/Domains) click 'Add domain'
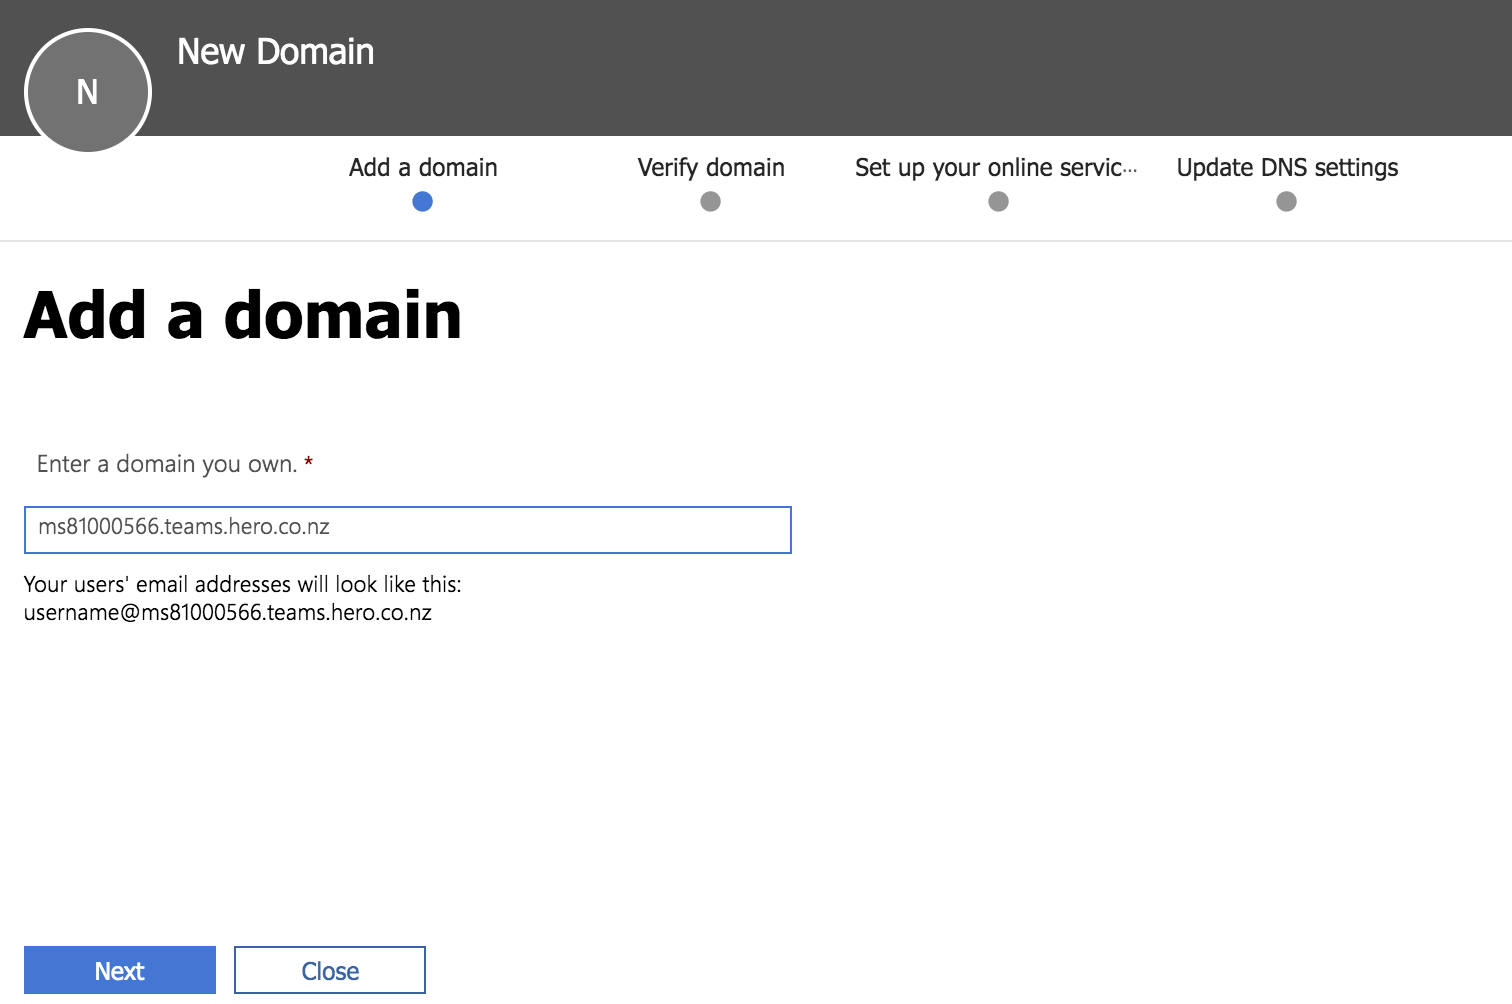
Step 30 - Enter the Teams Domain you copied into your clipboard in Step 28 into the domain text box and click Next
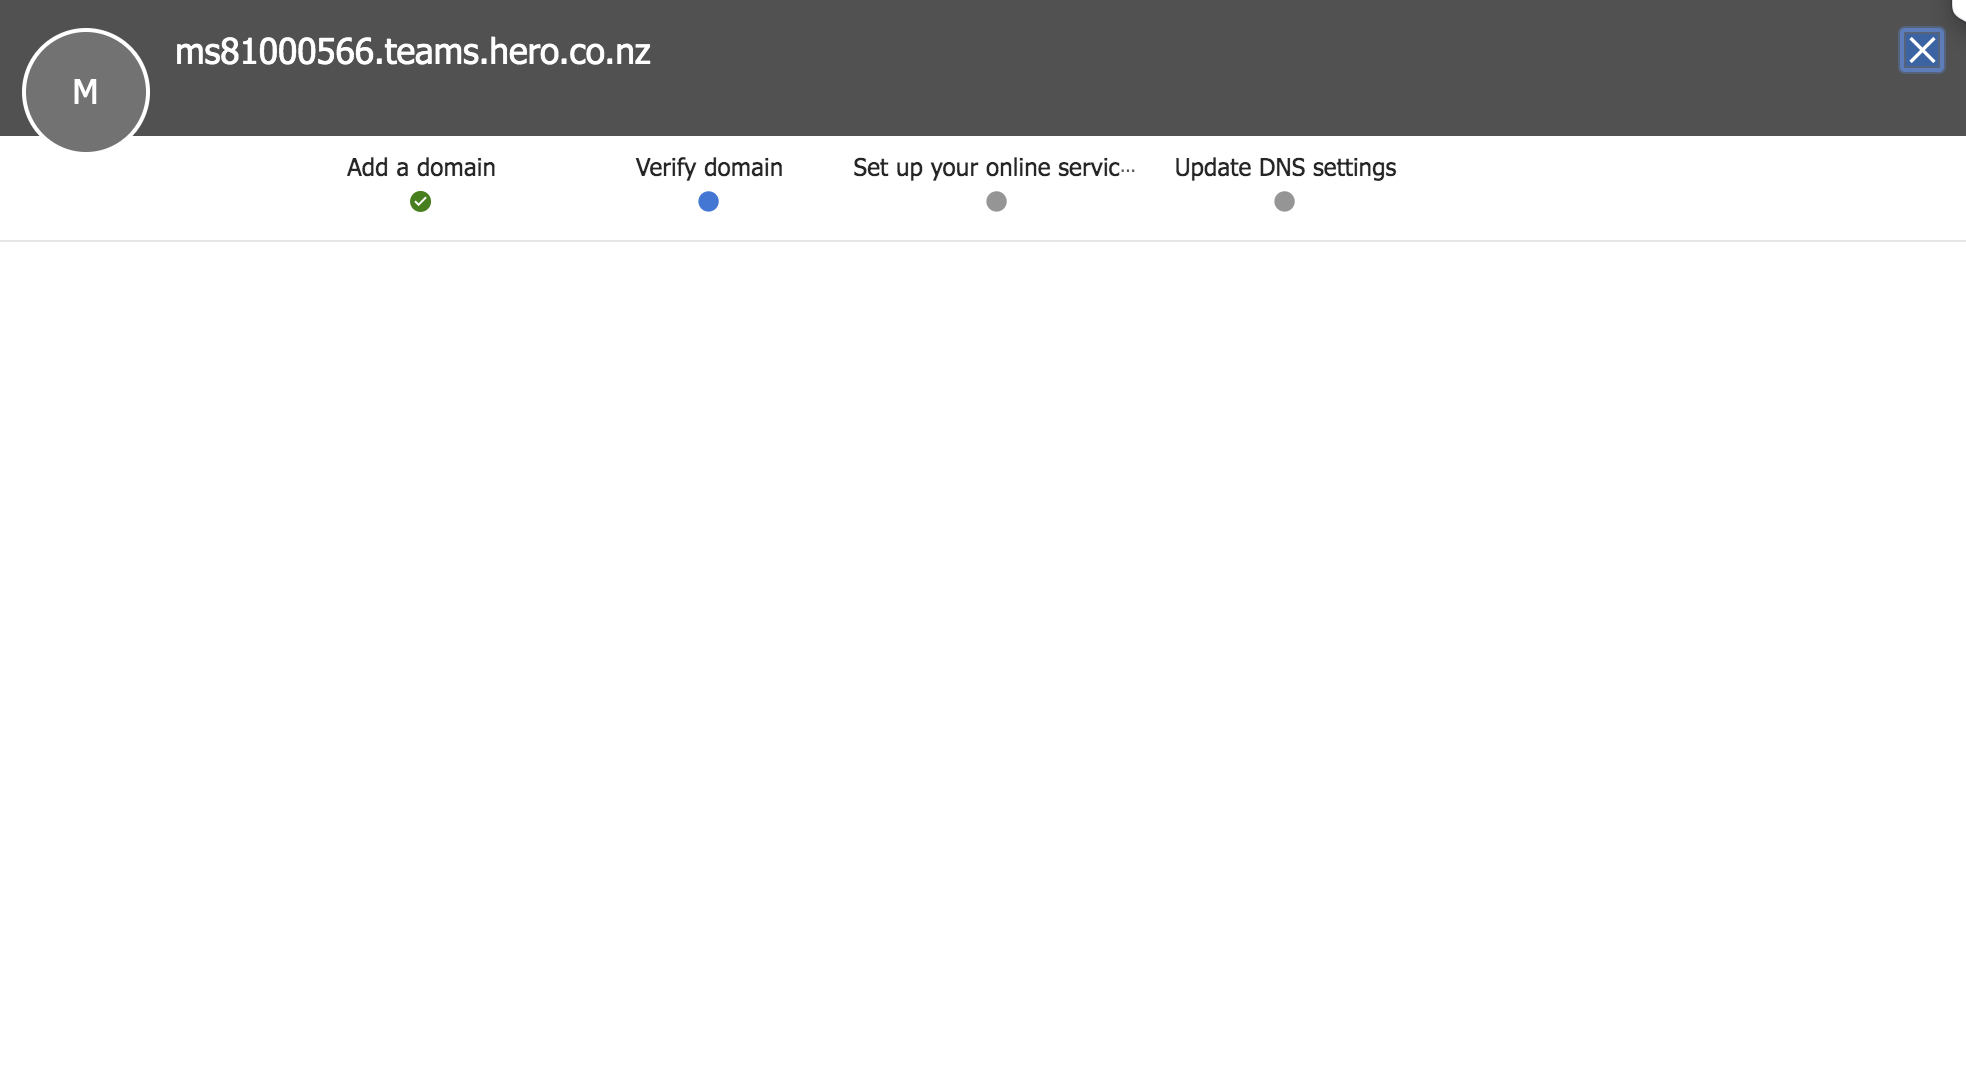
Step 31 - Wait for the Verify Domain page to load (this can take some time and you may need to refresh the page)
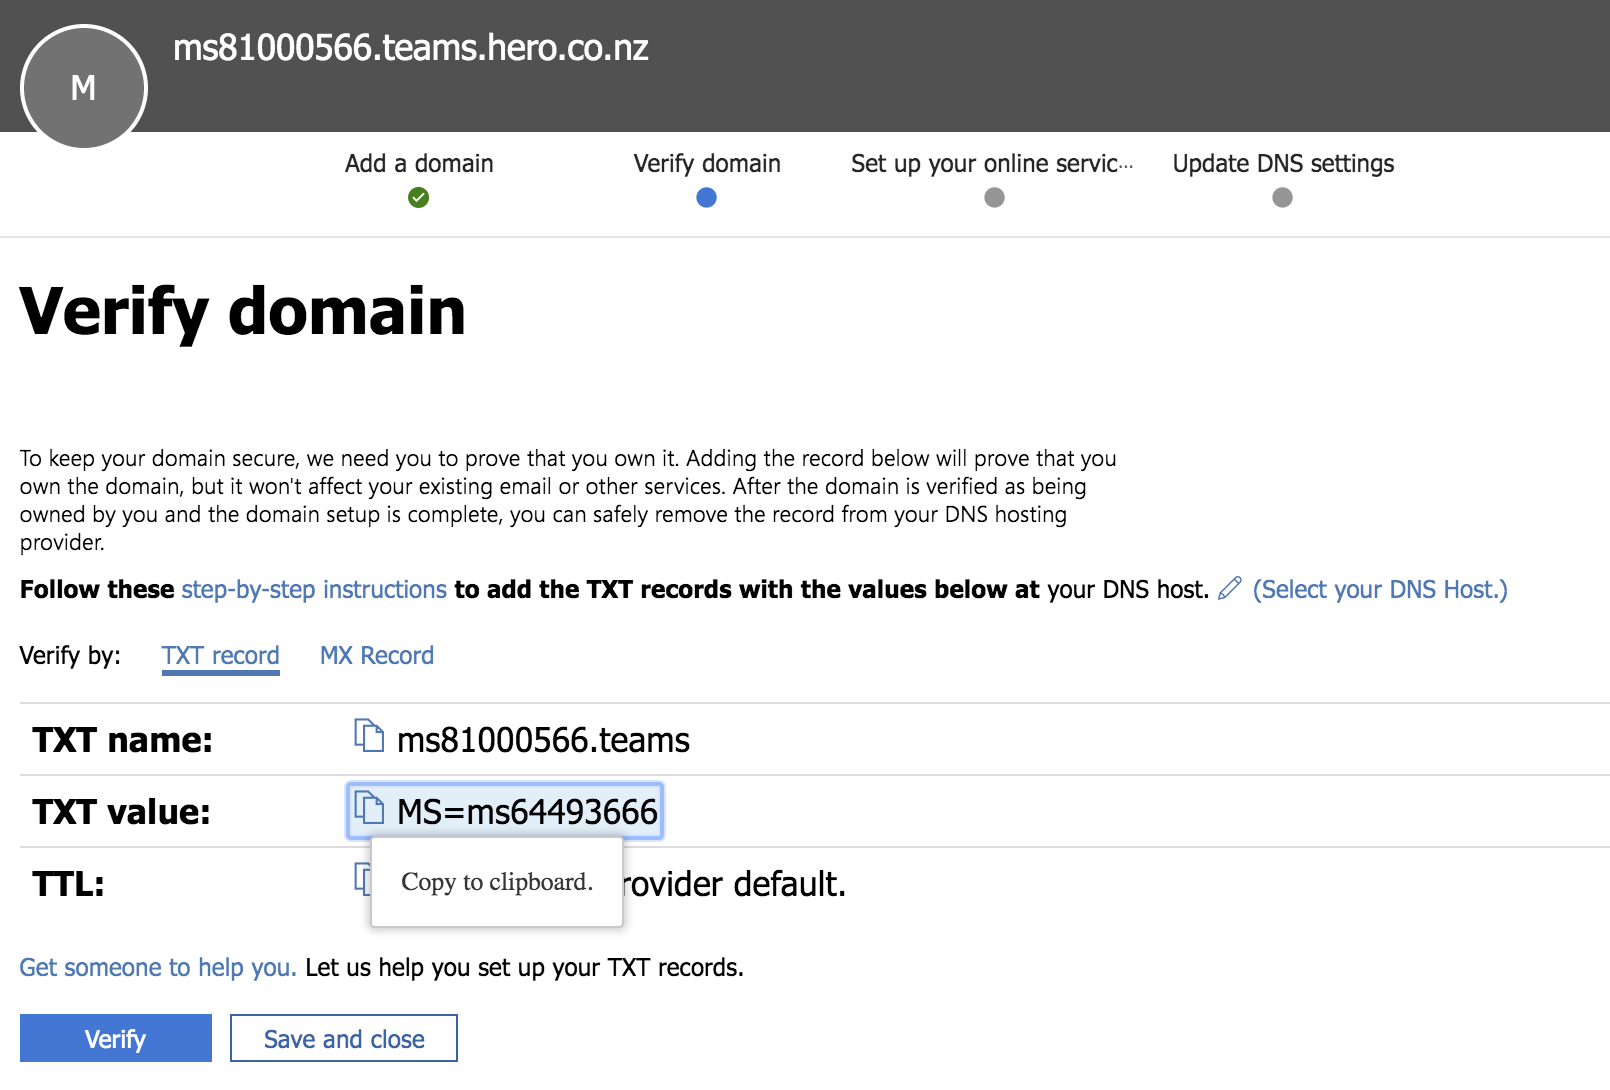
Step 32 - The Verify domain page should now be displayed
Step 33 - Copy the TXT value by clicking the icon beside the TXT value information (e.g. MS=msxxxxxxxx)
Step 34 - Now switch back to the Hero customer portal page and paste this value into the Domain TXT record value field and then press 'Save Default Profile'
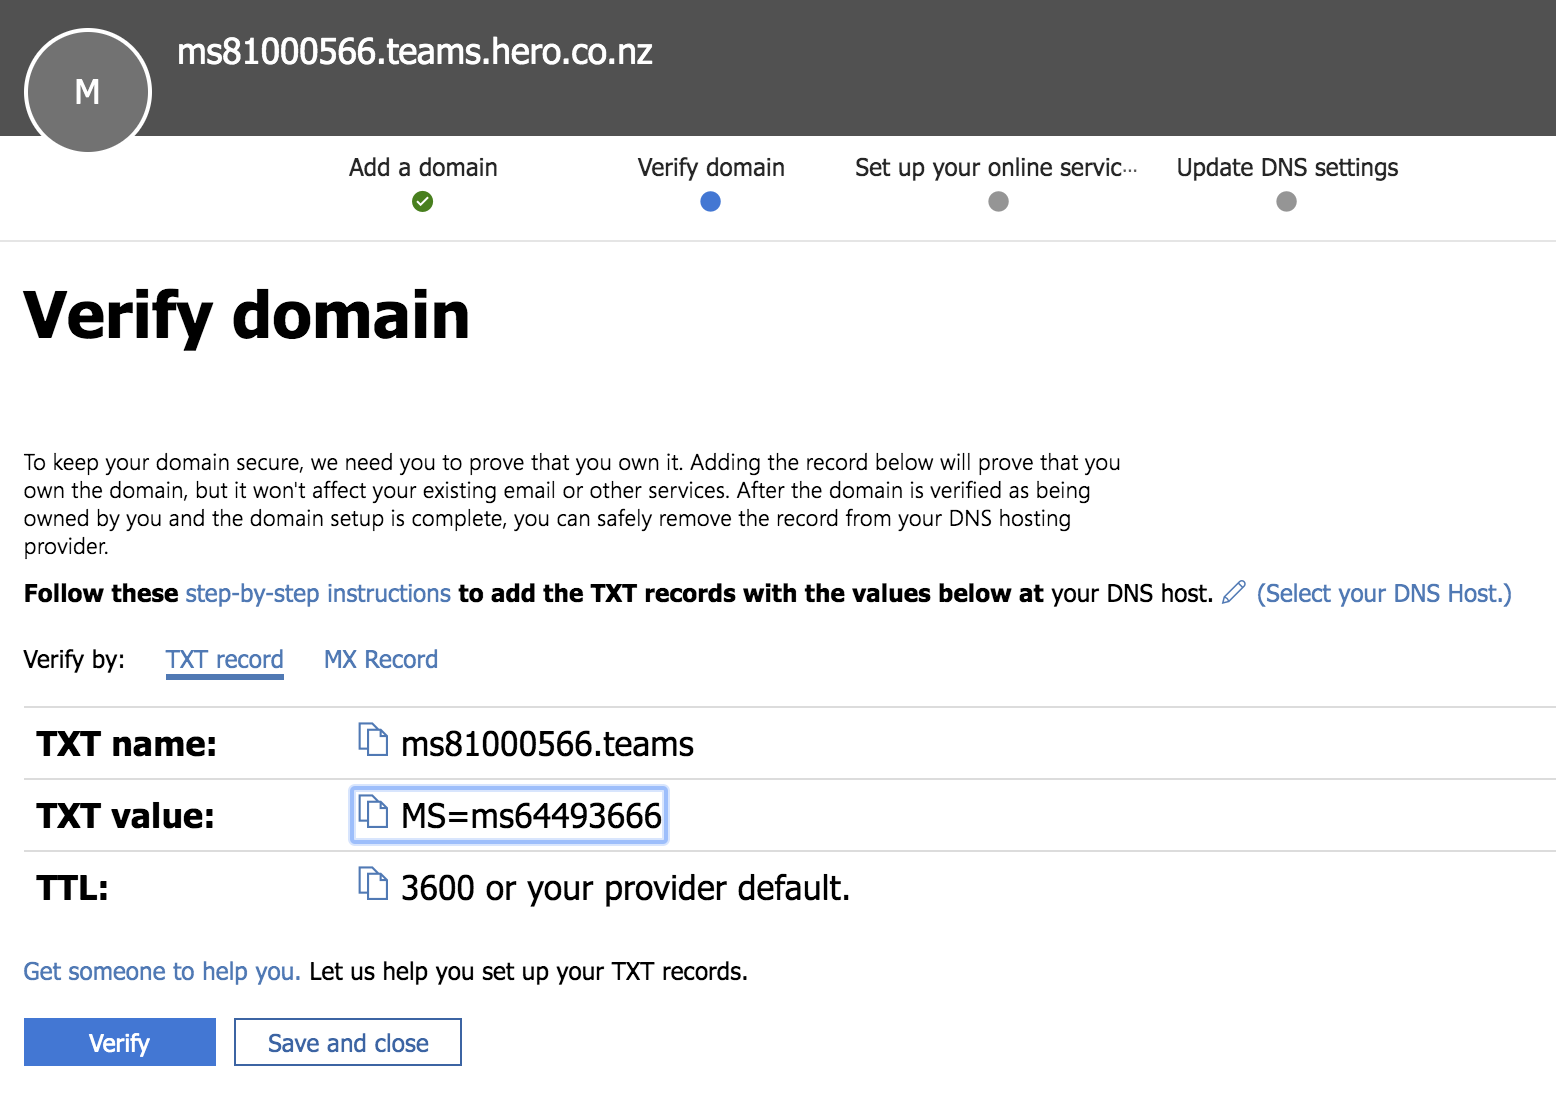
Step 35 - Now switch back to the Admin Center page and click on 'Verify'
Step 36 - You may need to wait 1 minute or retry if this fails. Be patient!
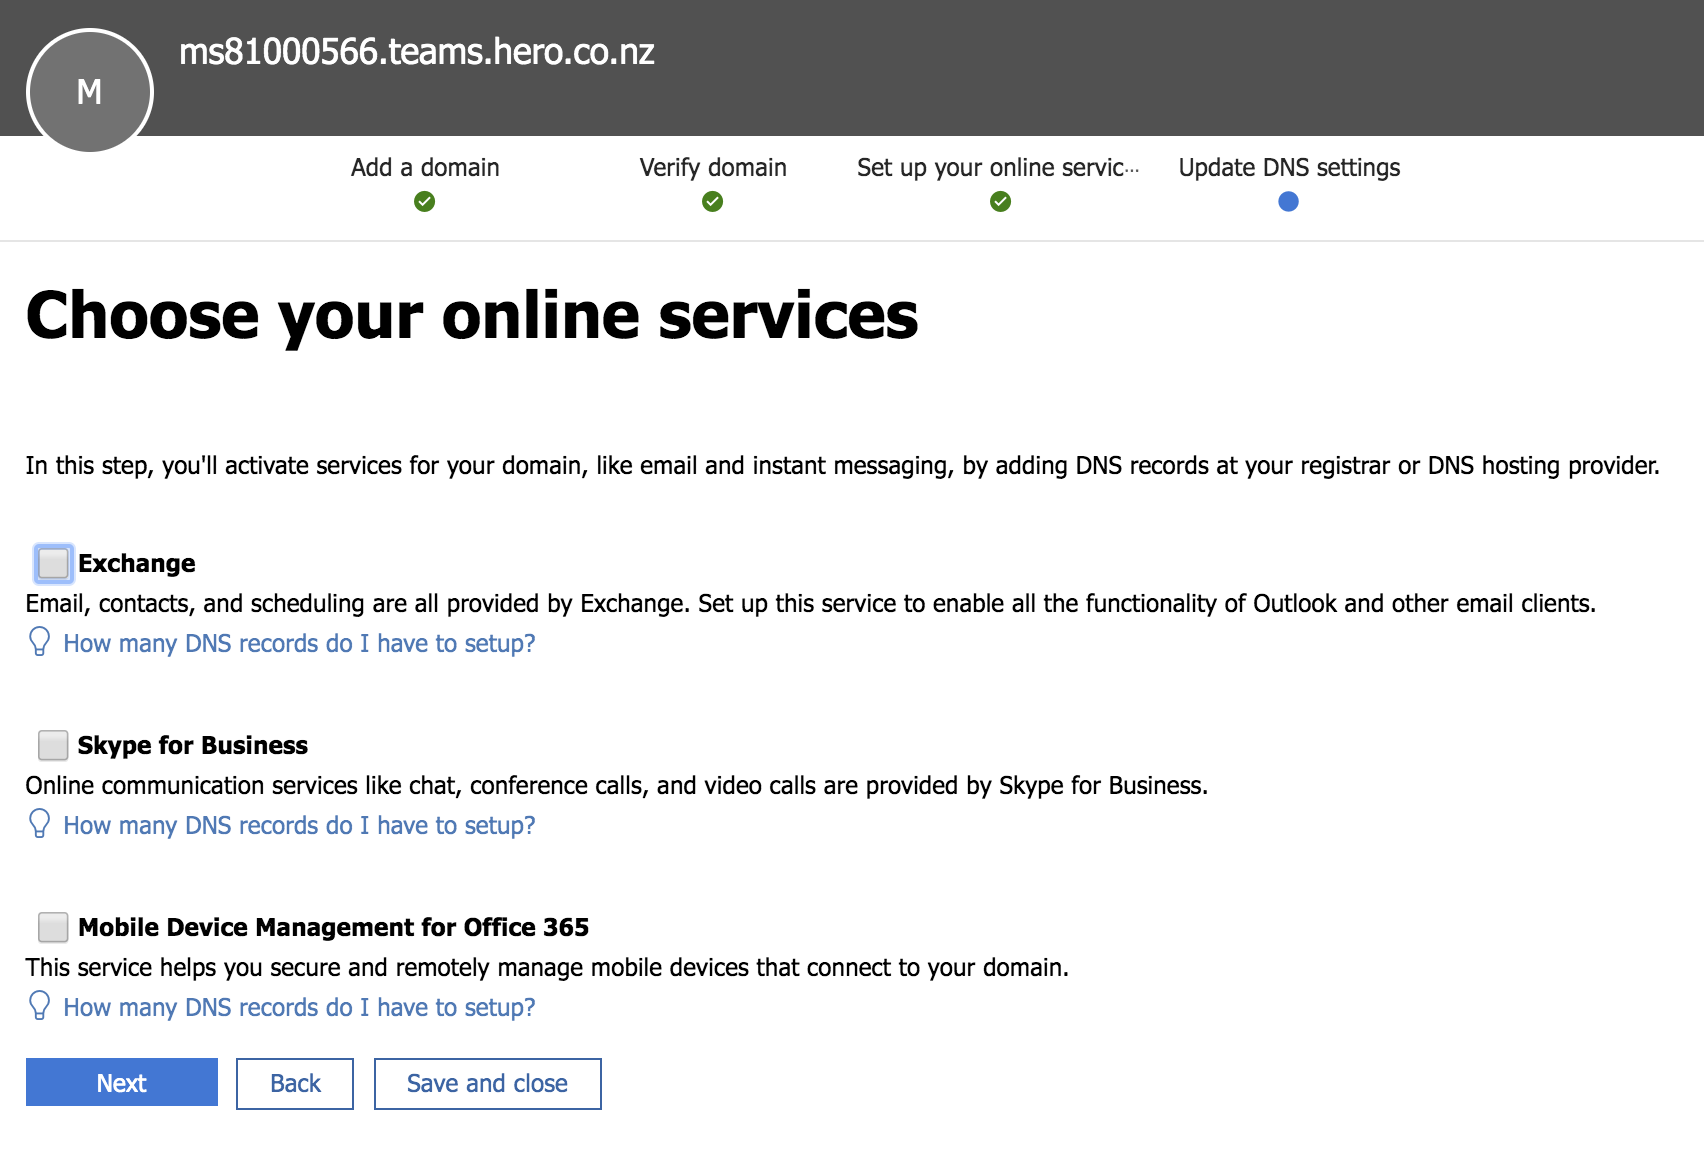
Step 37 - Once verified make sure all the options for online services are NOT ticked and click Next.
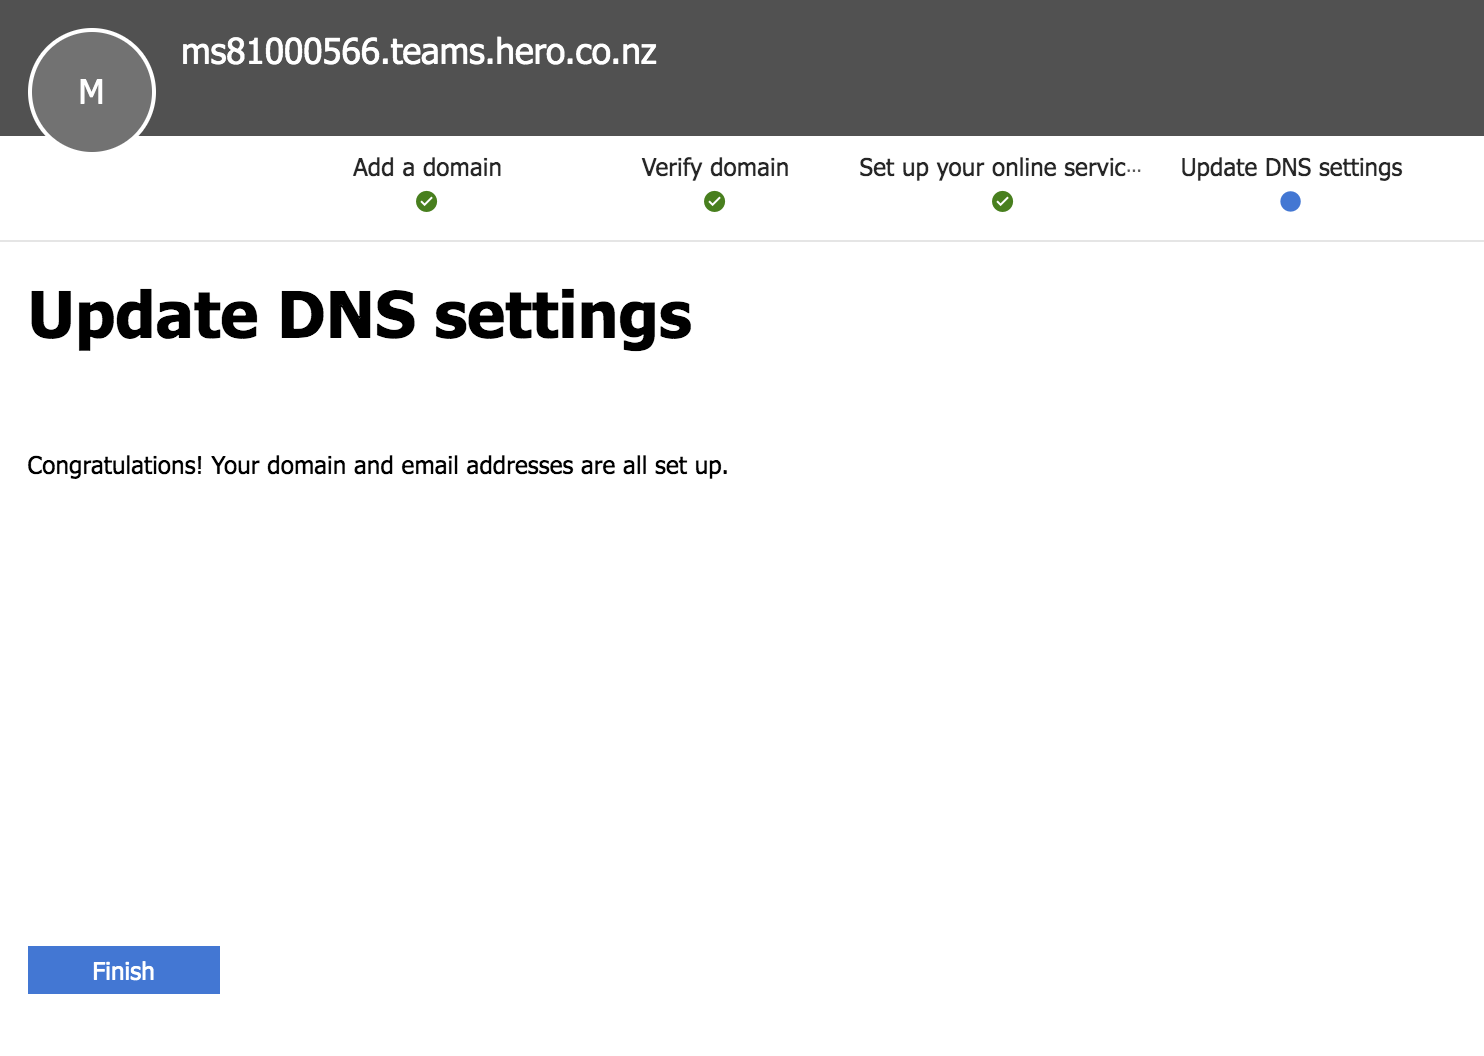
Step 38 - All being well this should complete and your Hero trunking domain will be added to your account.
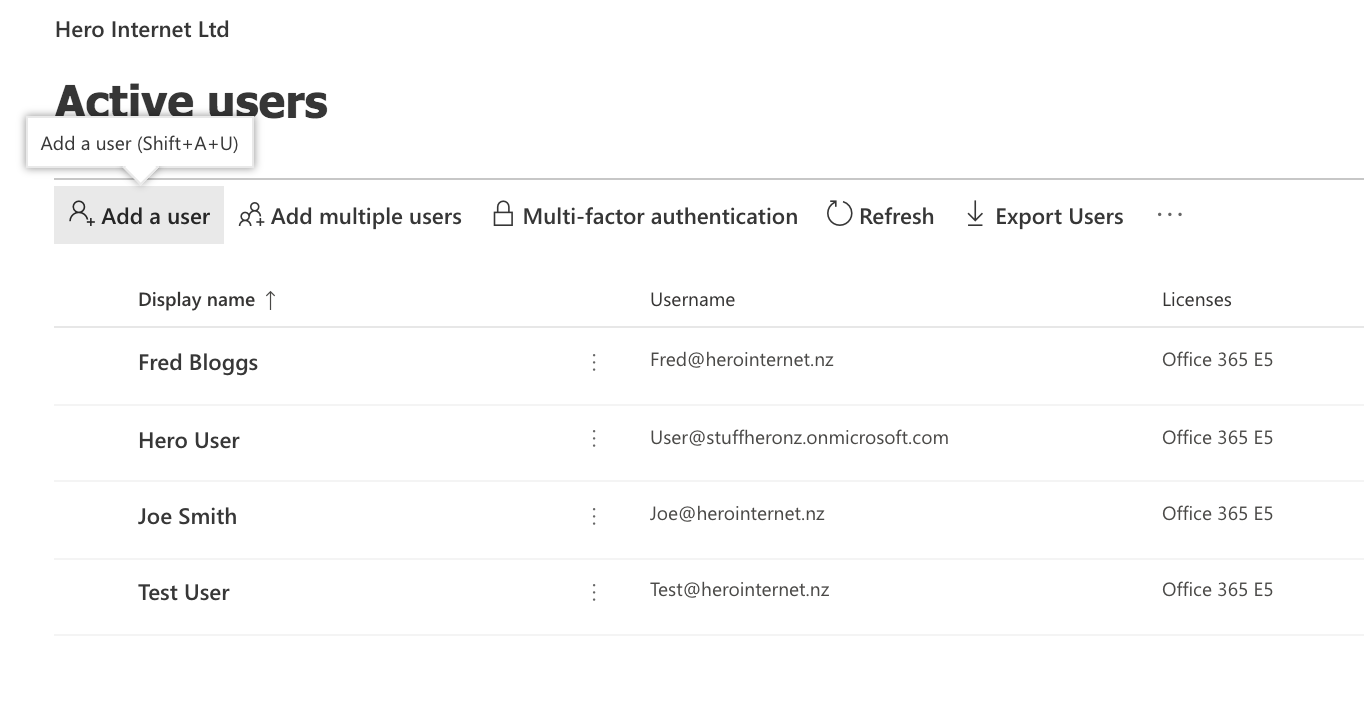
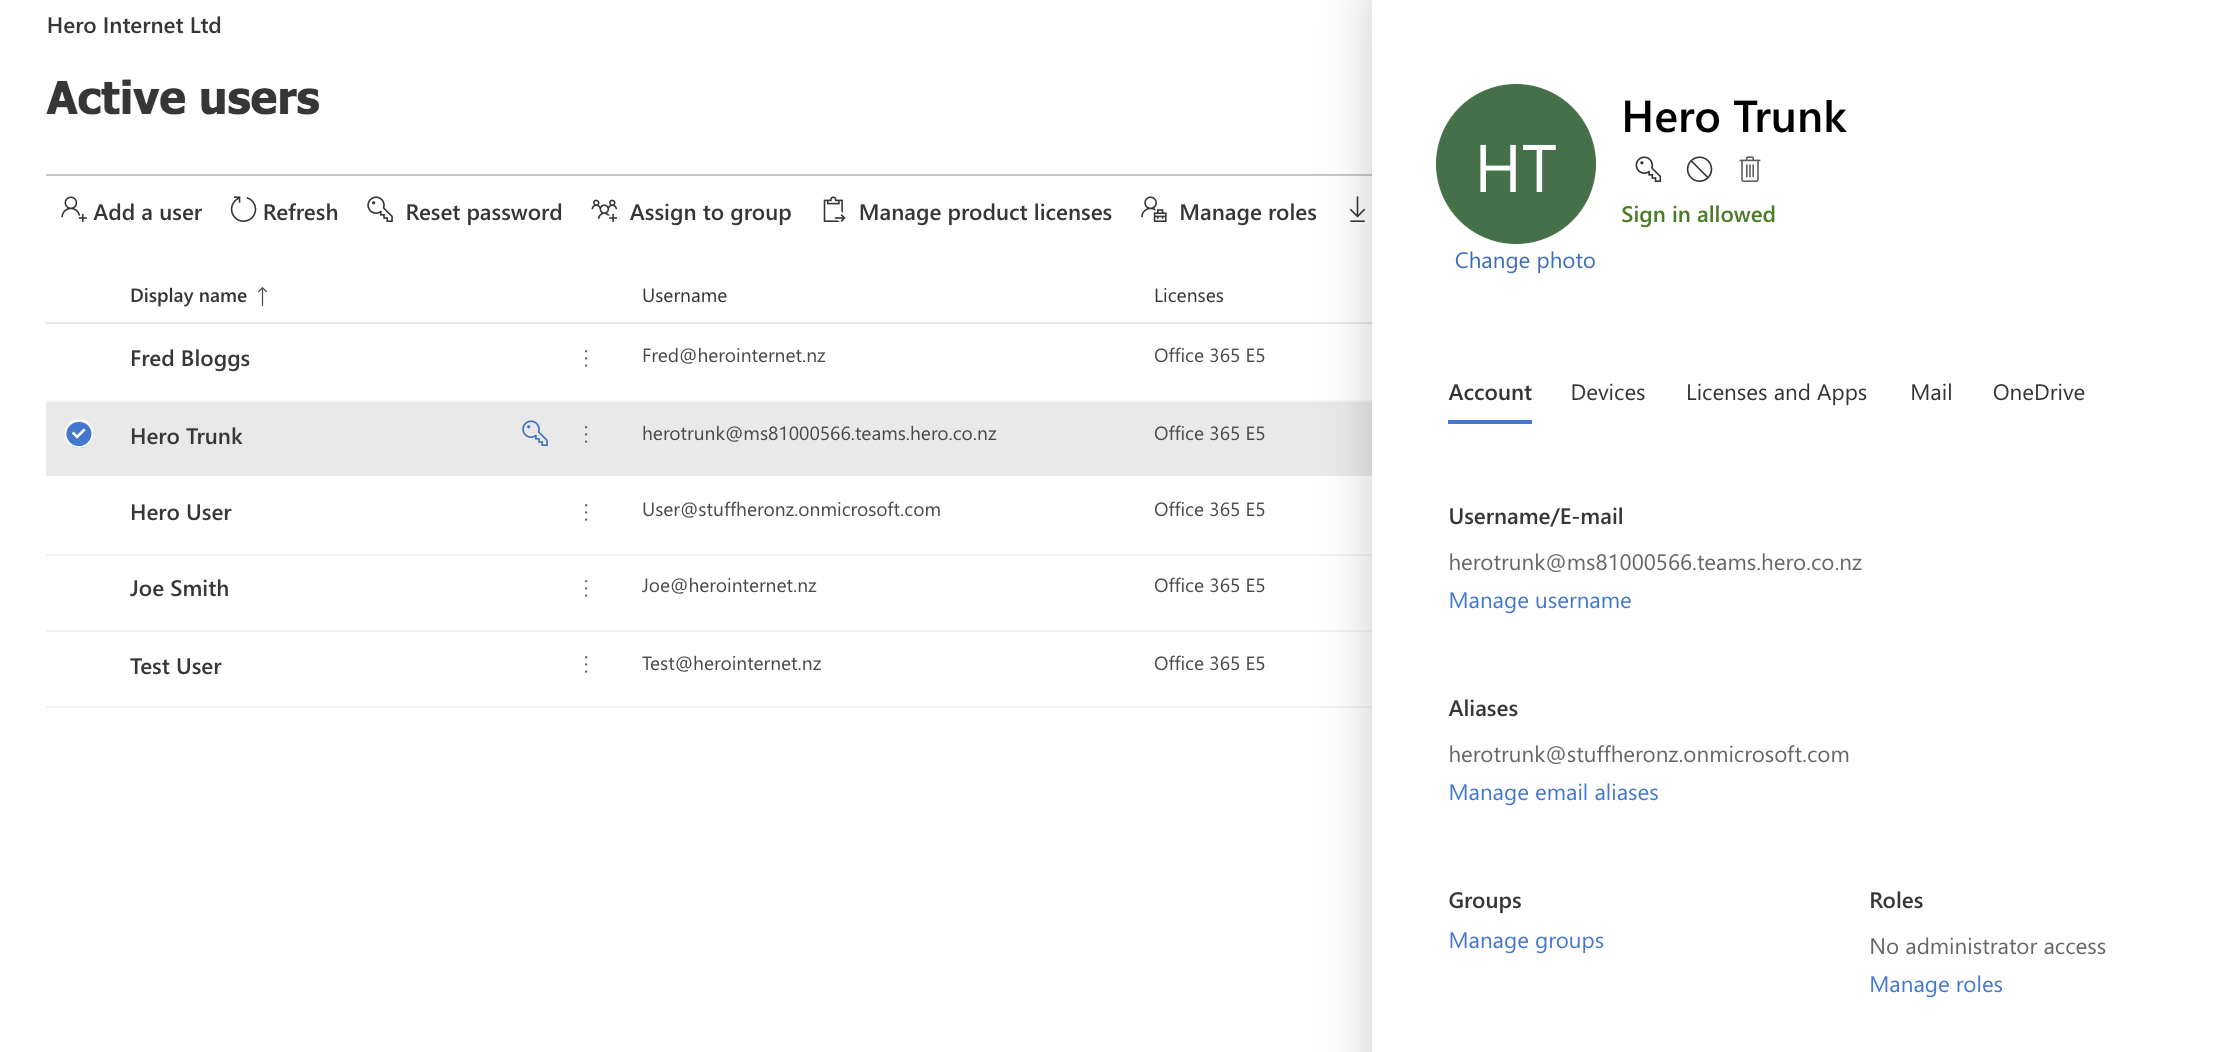
Step 39 - Now switch to the 'Users' tab in the Admin Center and click 'Add a user'
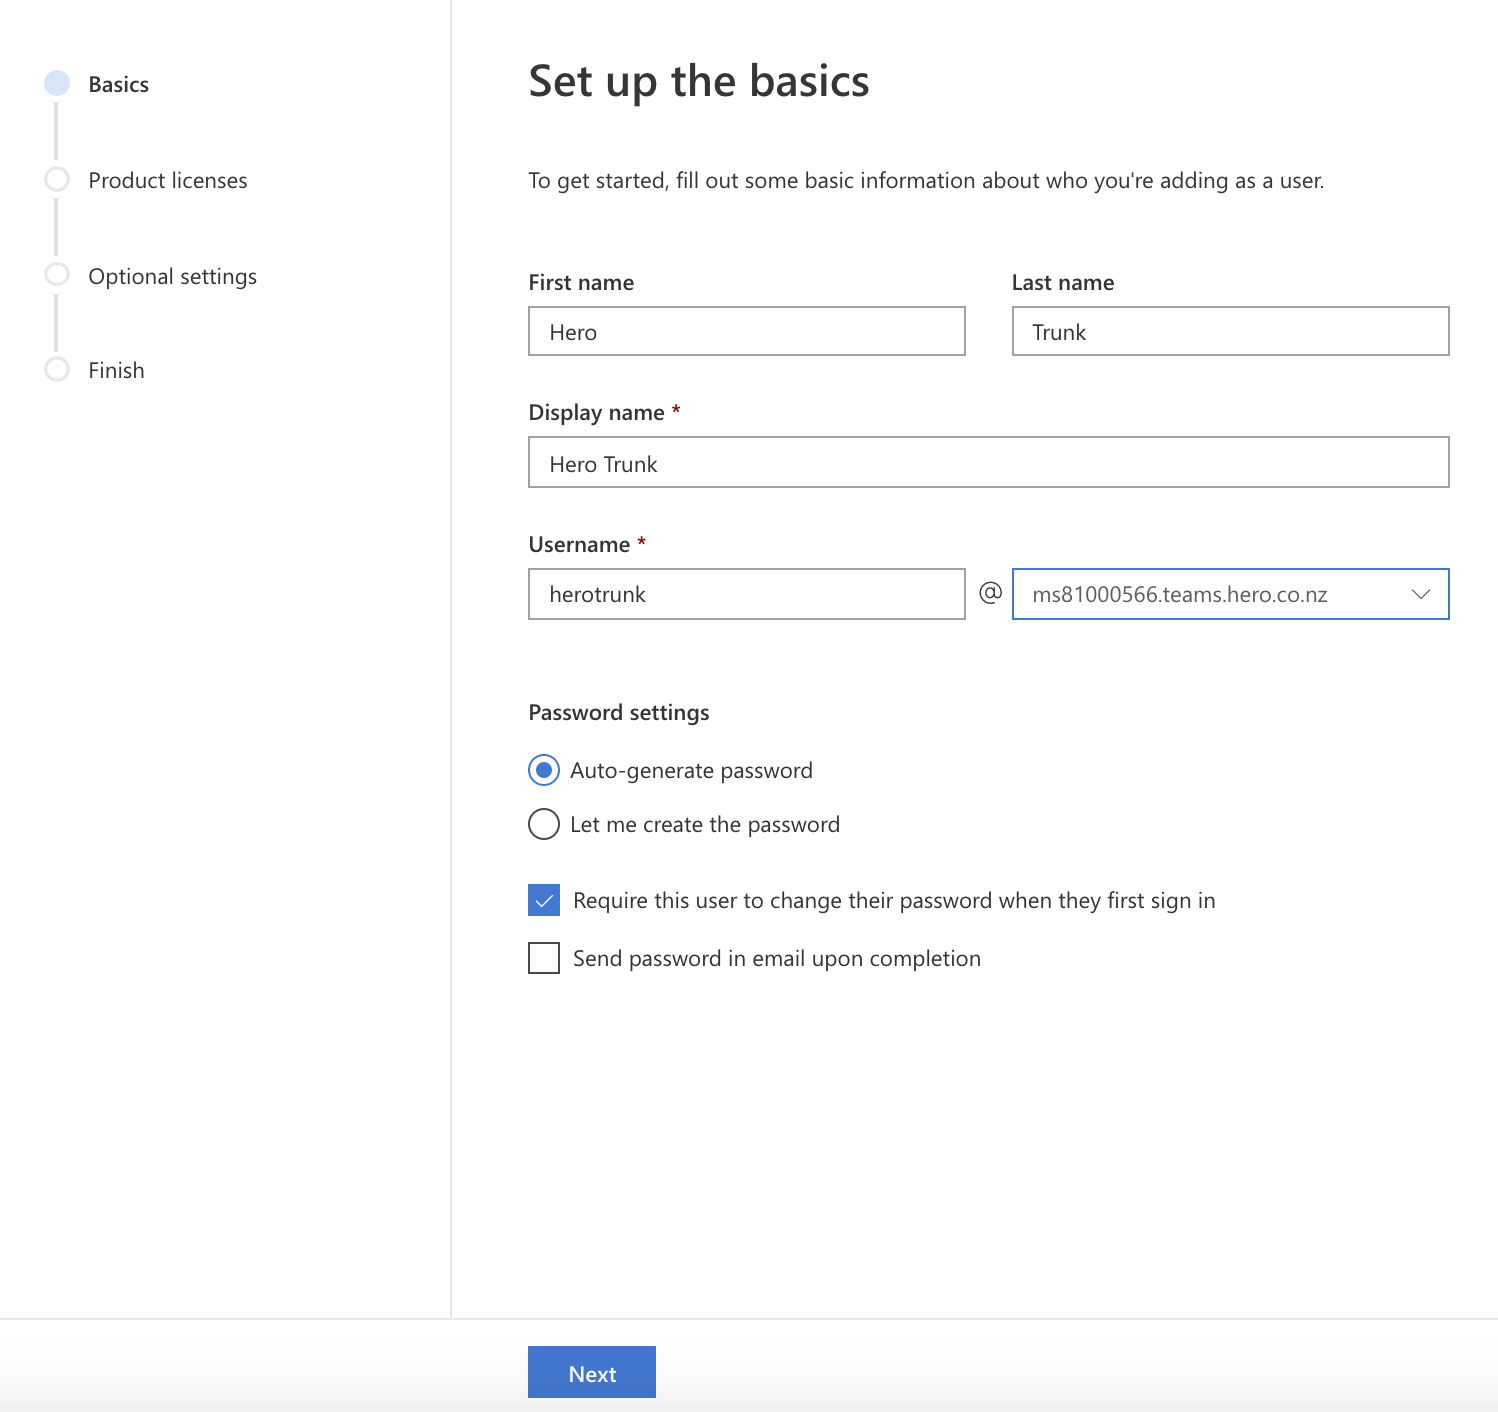
Step 40 - We are going to create a 'temporary user' to associate with the Hero trunk domain
Step 41 - The user details should be something like 'Hero Trunk' and username of 'herotrunk'. Make sure you select our new Hero trunk domain from the drop down menu (e.g. msxxxxxxxx.sbc.msteams.uk). Then Click Next.
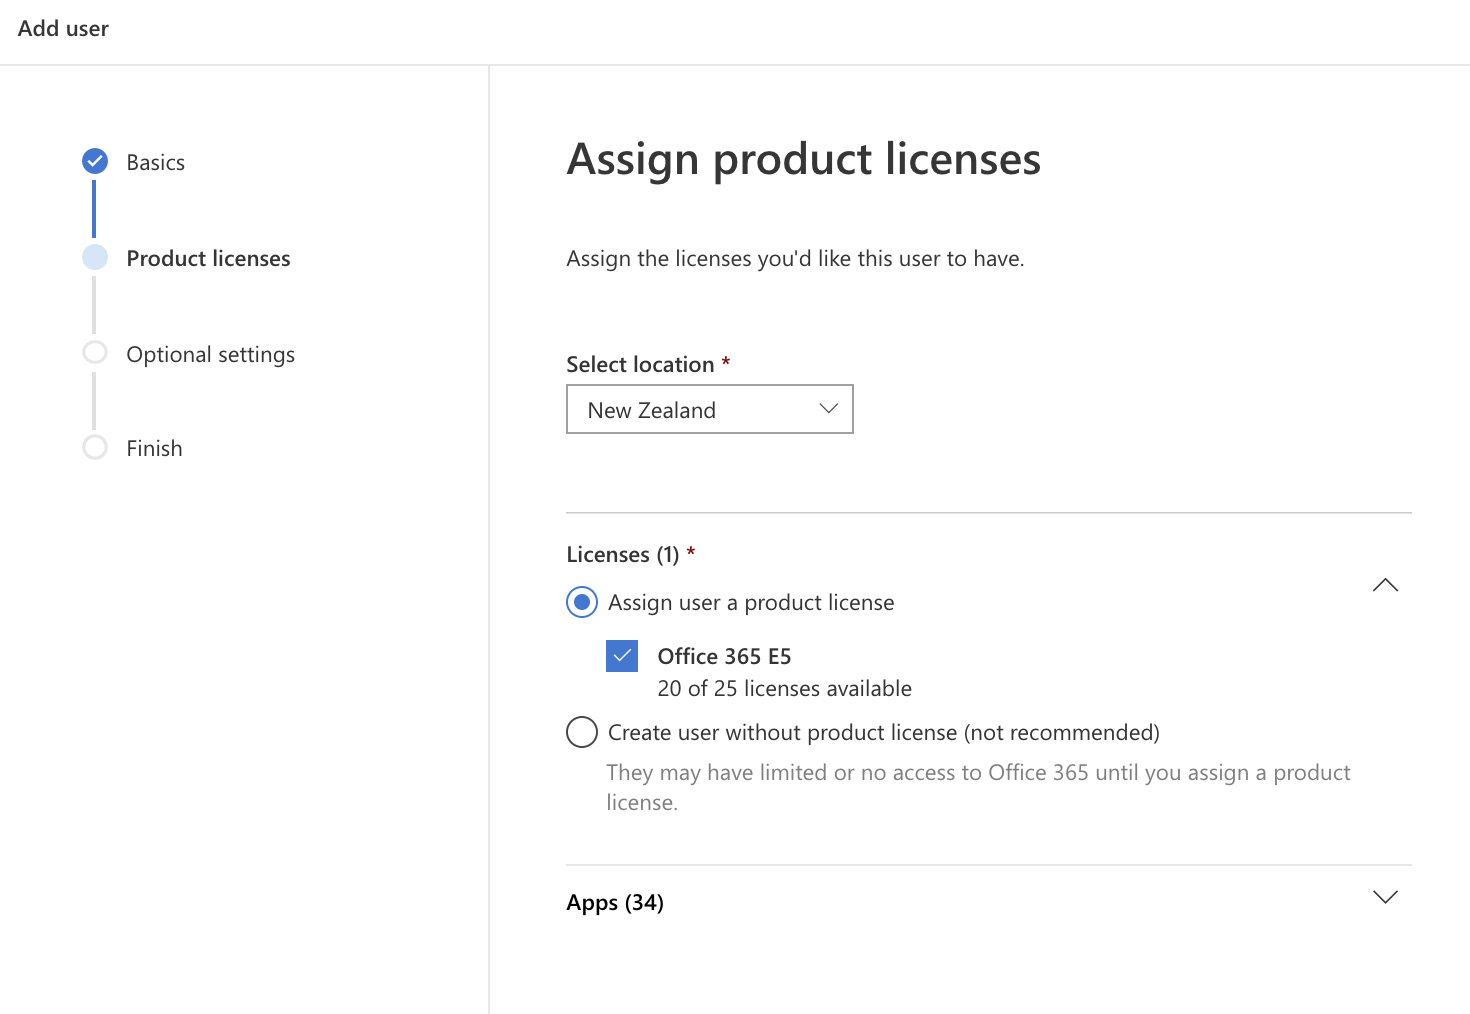
Step 42 - Now you need to assign a product license that includes phone services such as an E5 or E3 license to this user.
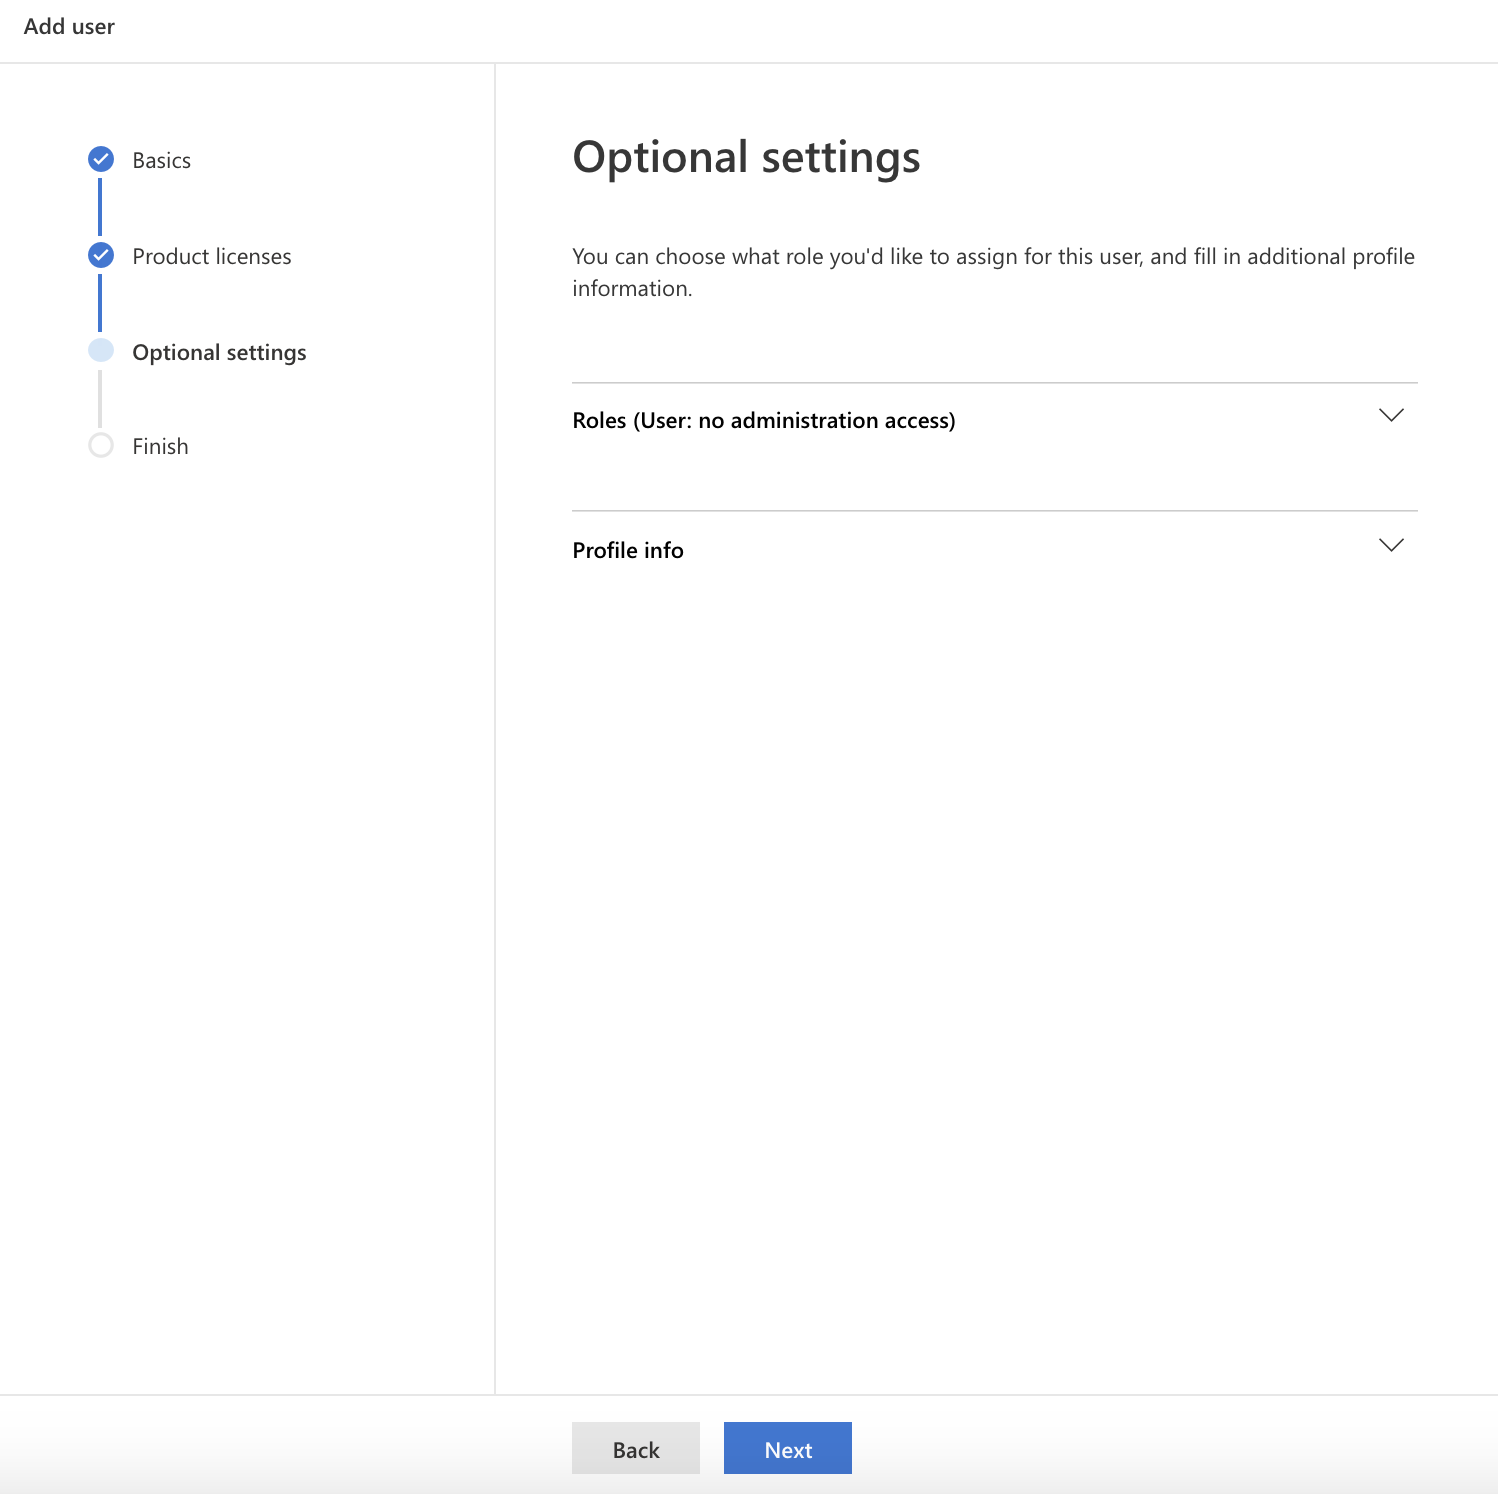
Step 43 - Leave the Role and Profile Info as default and click Next
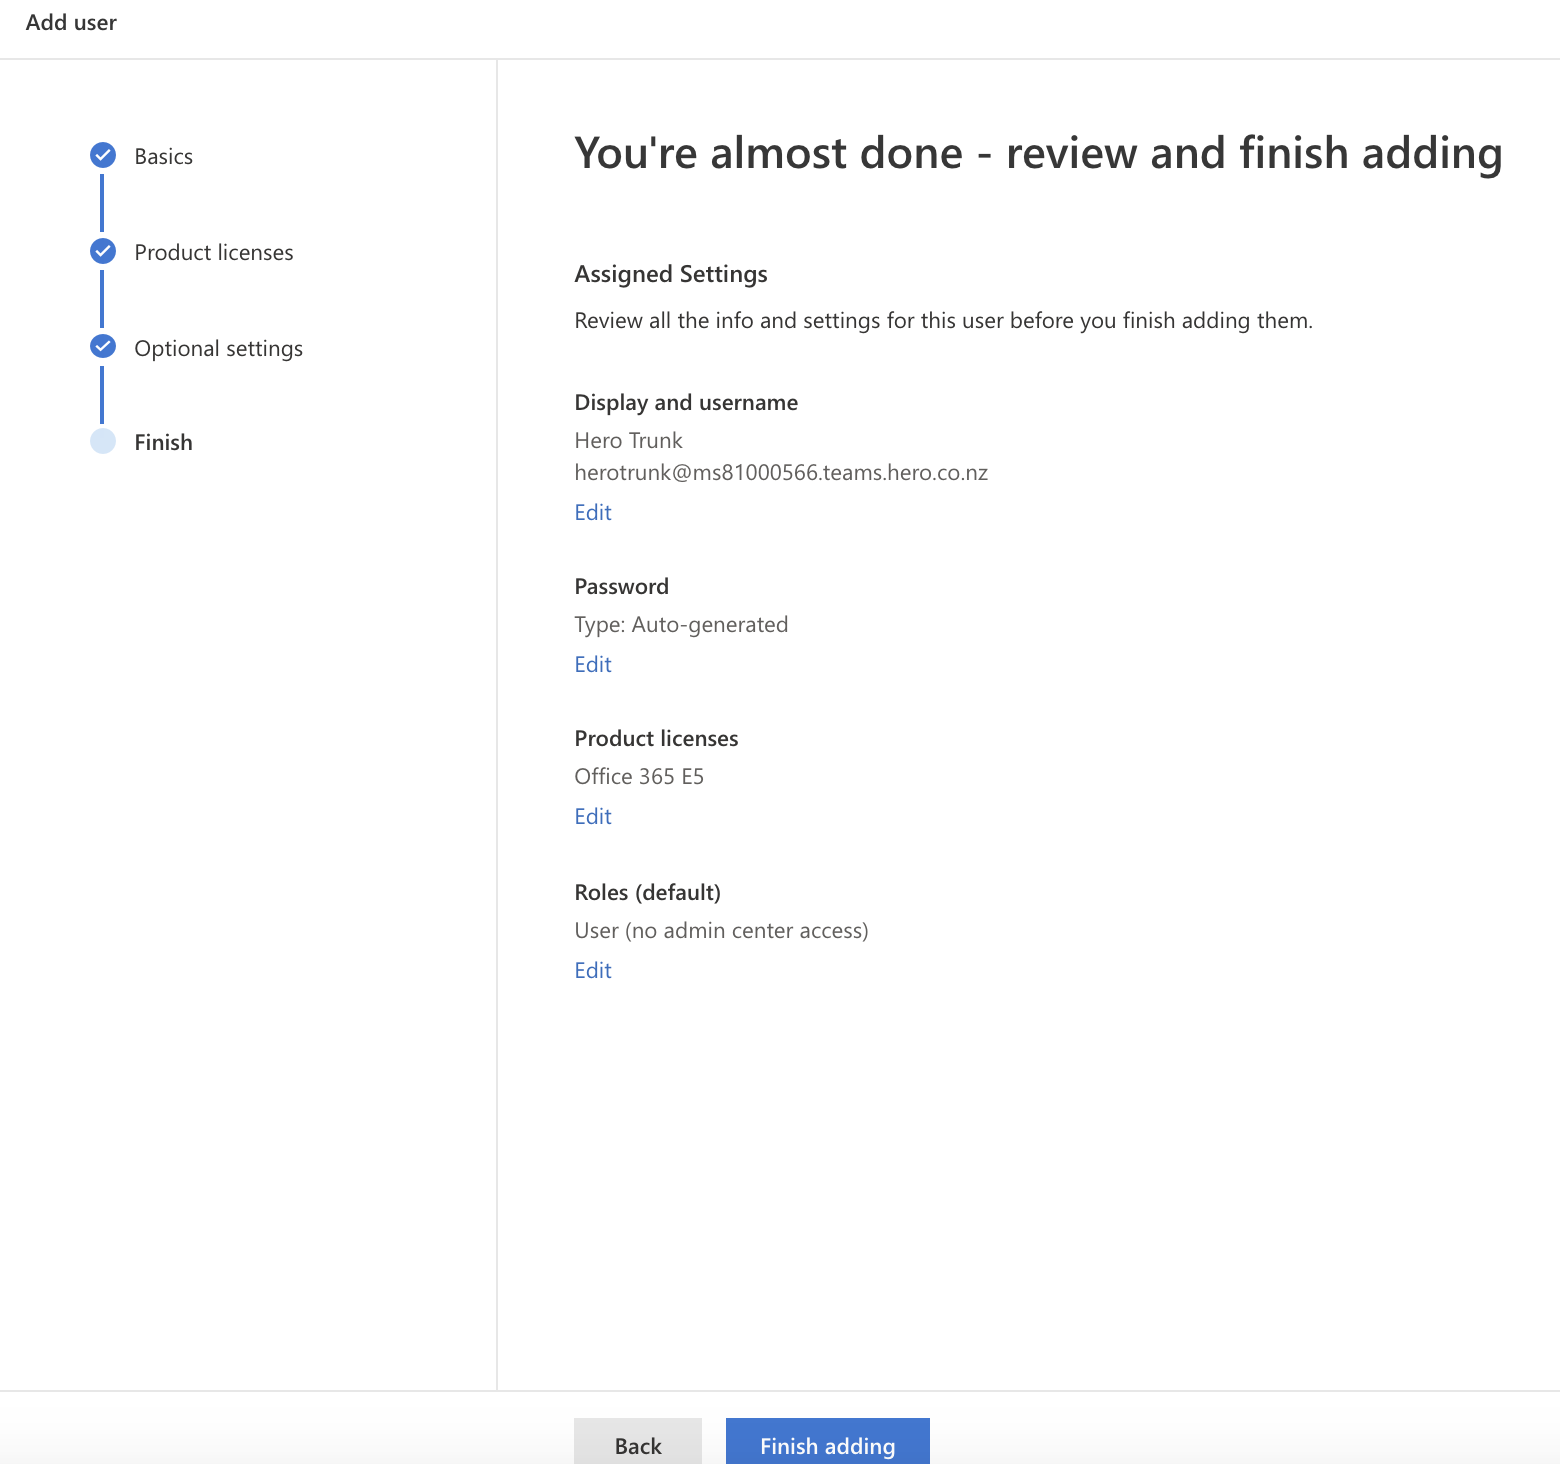
Step 44 - Press 'Finish Adding'
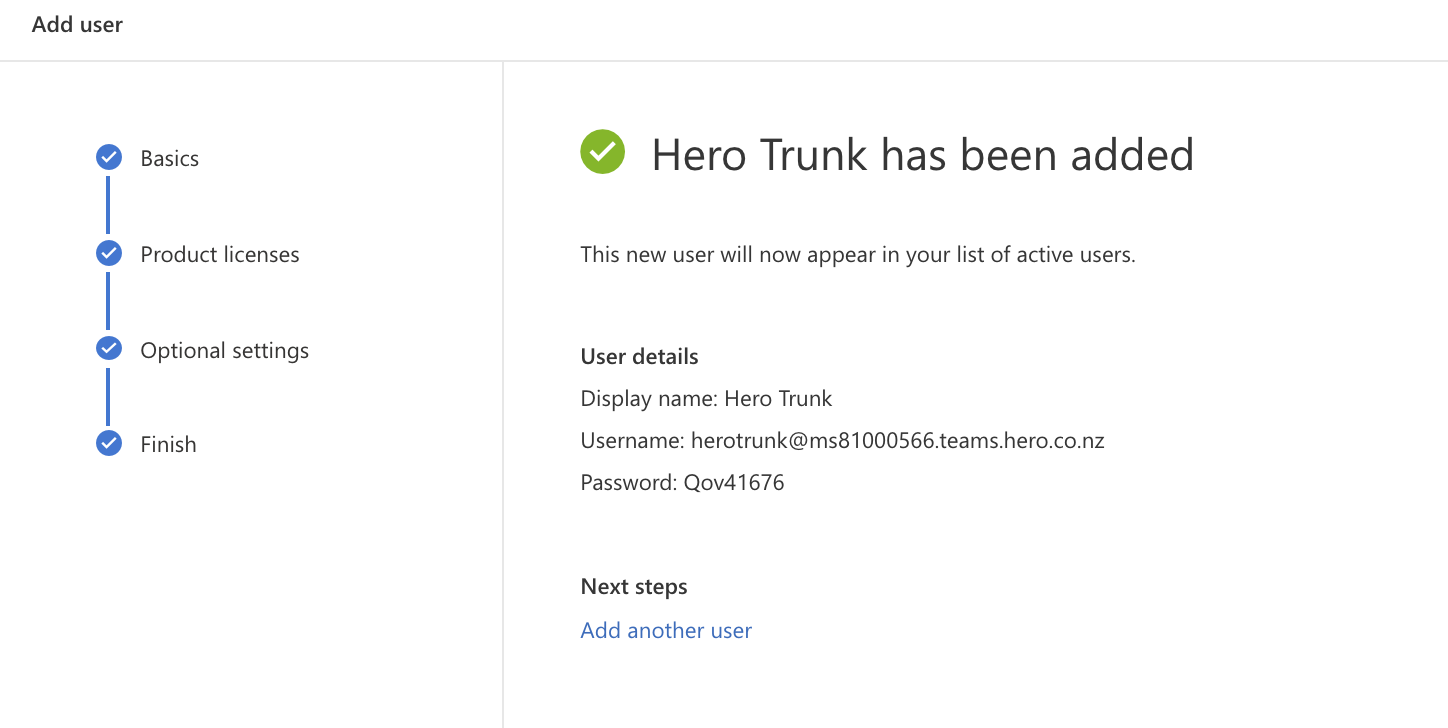
Step 45 - You should receive confirmation the Trunk user has been created.
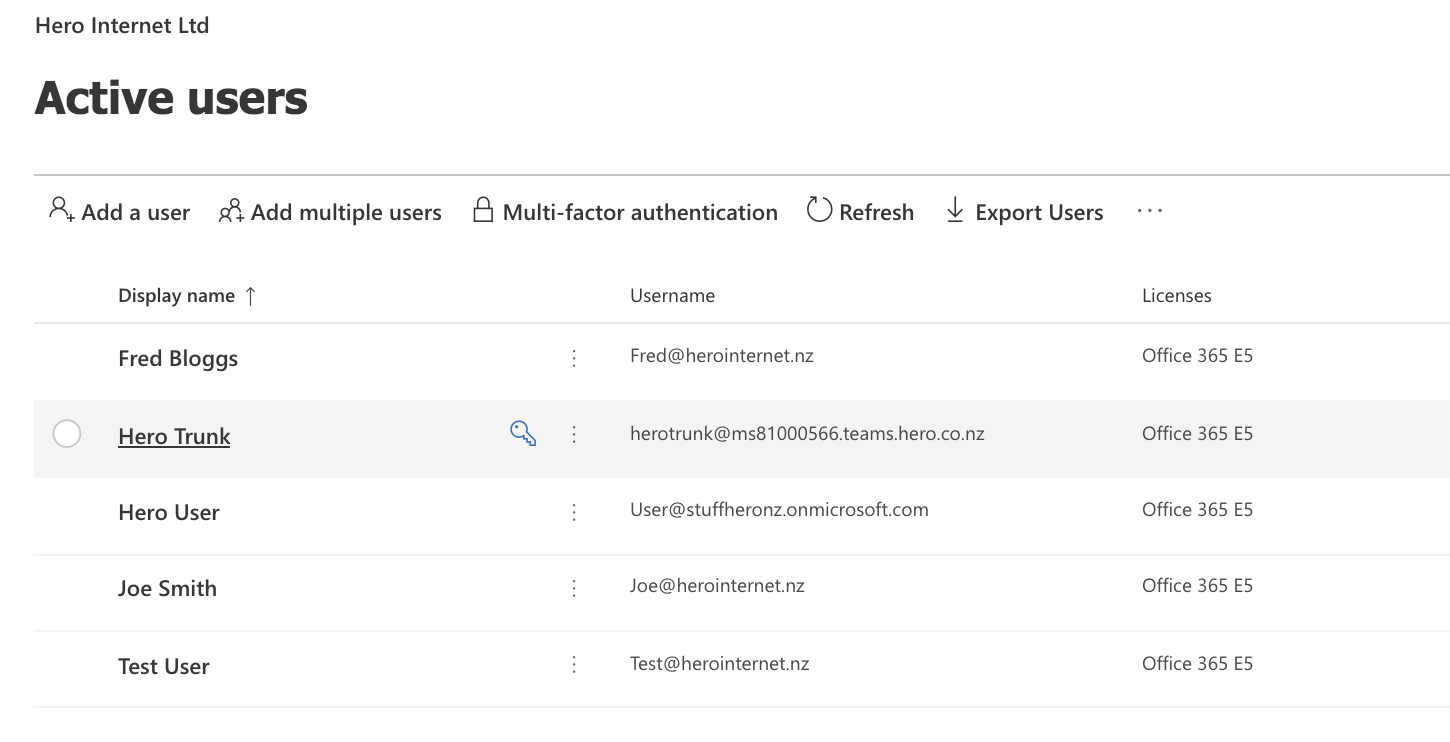
Step 46 - Go back to your Active users in the Users tab in Admin Center and the Trunk User should be listed.
Step 47 - Now switch back to your Hero customer portal tab and add any new numbers you want on teams. You can also port a number to Hero Teams or change an existing line type to be a Teams line in the Account/Numbers page.
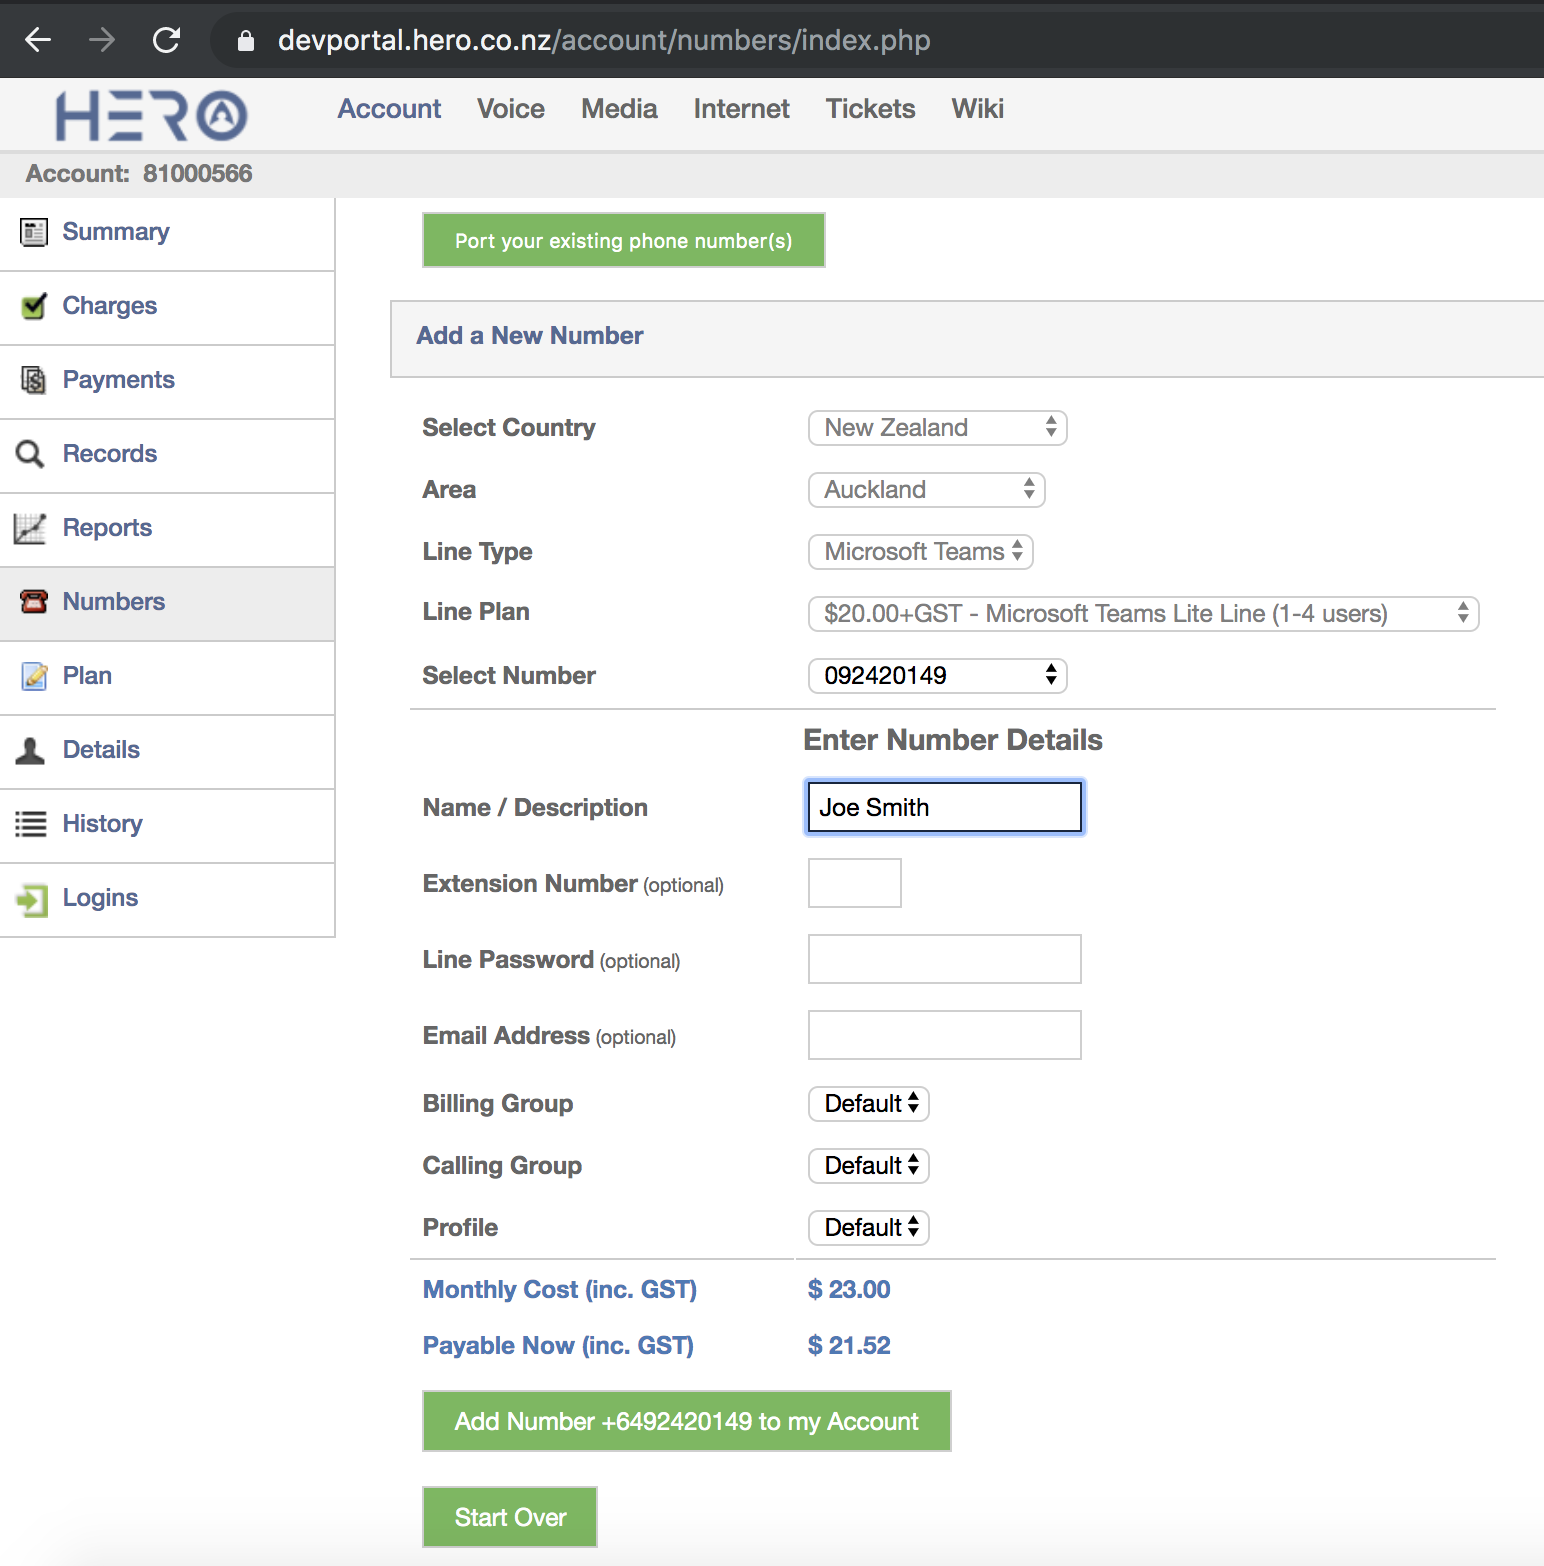
Step 48 - For adding a new Teams number ensure you select the Line Type as 'Microsoft Teams' and select a Teams plan for the line. In this example we are adding a new user 'Joe Smith'
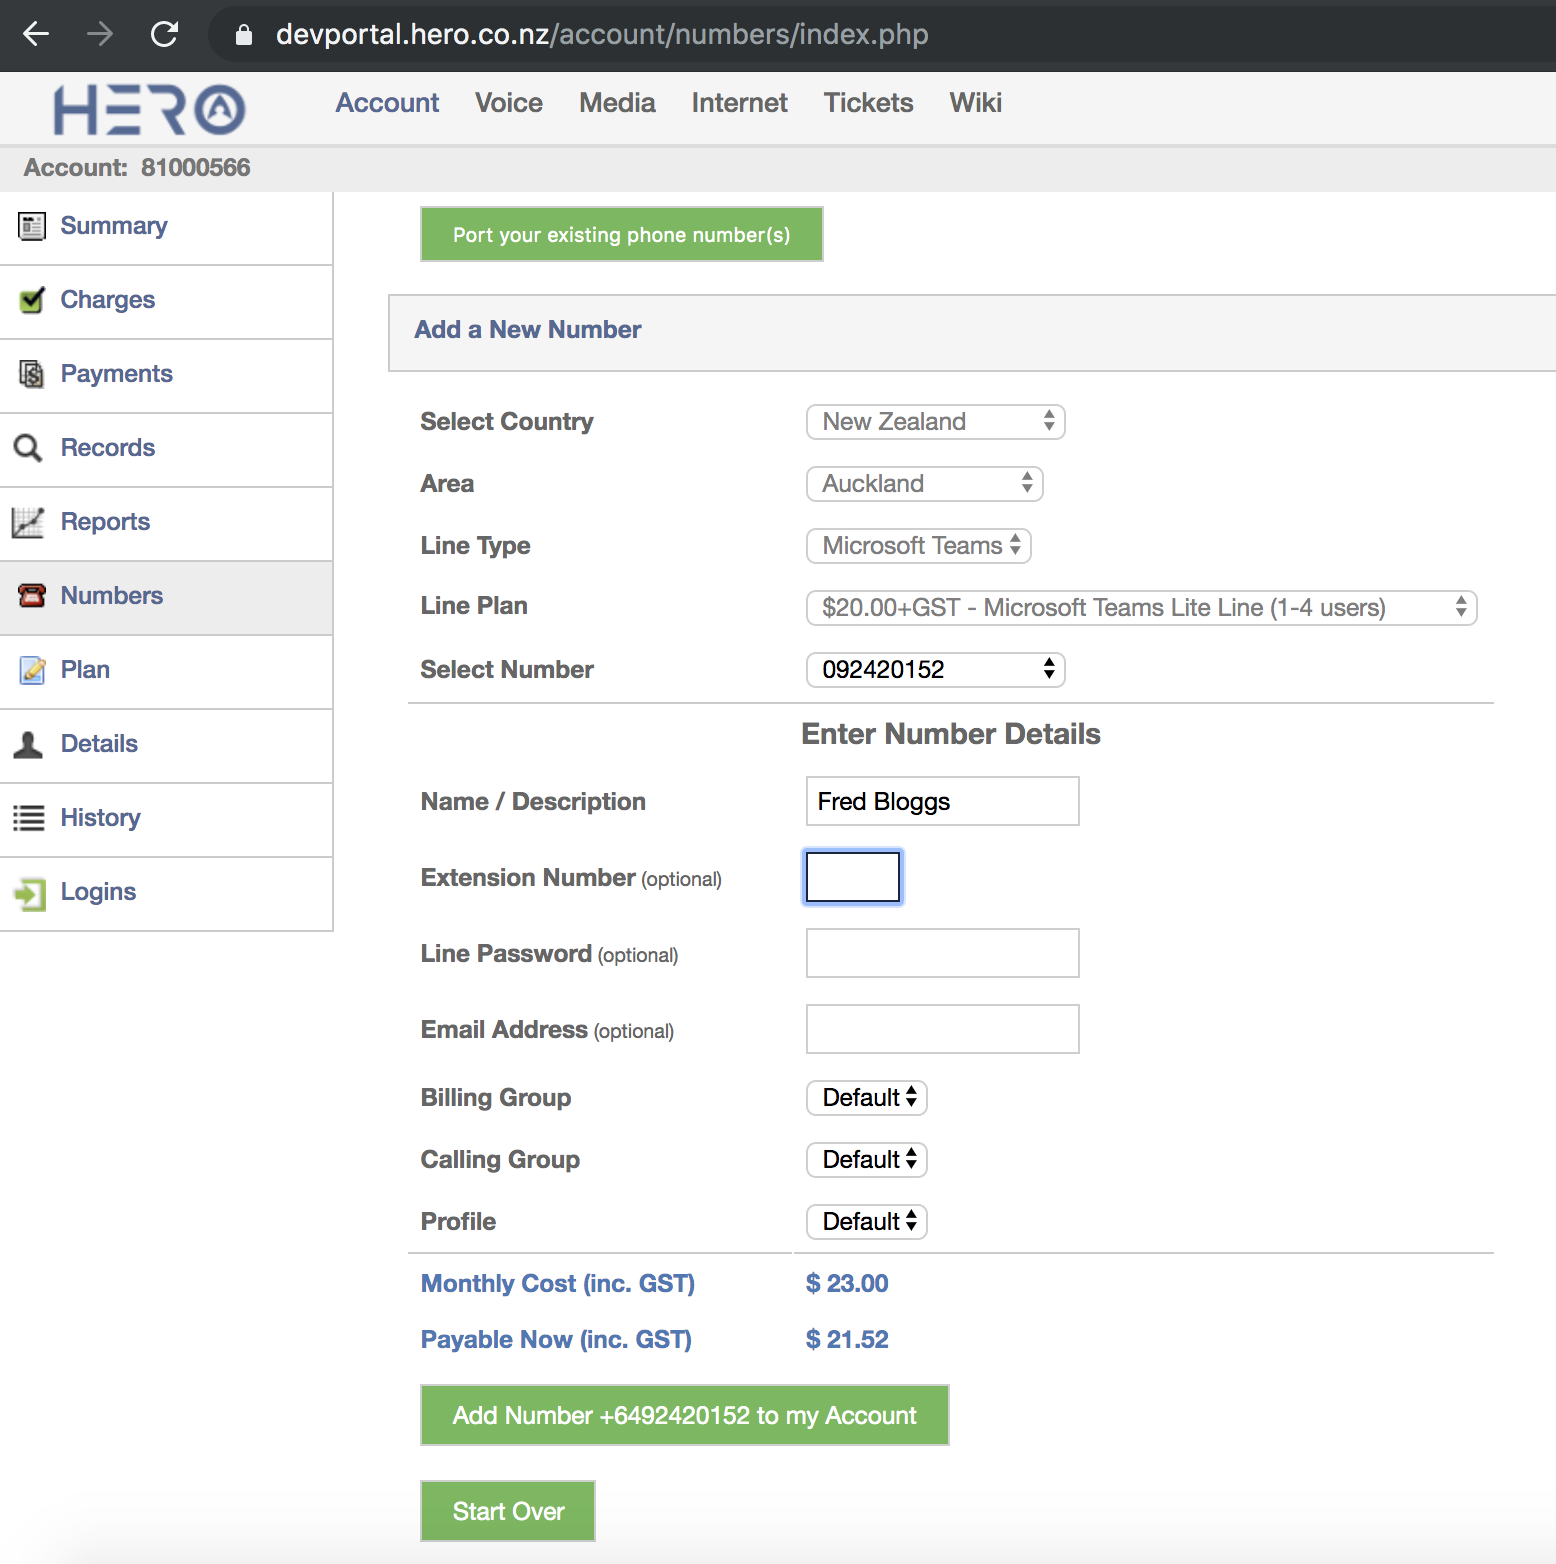
Step 49 - Continue to add numbers to your account as required. In this example the 2nd user is 'Fred Bloggs'
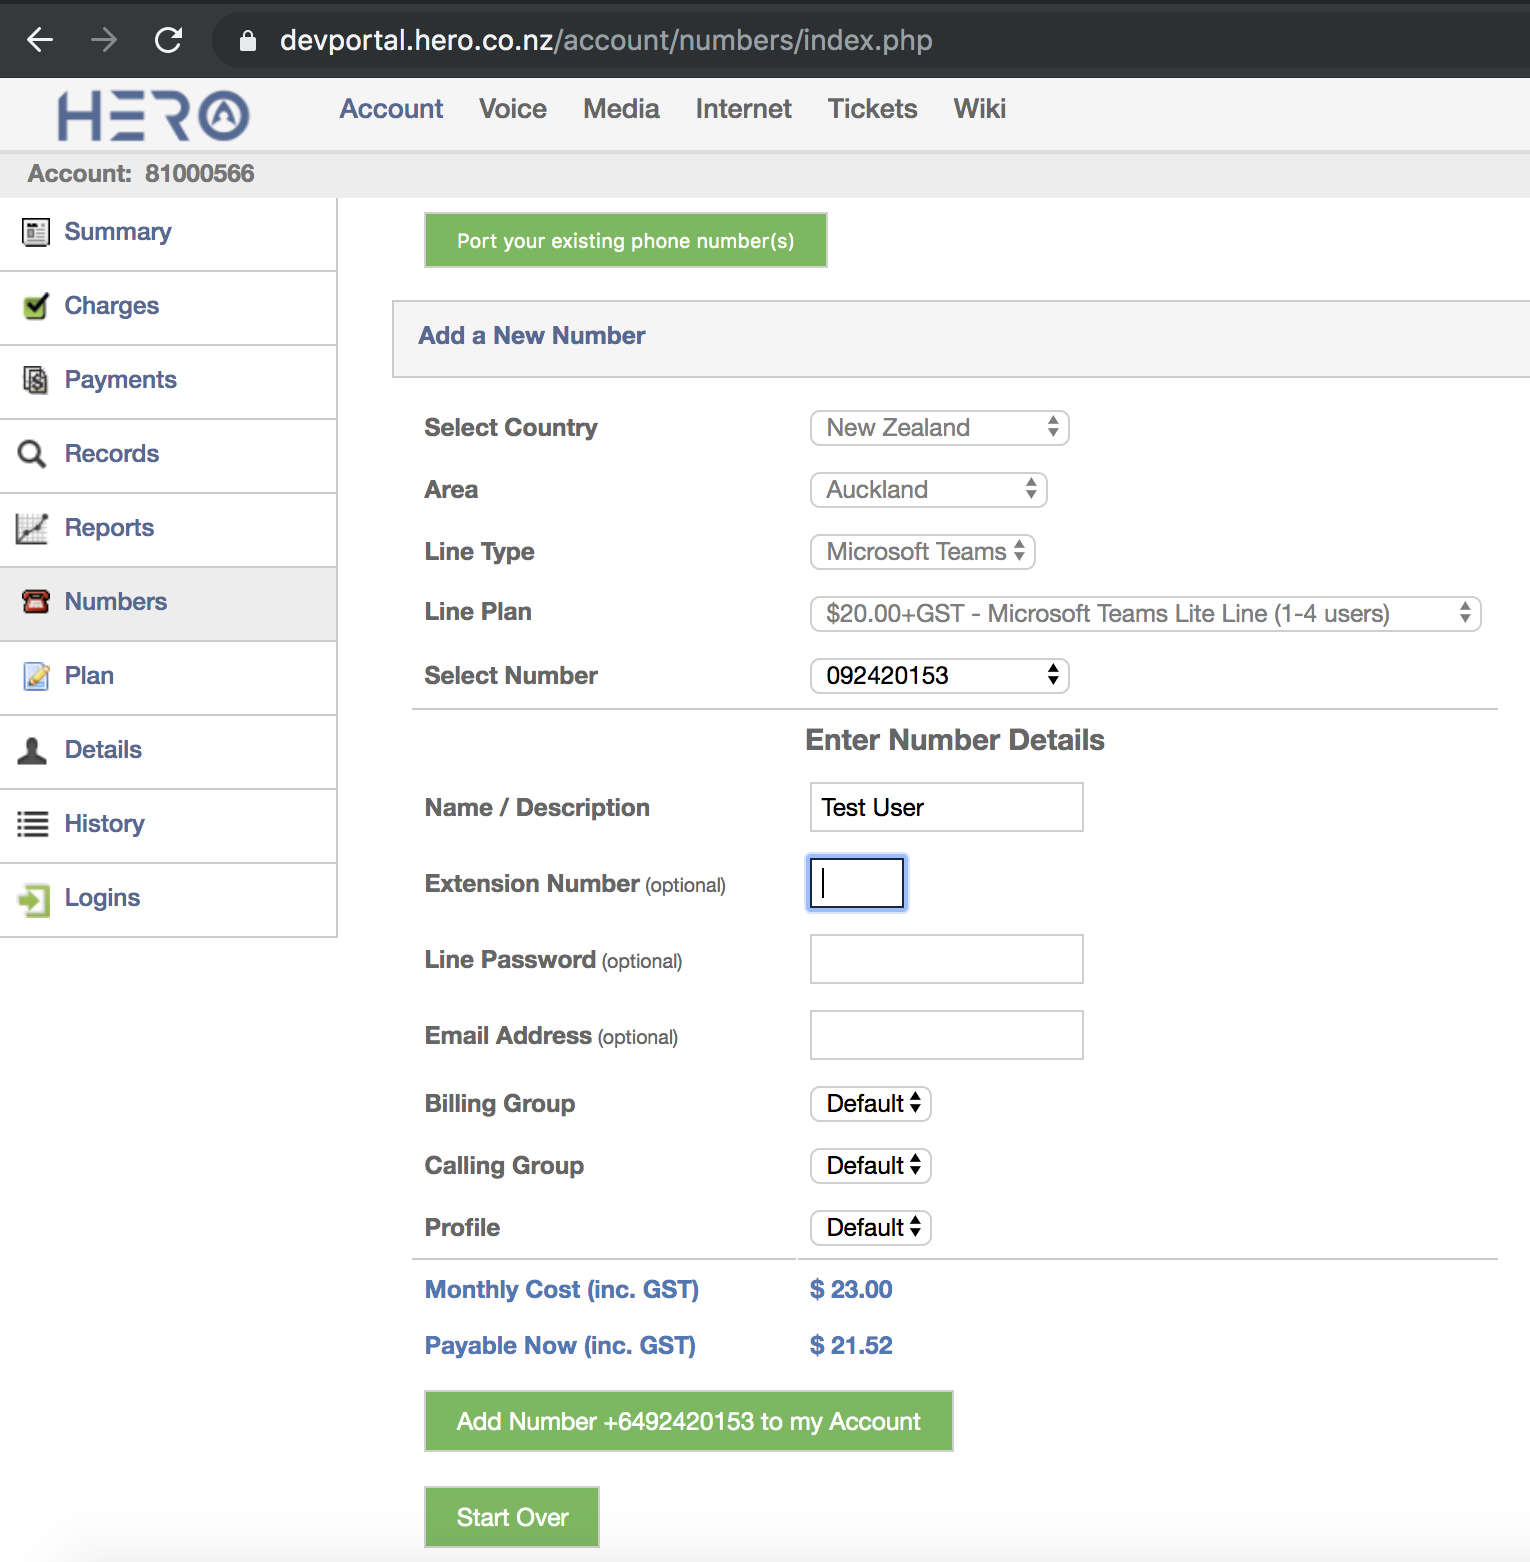
Step 50 - Finally for our example we add a 3rd user called 'Test User'
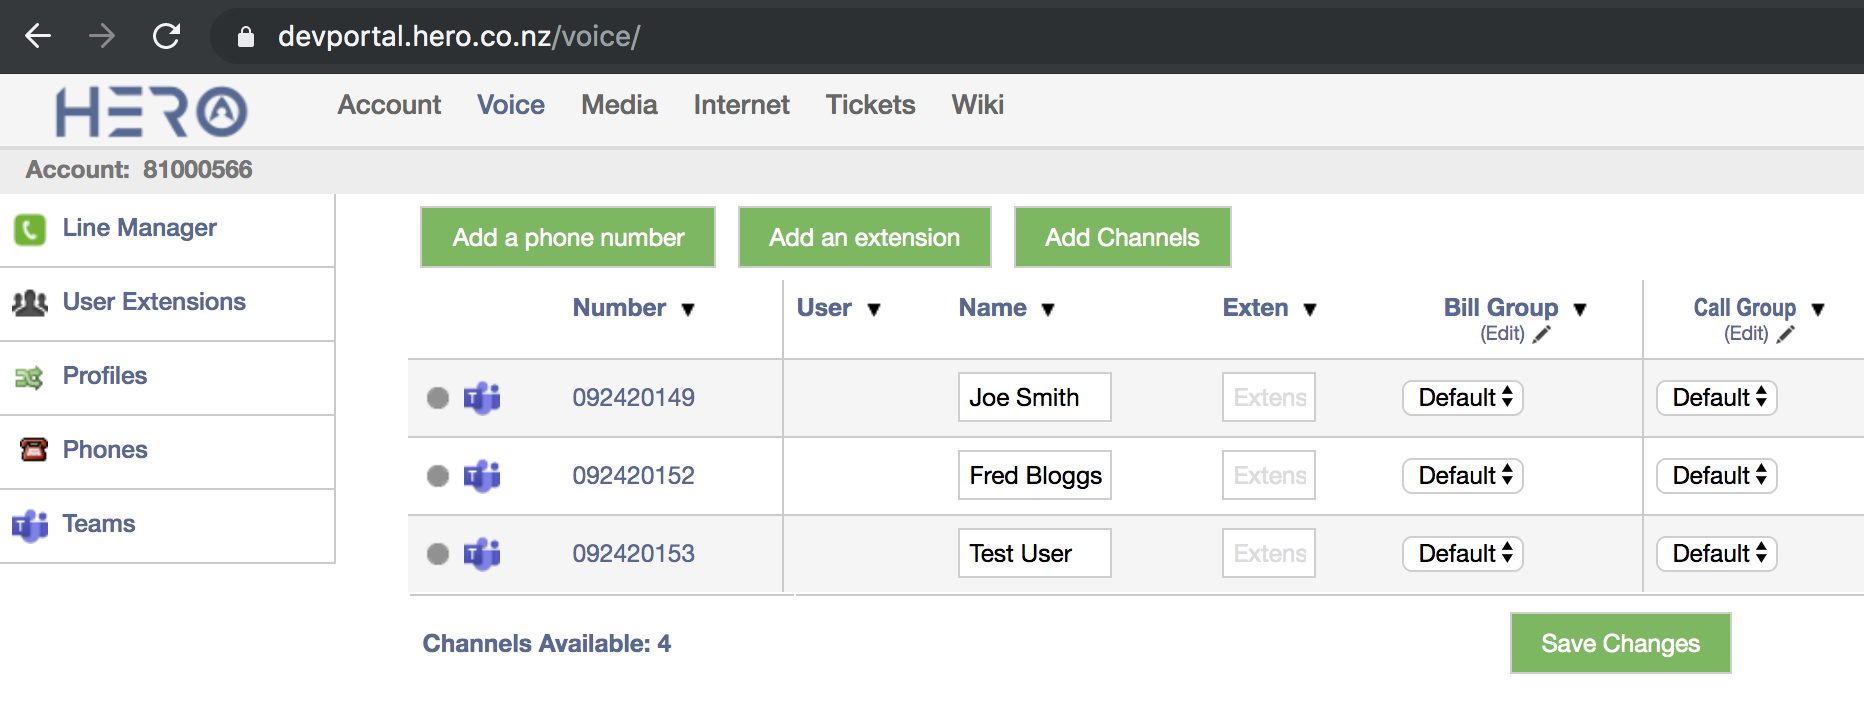
Step 51 - Click on 'Voice' tab and your Teams users should be listed with a 'Teams icon' beside them.
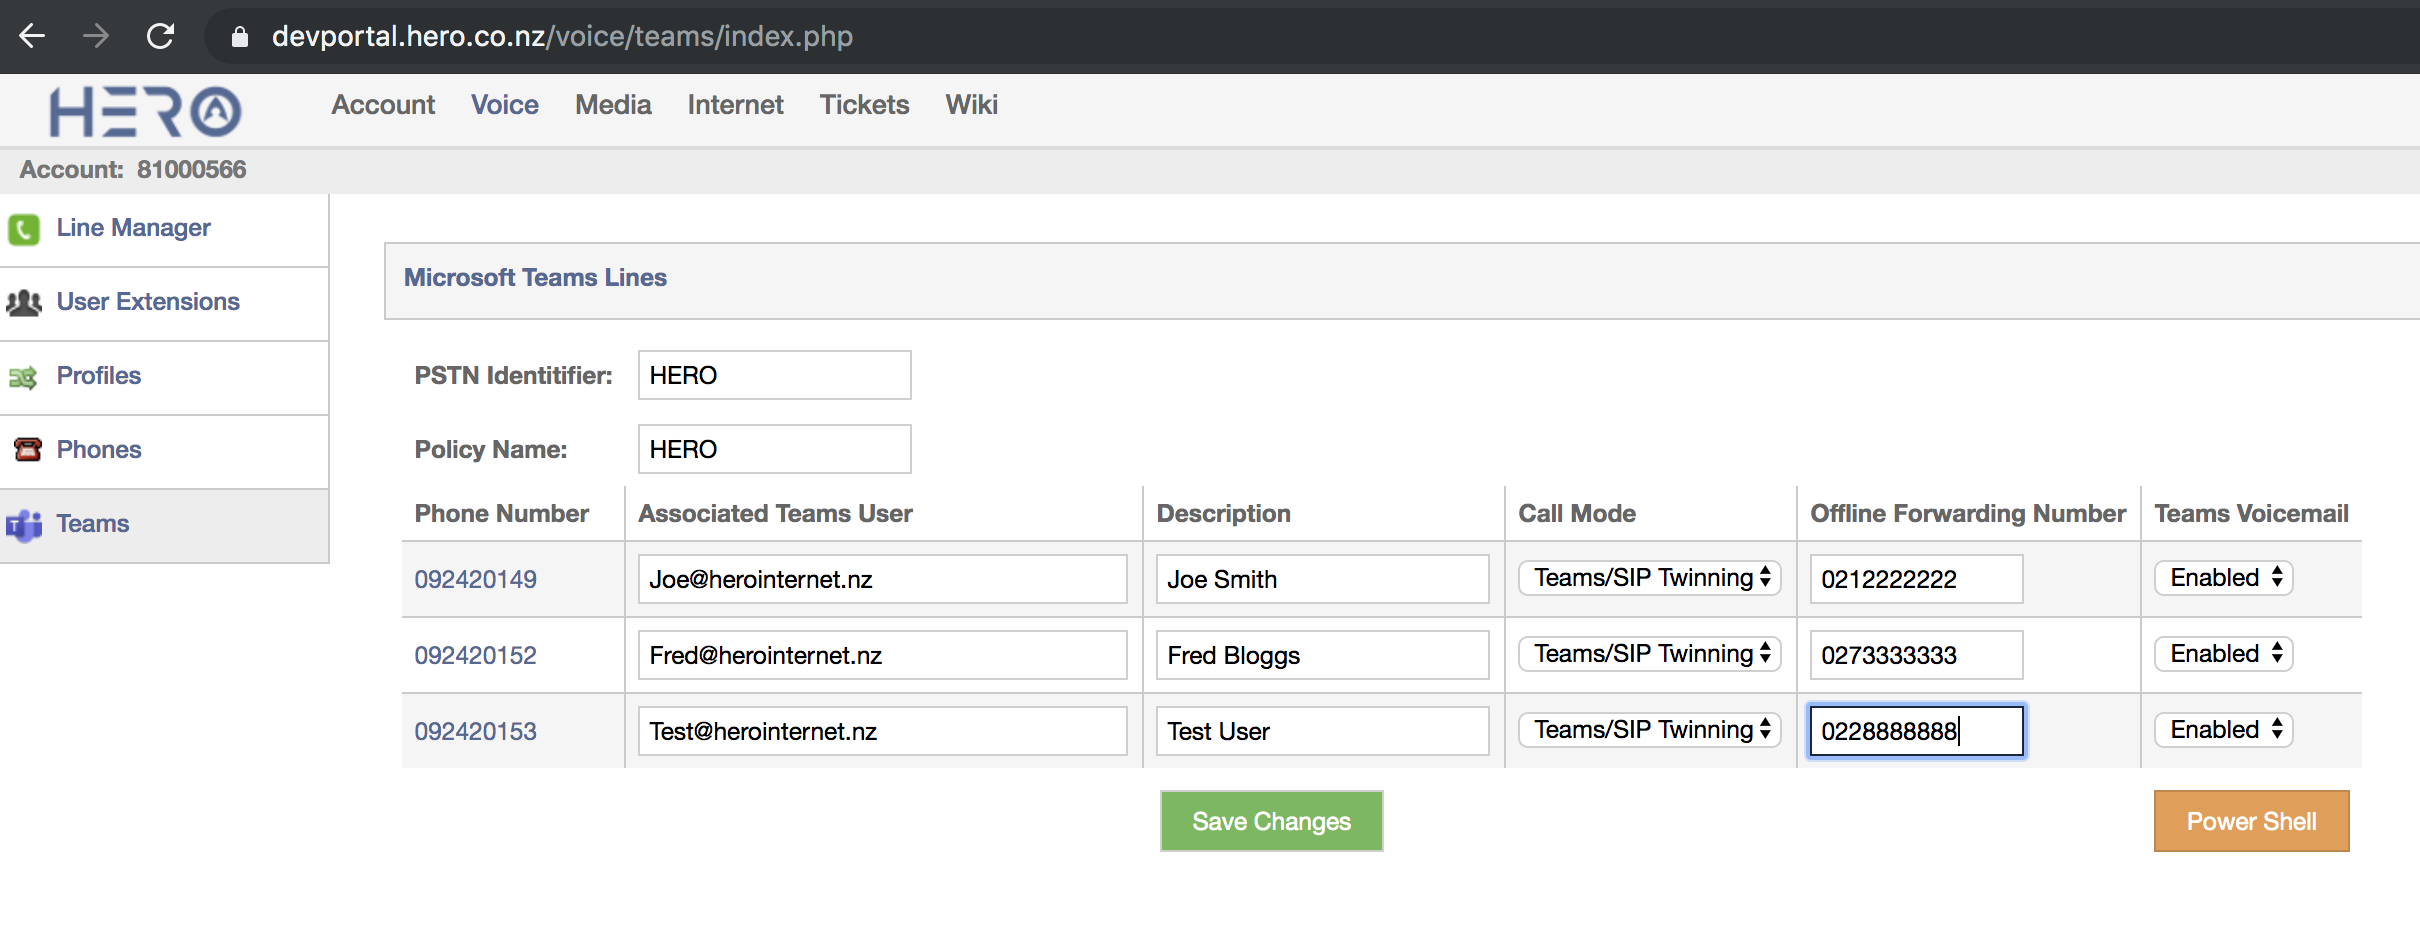
Step 52 - Now click on the 'Teams' page on the left menu
Fill in the fields against each teams number including the teams user IDs hosted in Office 365 (including the domain name e.g. Joe@herointernet.nz). You can also decide if you want to twin with a regular SIP phone or have the call failover to SIP or be hosted on Teams only. You can also decide if you want to use the Teams Voicemail system or the Hero voicemail and provide an 'offline forwarding number' for your users in case calls fail to Teams and you need to have a backup number for these users (e.g. their mobile phone number). Press 'Save Changes' when done.
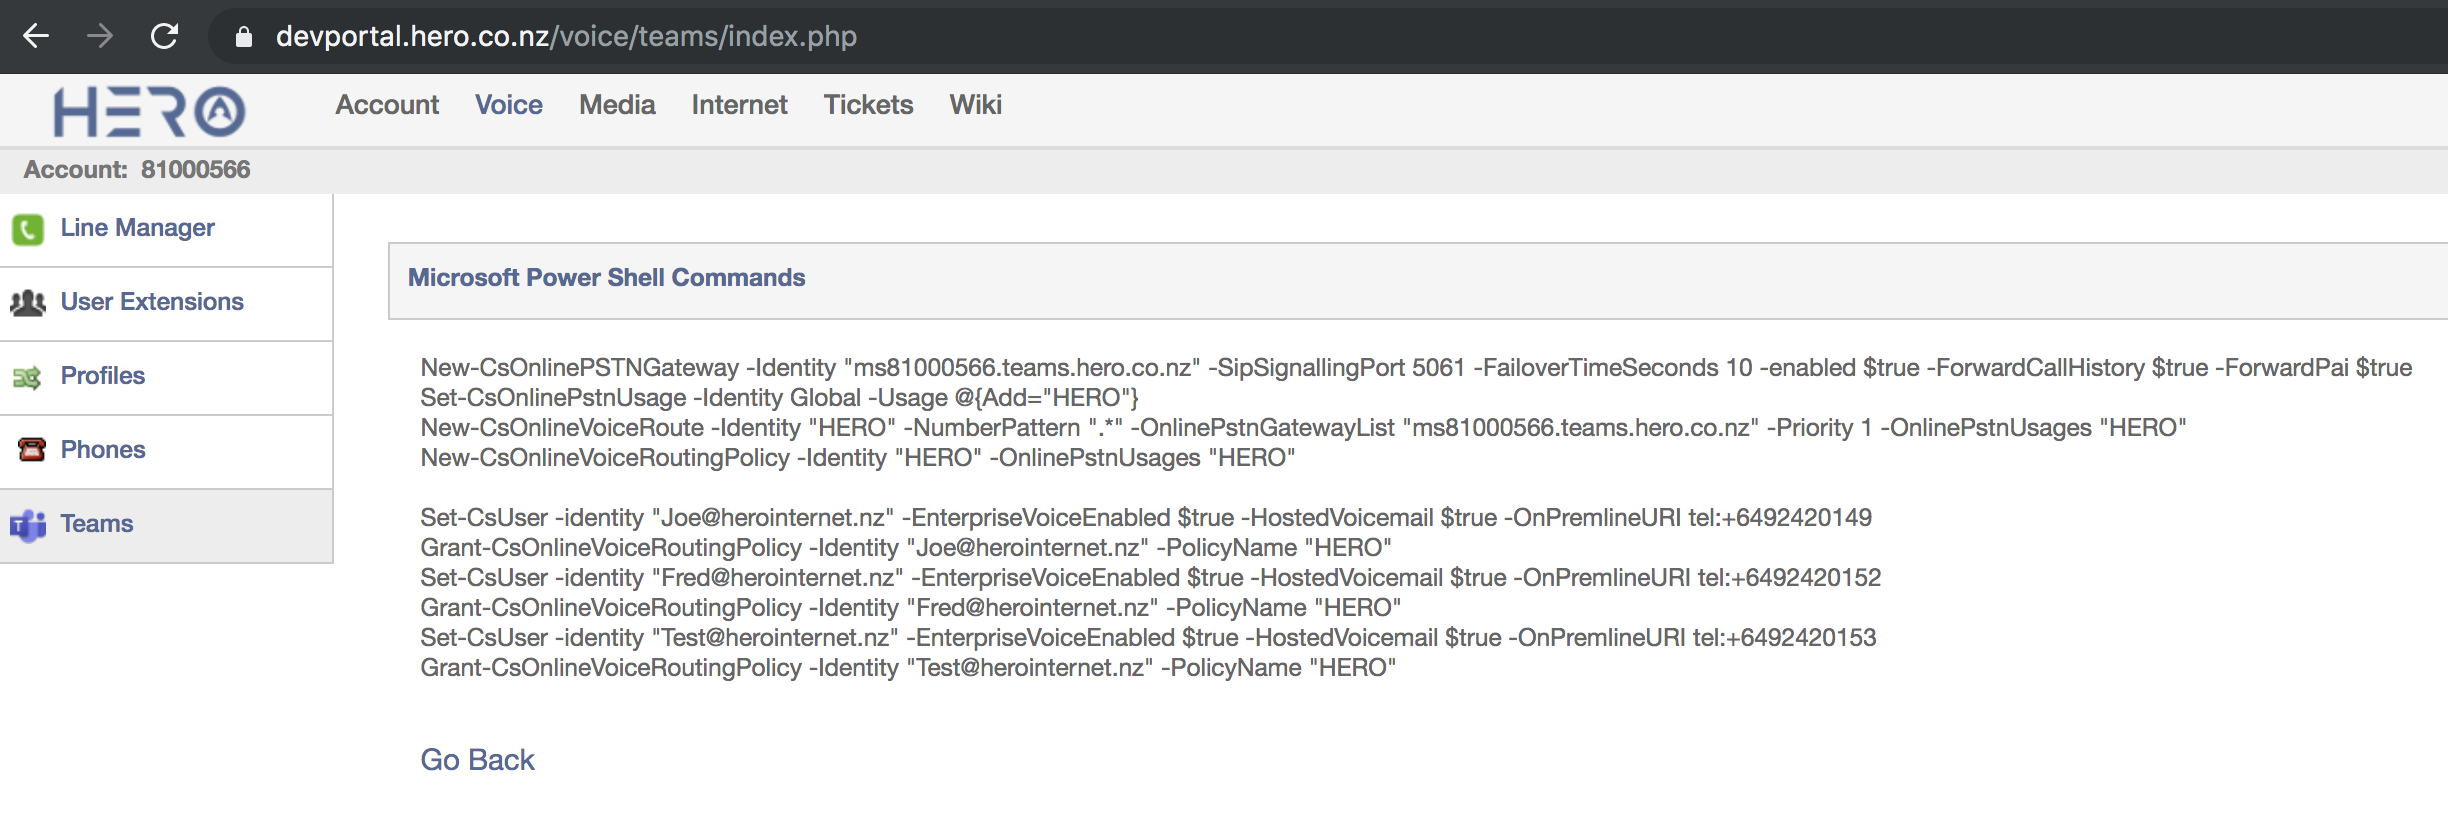
Step 53 - The following steps are for Advanced users only who understand how to use the Microsoft Power Shell. Click on 'Power Shell' to display a list of commands you need to enter.
Step 54 - Open Microsoft Power Shell
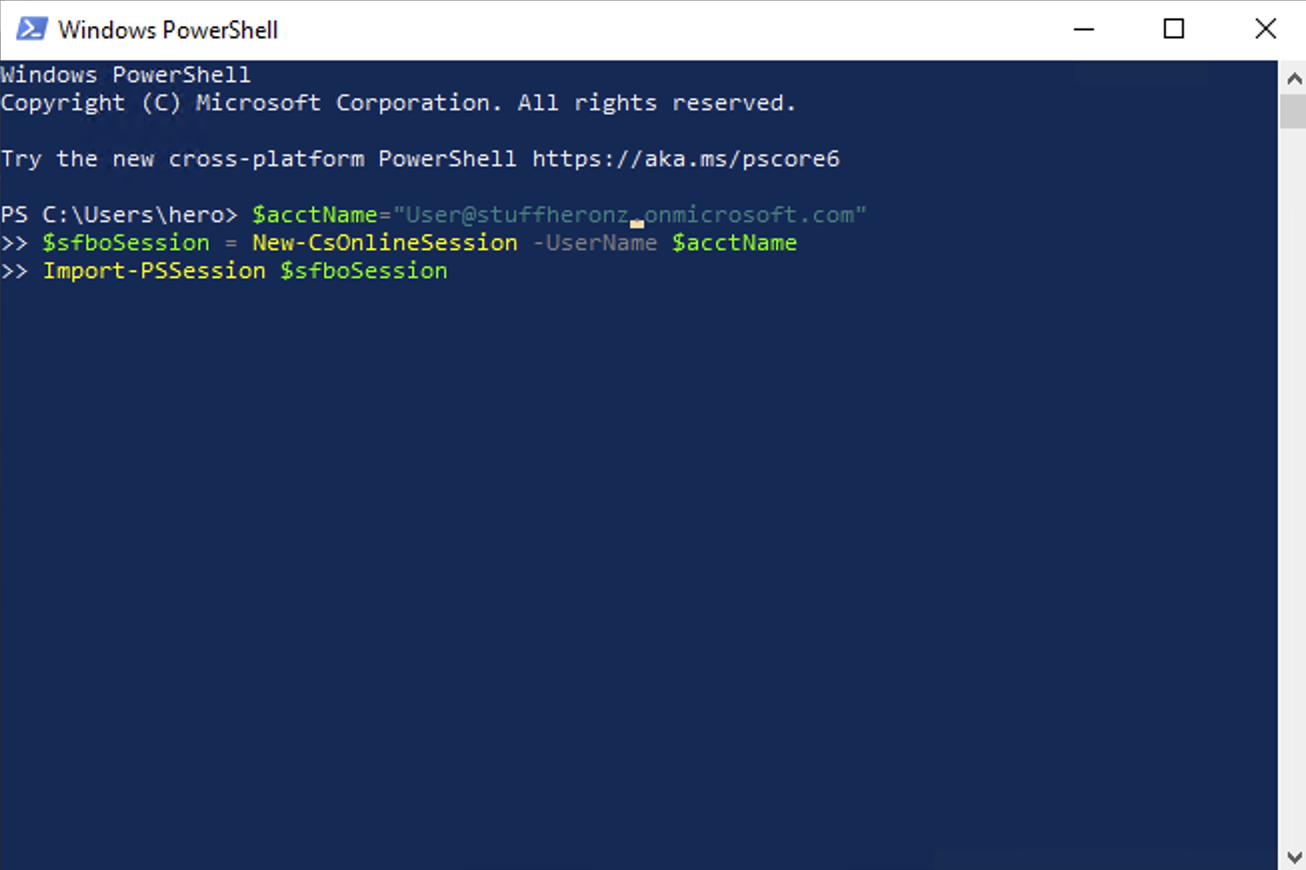
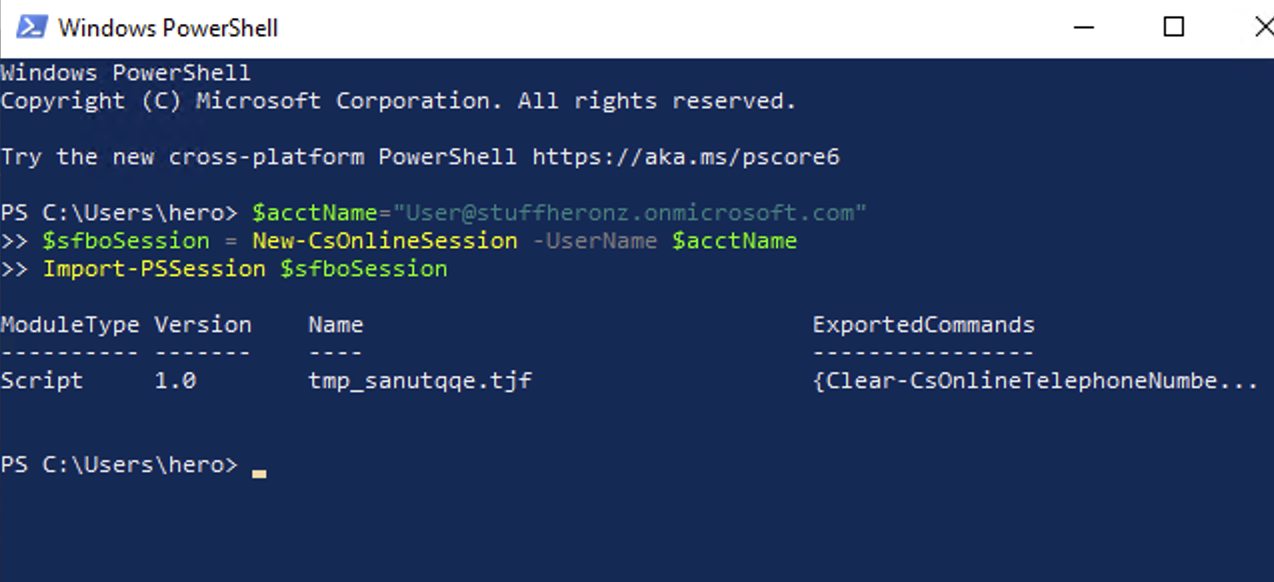
Step 55 - Login a session to Power Shell using your main Teams Admin login which you usually use to Manage your Office 365 account (created in Step 7) which you use to login to your Teams Admin Center.
The format for this command is similar to the below commands:
$acctName="User@yourdomain.onmicrosoft.com"
$sfboSession = New-CsOnlineSession -UserName $acctName
Import-PSSession $sfboSession
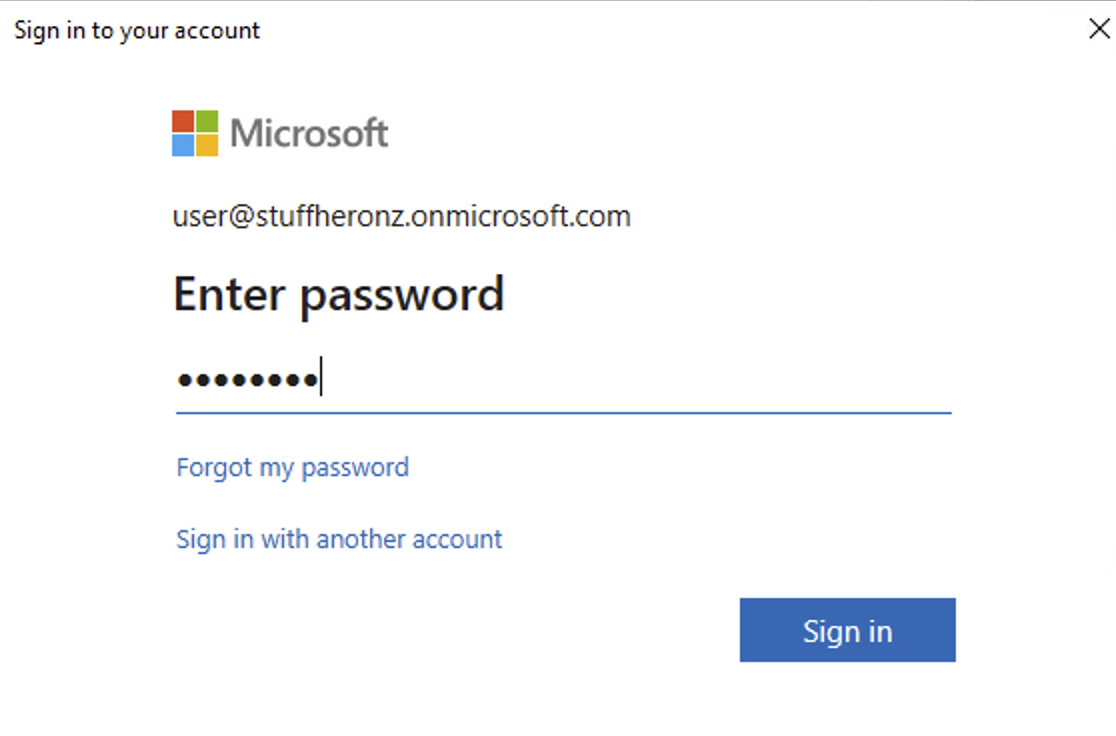
Step 56 - Enter your Microsoft User Password
Step 57 - You should now be logged into a new session in the Power Shell and can start executing commands
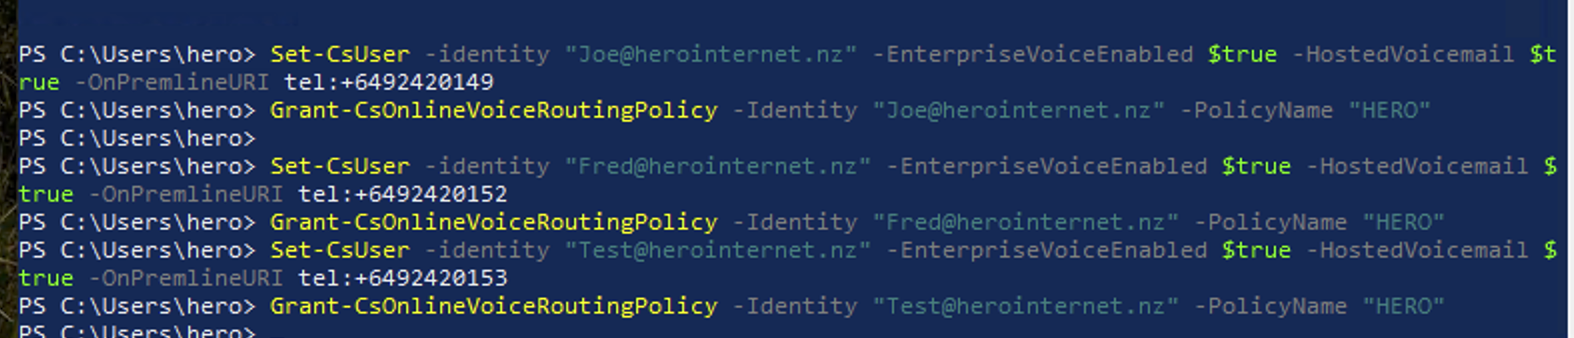
Step 58 - Now start pasting the commands from Step 53 presented in the Hero Portal. The first command adds the first user to the trunk and this needs to be done BEFORE creating the Voice Route and Policy and will look something like:
Set-CsUser -identity "User@yourdomain.co.uk" -EnterpriseVoiceEnabled $true -HostedVoicemail $true -OnPremlineURI tel:+442034567890
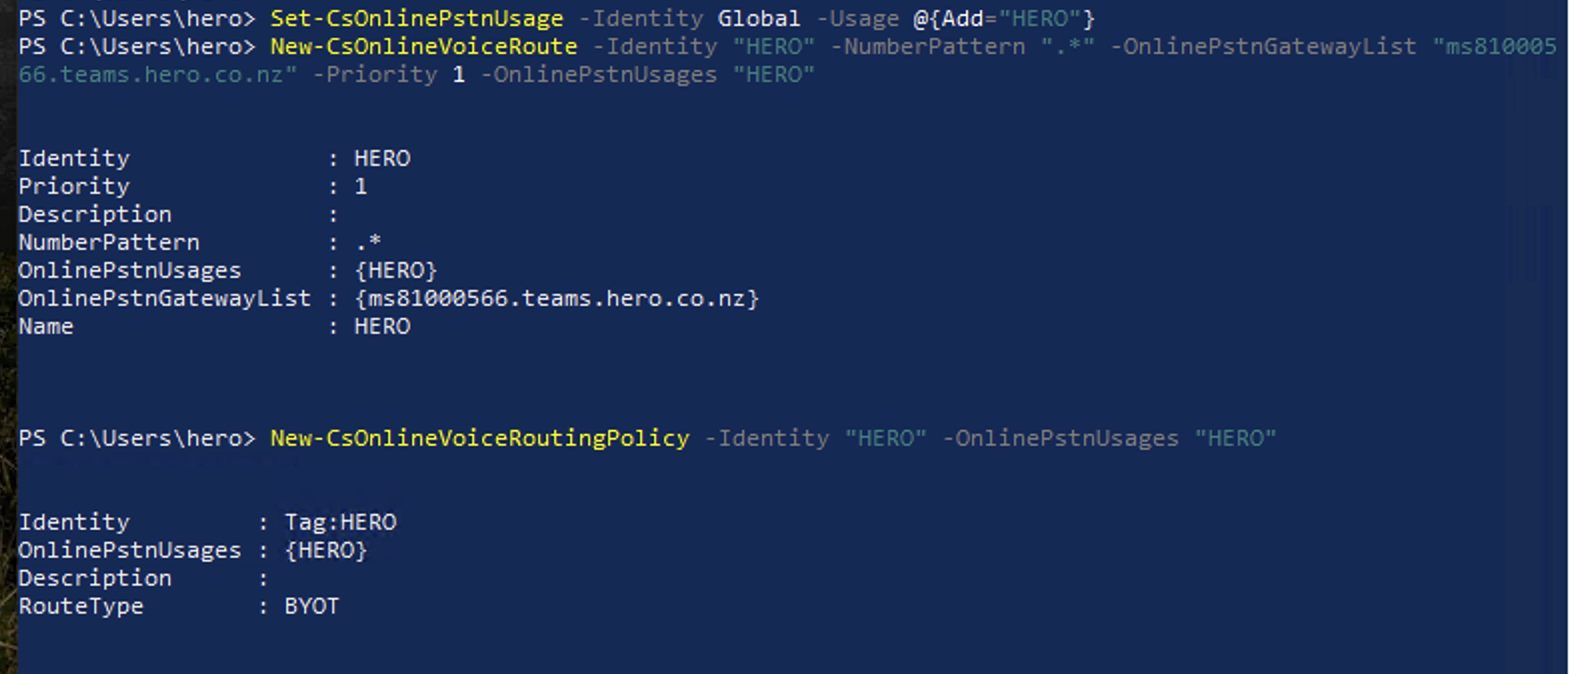
Step 59 - Next paste the other tenant commands to setup the PSTN identity and Voice route details and then assign the calling and voice routing policy to your first user. This should look something like:
Set-CsOnlinePstnUsage -Identity Global -Usage @{Add="VOIP"}
New-CsOnlineVoiceRoute -Identity "VOIP" -NumberPattern ".*" -OnlinePstnGatewayList "msxxxxxxxx.sbc.msteams.uk" -Priority 1 -OnlinePstnUsages "VOIP"
New-CsOnlineVoiceRoutingPolicy -Identity "VOIP" -OnlinePstnUsages "VOIP"
Grant-CsTeamsCallingPolicy -PolicyName AllowCalling -Identity "User@yourdomain.co.uk"
Grant-CsOnlineVoiceRoutingPolicy -Identity "User@yourdomain.co.uk" -PolicyName "VOIP"
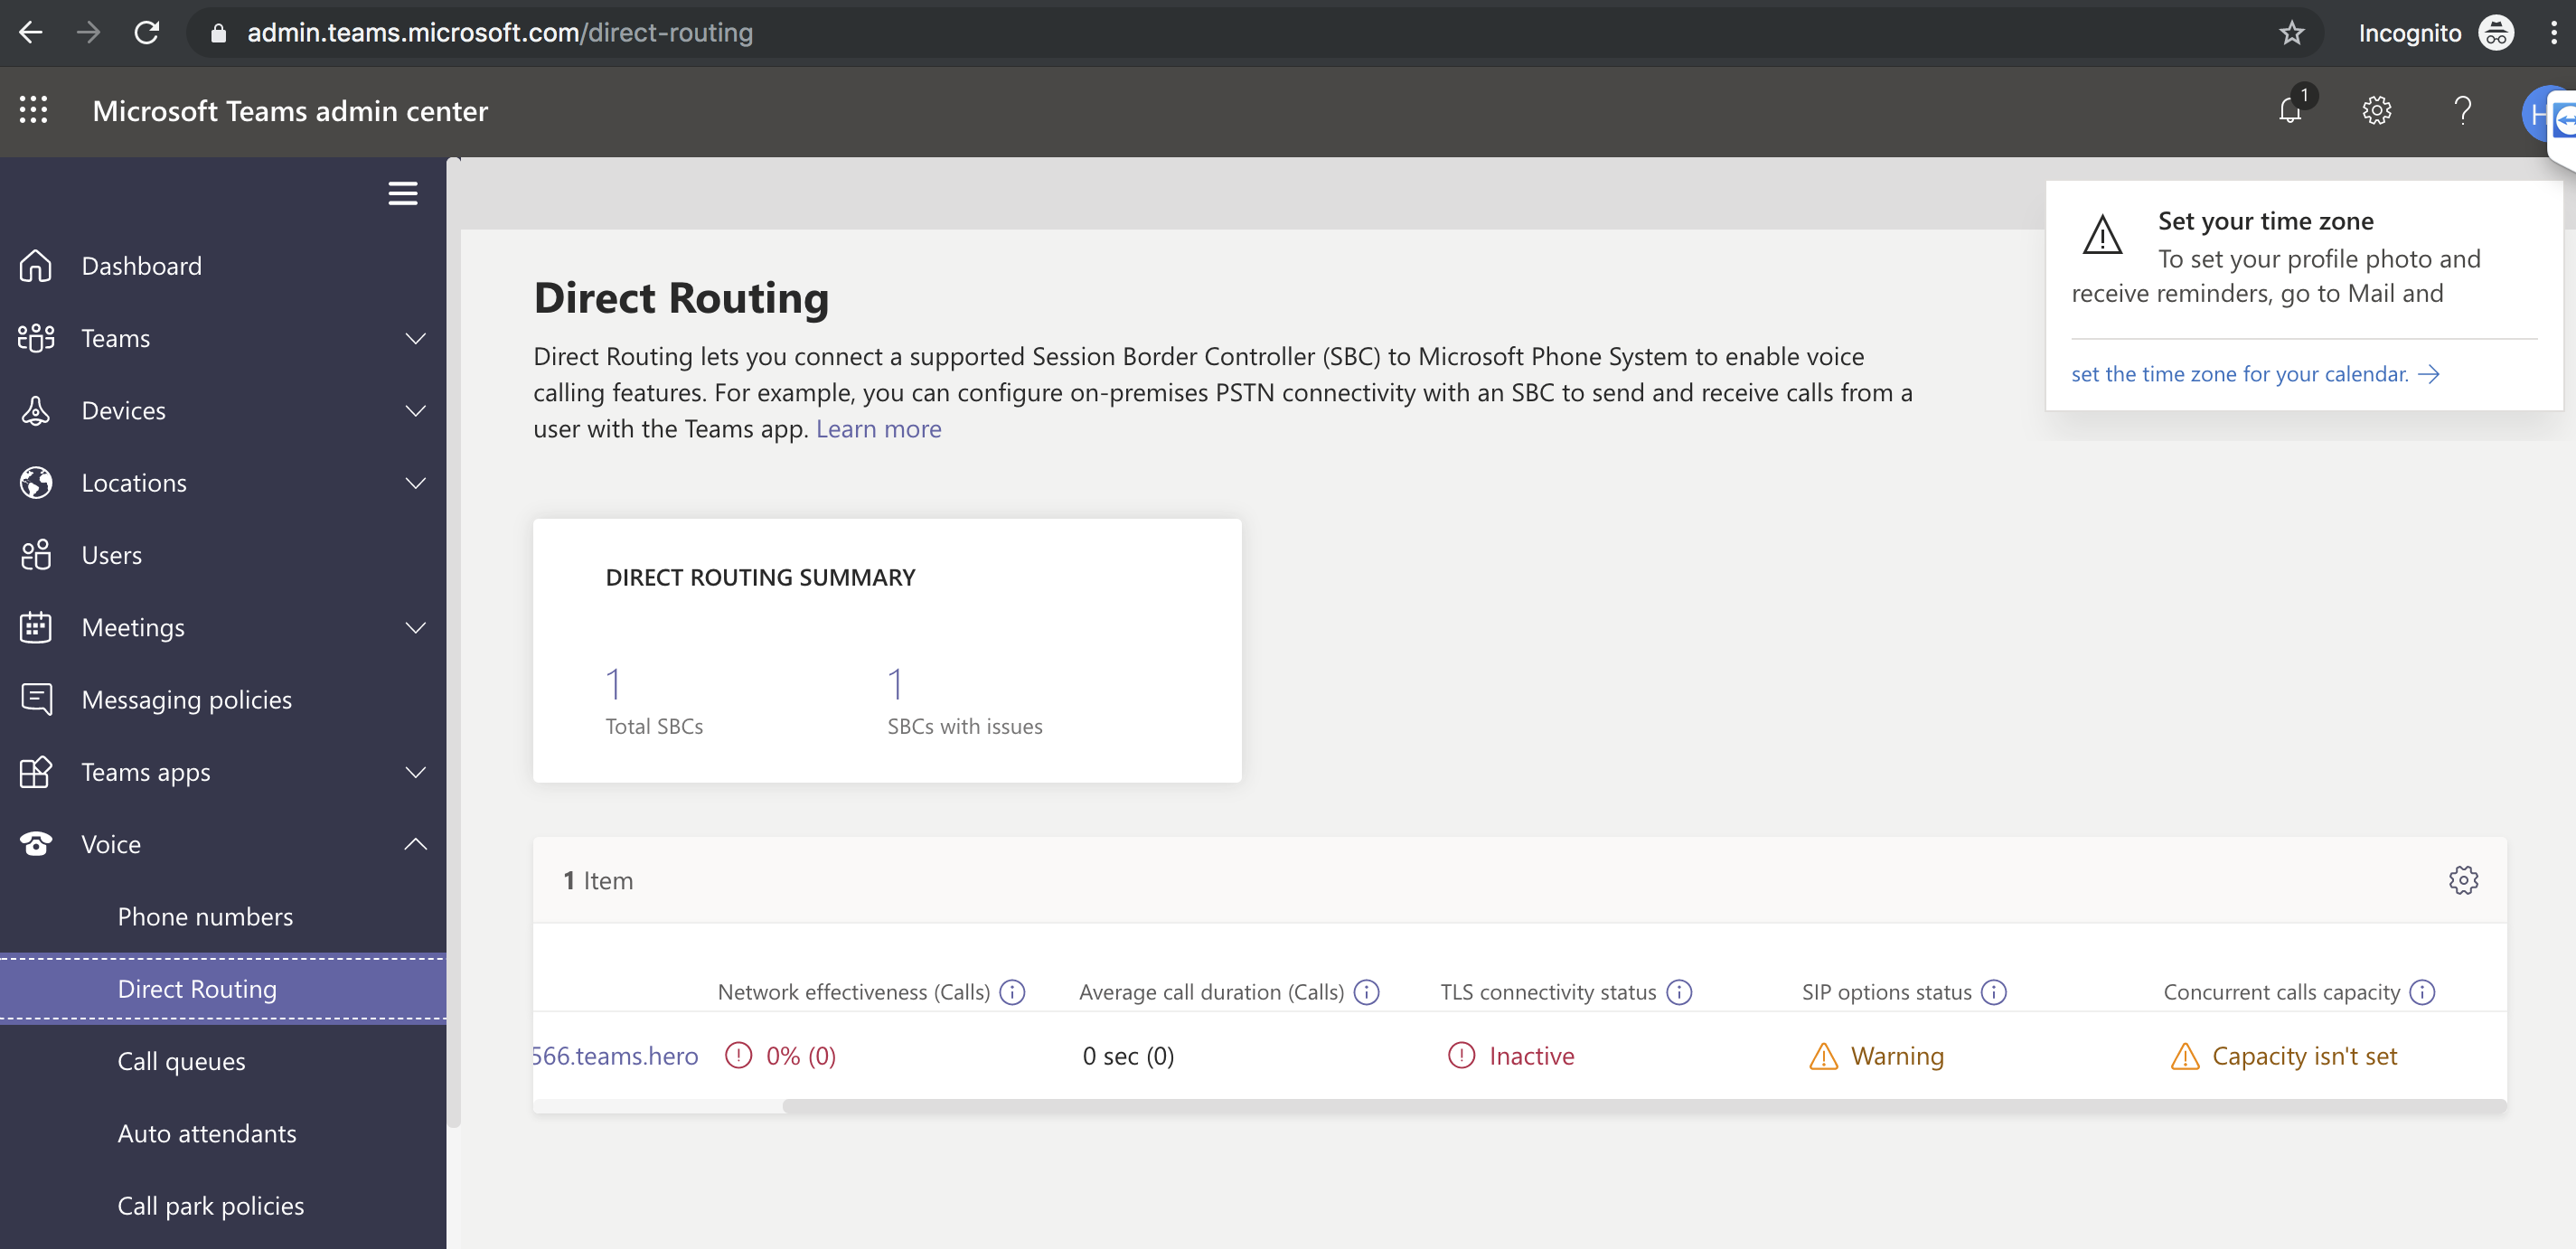
Step 60 - Check your trunk status
If the commands above ran okay with no errors then you can check the status of your SBC trunk by visiting the Microsoft Teams Admin Portal - Direct Routing page at the following link:
https://admin.teams.microsoft.com/direct-routing/v2
Your trunk should show TLS Connectivity Status as 'Active' and SIP Options status as 'Active'. It can often take an hour or more for the trunk to become active, so please be patient. Once the trunk is active you can delete the temporary trunk user you created to free up the phone system license for other users.
Now, if you have more than just 1 user you can paste the Set-CsUser and Grant commands to associate of them them with a phone number and profile. The commands for each user will look something like:
Set-CsUser -identity "User@yourdomain.co.uk" -EnterpriseVoiceEnabled $true -HostedVoicemail $true -OnPremlineURI tel:+442034567890
Grant-CsTeamsCallingPolicy -PolicyName AllowCalling -Identity "User@yourdomain.co.uk"
Grant-CsOnlineVoiceRoutingPolicy -Identity "User@yourdomain.co.uk" -PolicyName "VOIP"
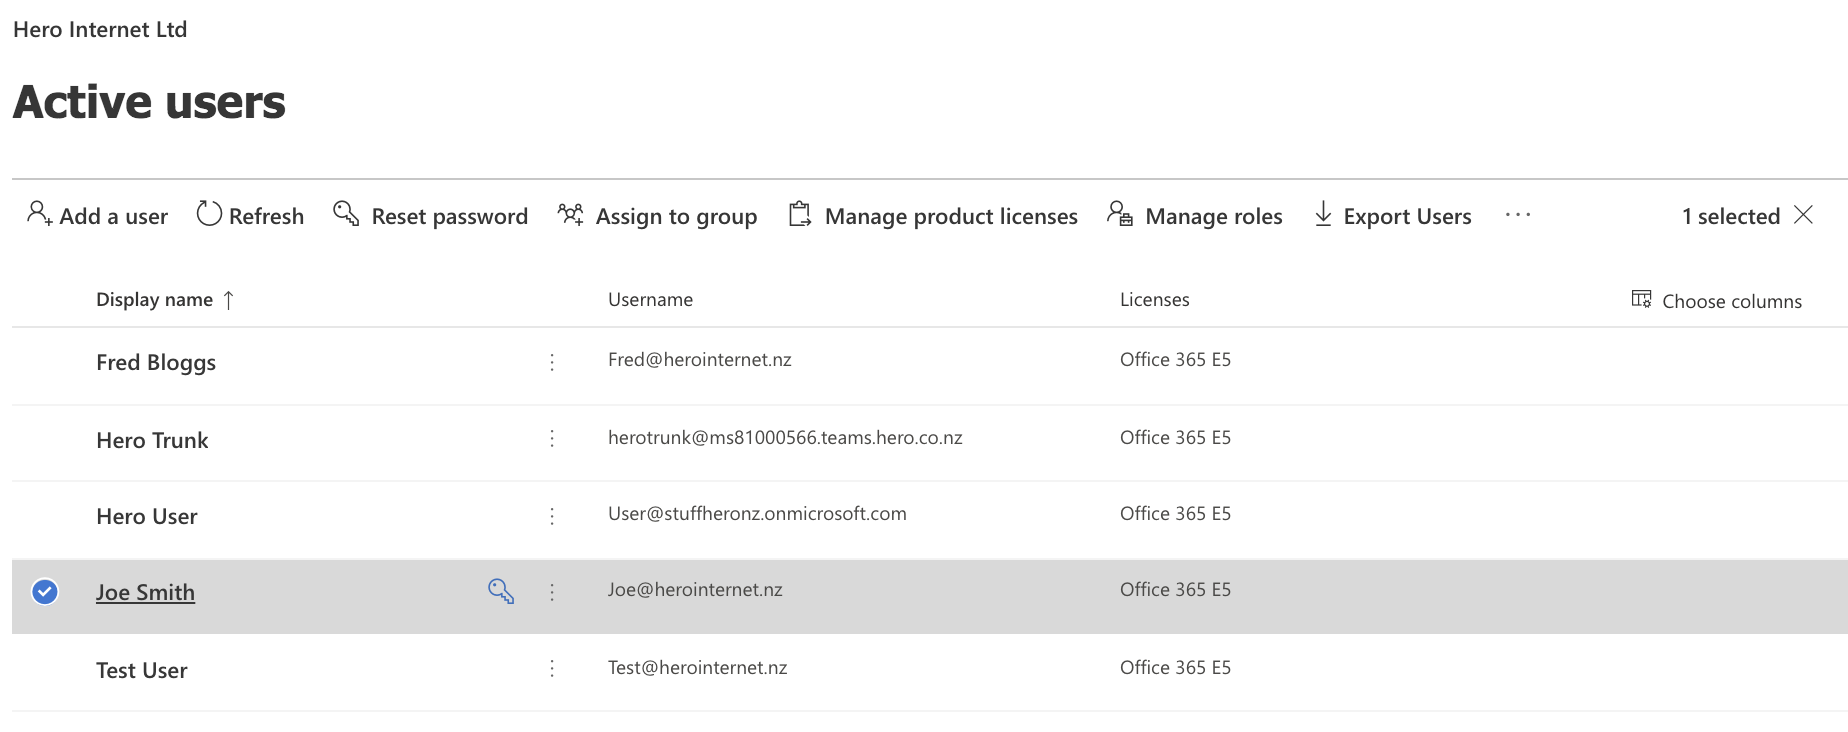
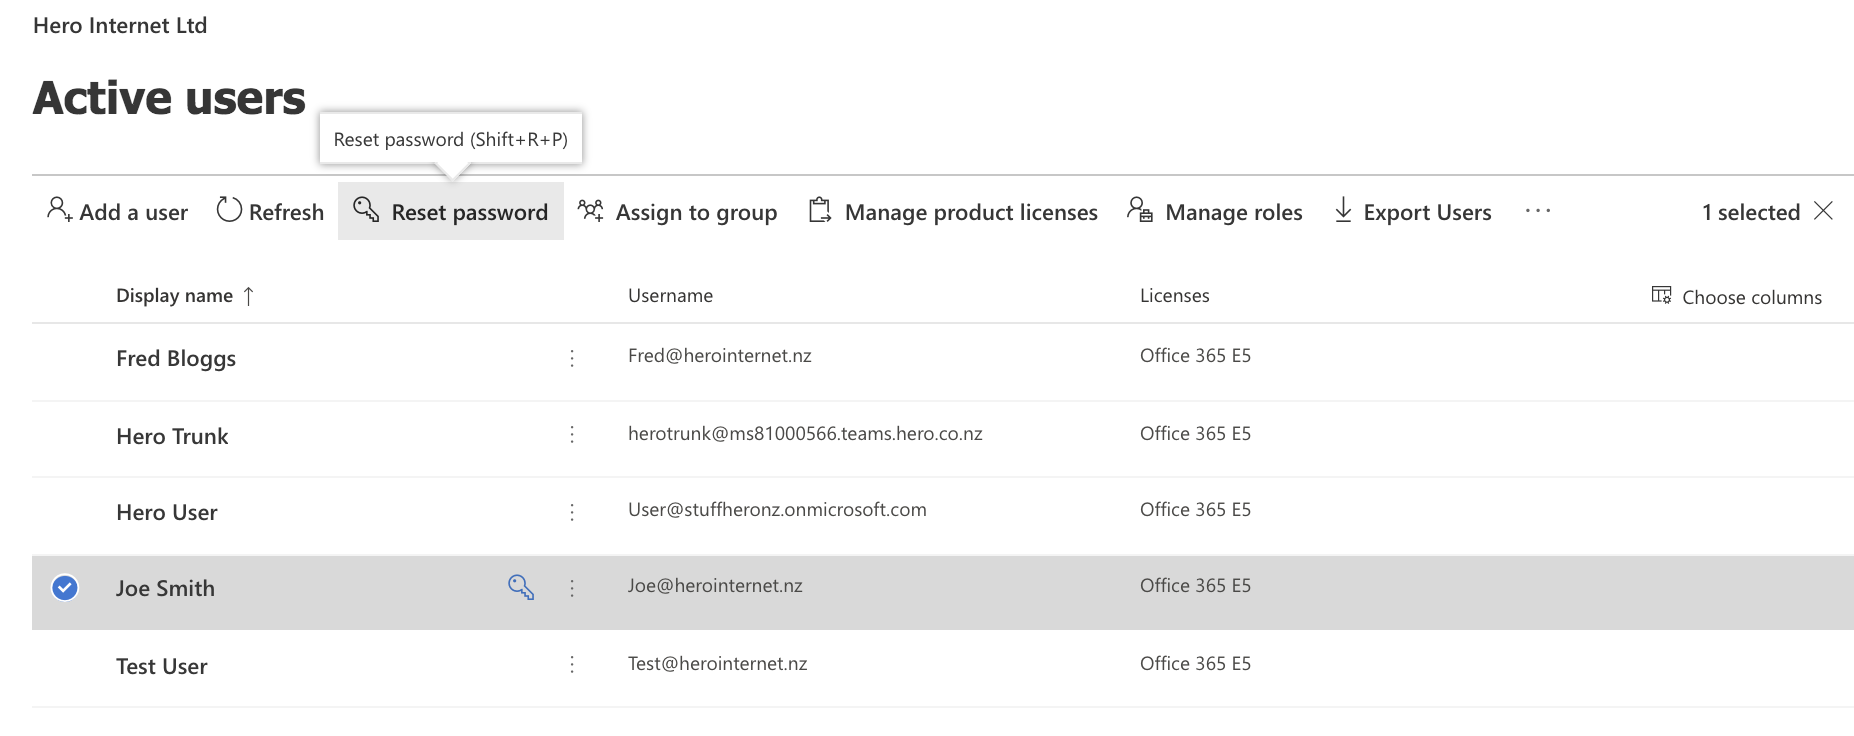
Step 61 - Now go back to the Active Users page in the 'Admin Center' and if required set a password for your users otherwise move to Step 66
Step 62 - To set a password for your users select a user and click on Reset Password
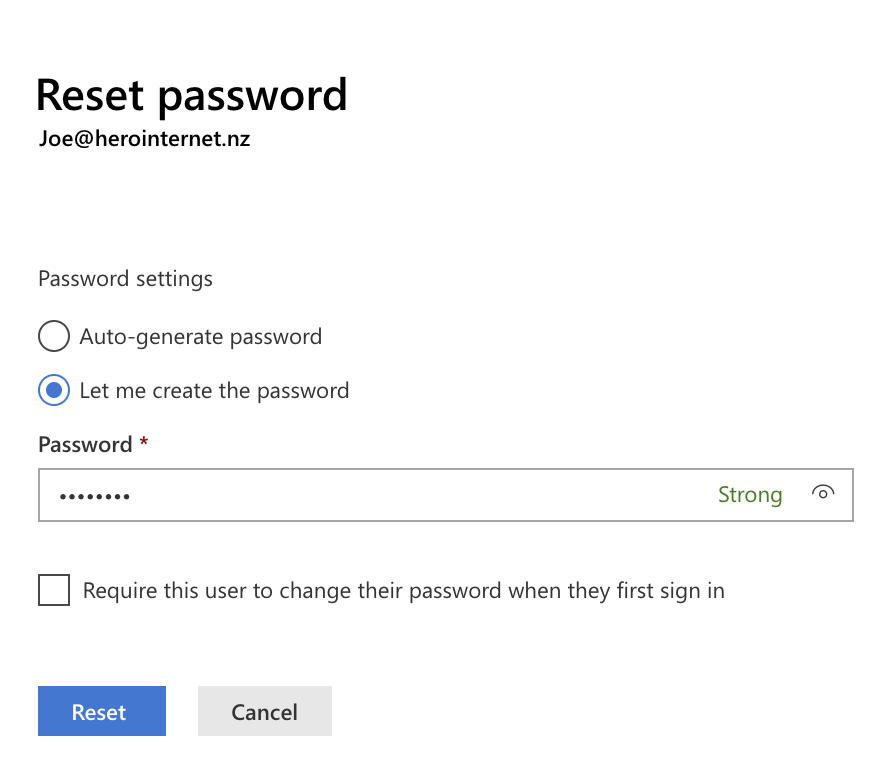
Step 63 - Select 'Let me create the password' and enter a new password (in this example for Joe)
Step 64 - Click the Reset button to reset the password
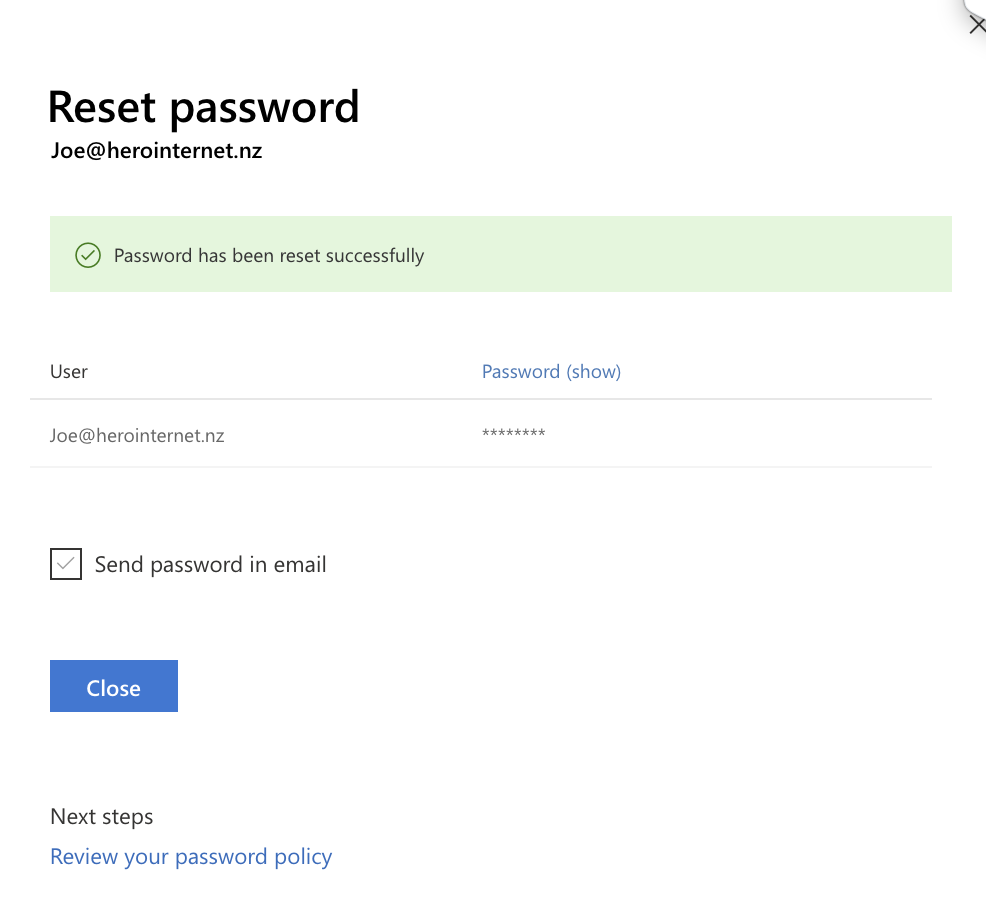
Step 65 - Once you have confirmation that the password has been reset you are ready to login to Teams
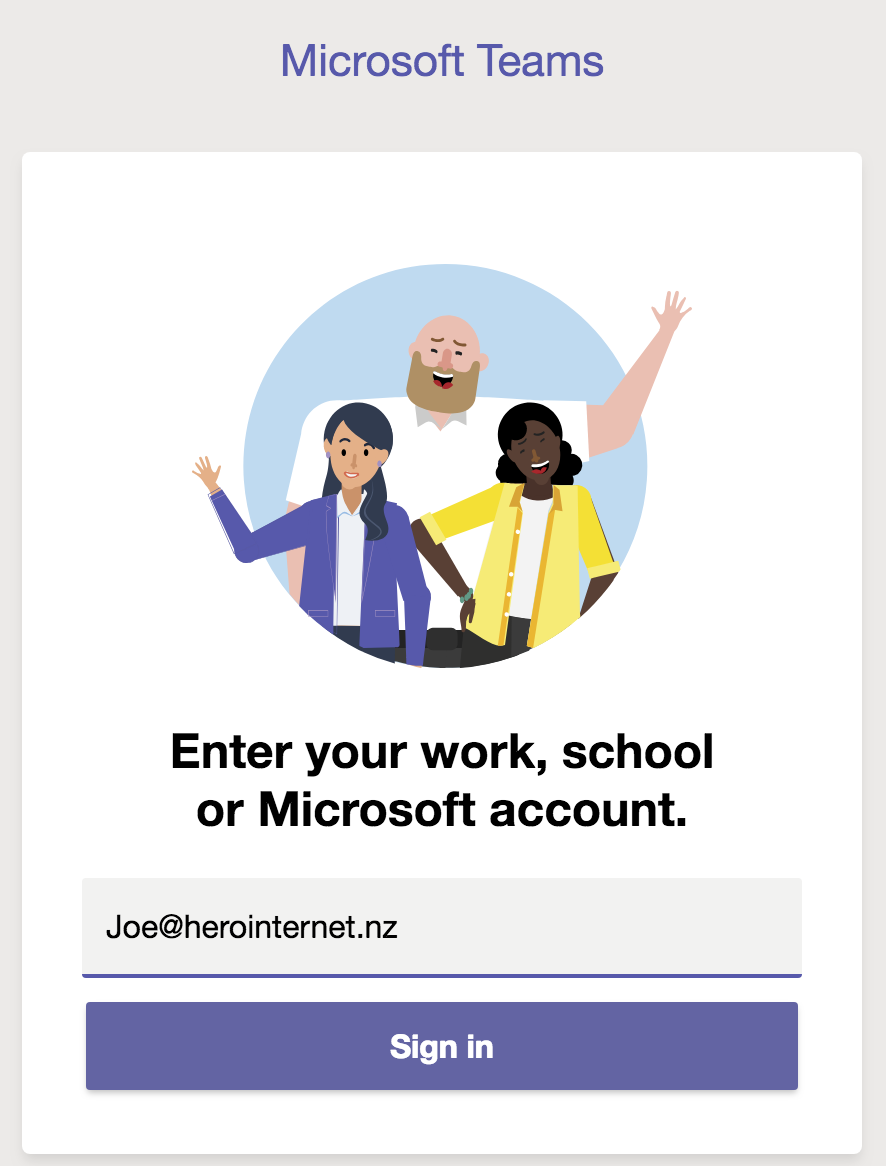
Step 66 - Download the Teams client for your PC, Mac or Smartphone and login using your User ID (e.g. Joe@herointernetnz.nz)
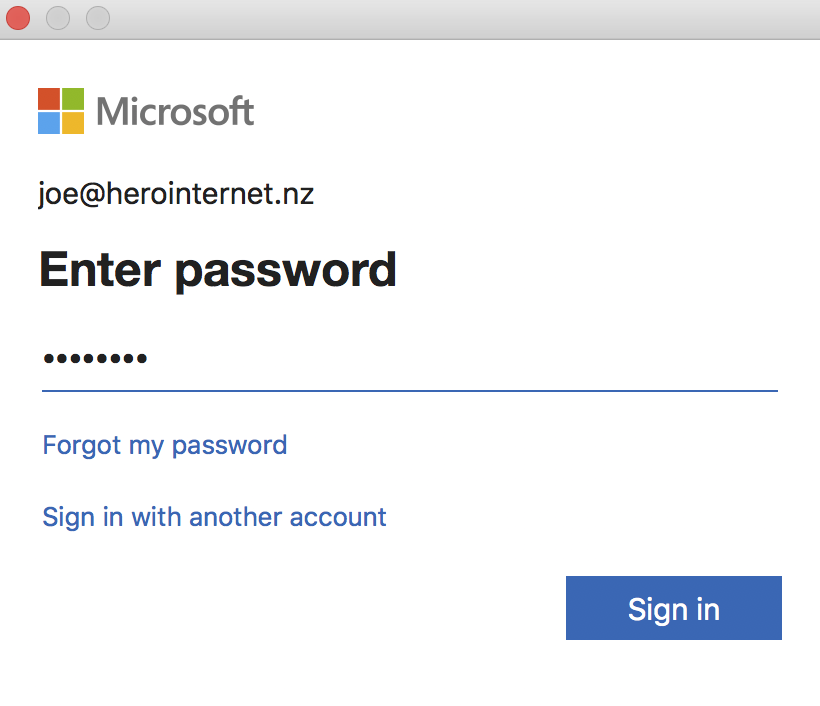
Step 67 - Enter your Teams password to login
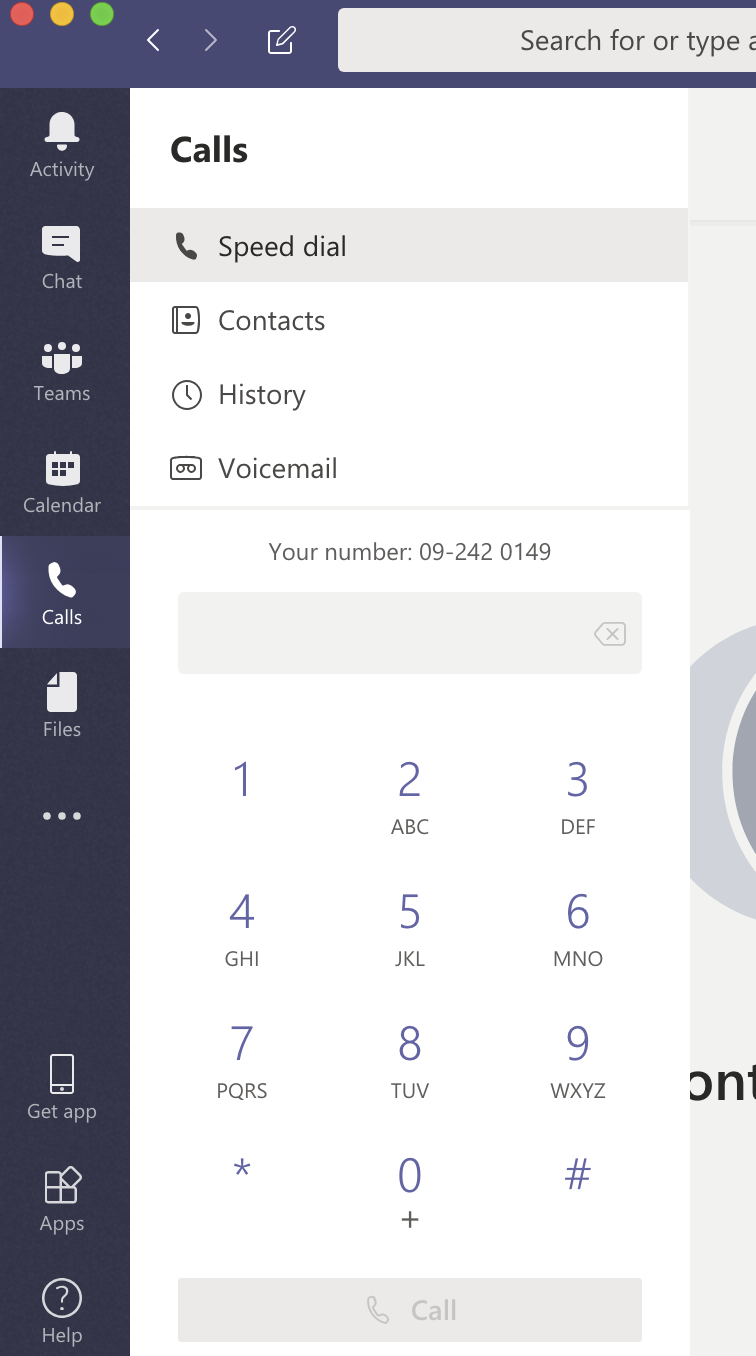
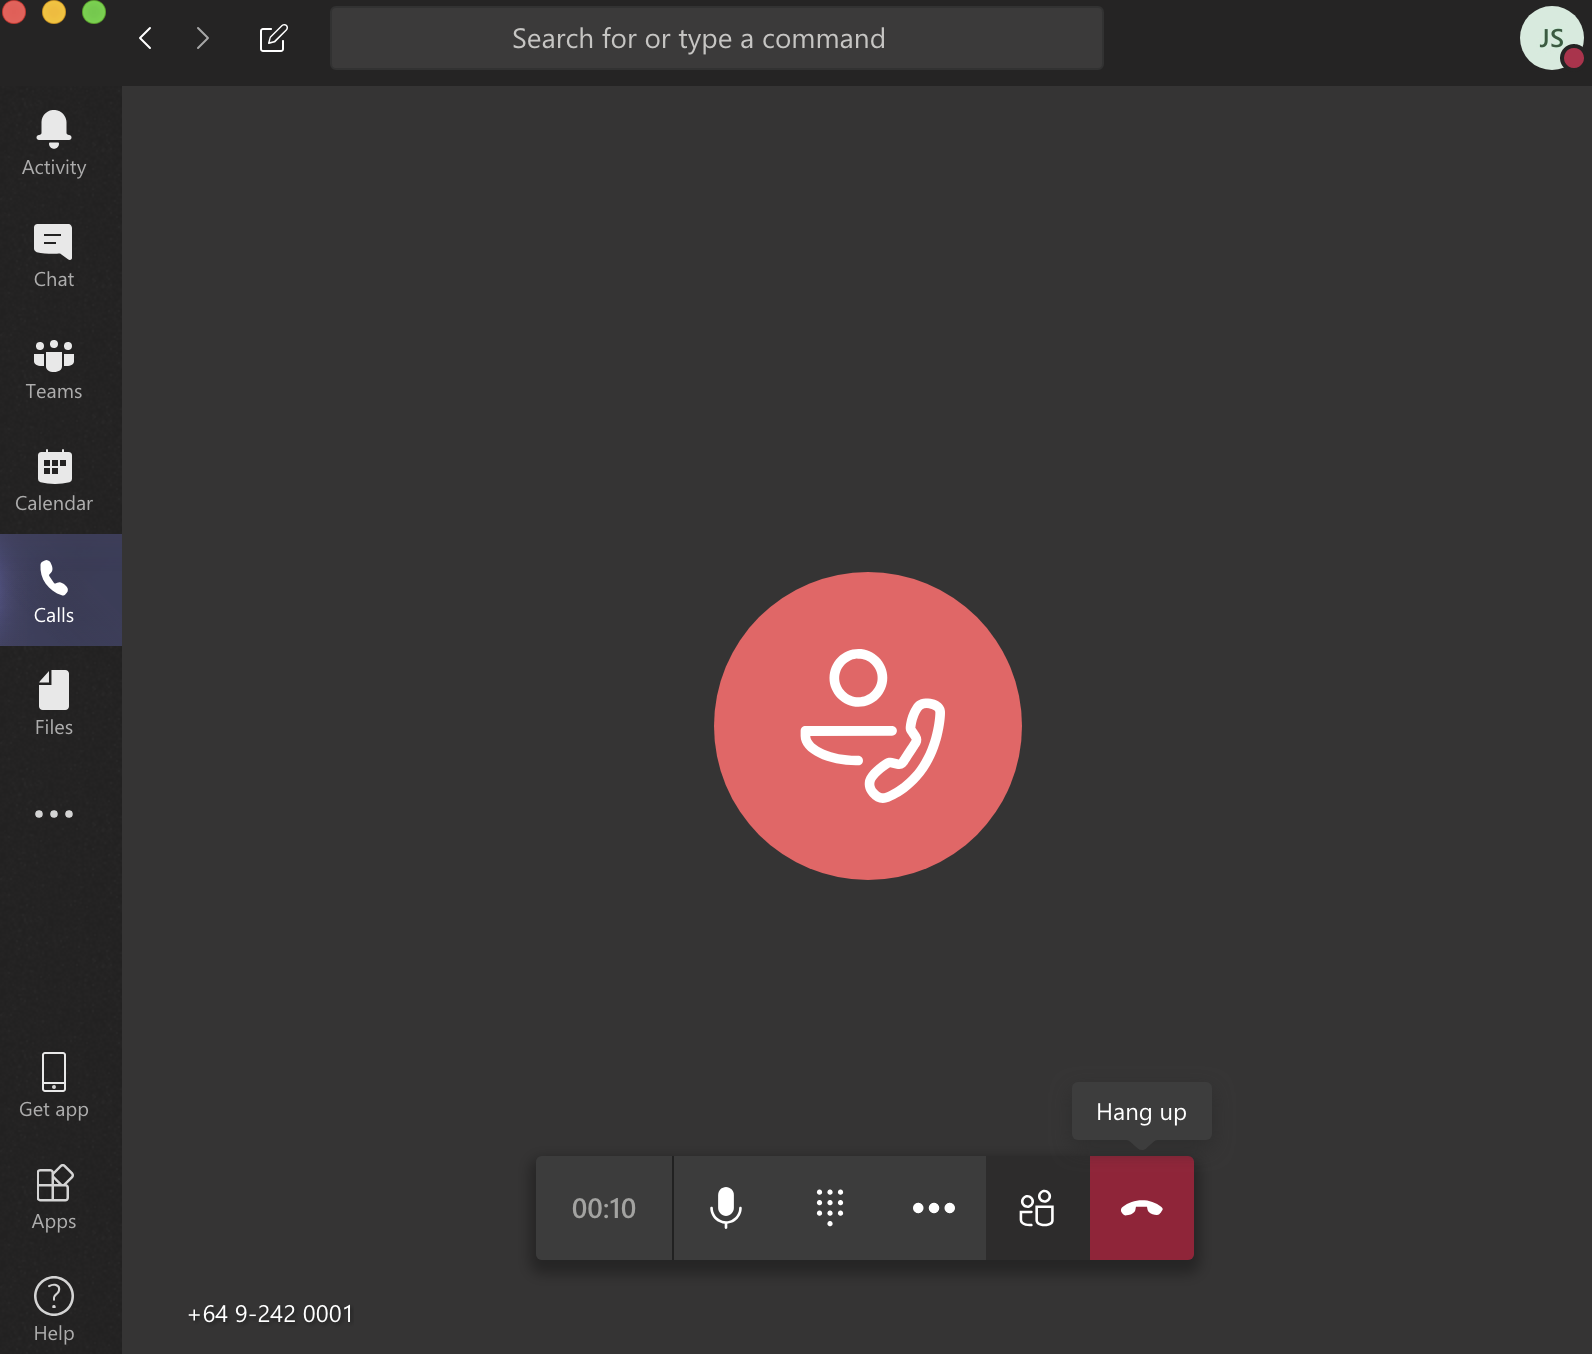
Step 68 - Click on the 'Calls' option on the left menu
Step 69 - If everything has worked to this point then you should see your phone number displayed and you will be able to make an outgoing call from Teams
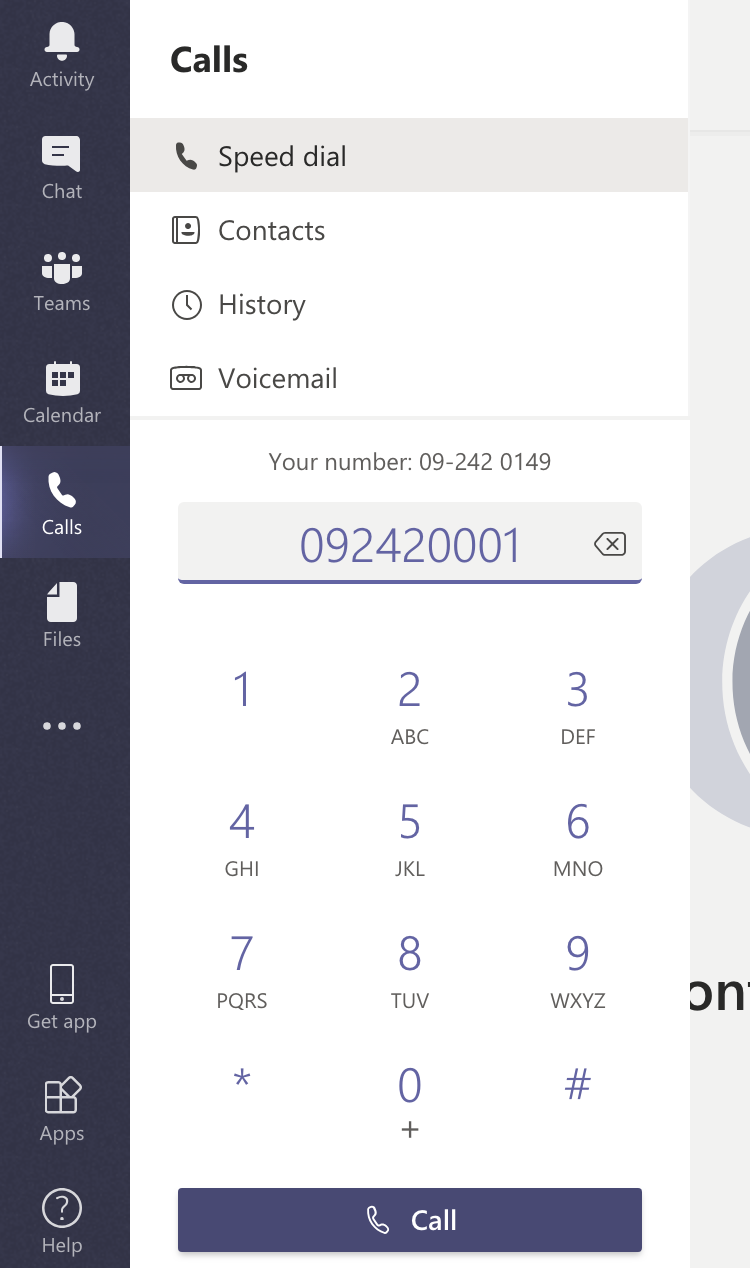
Step 70 - Try a test call to any phone number to test this is working
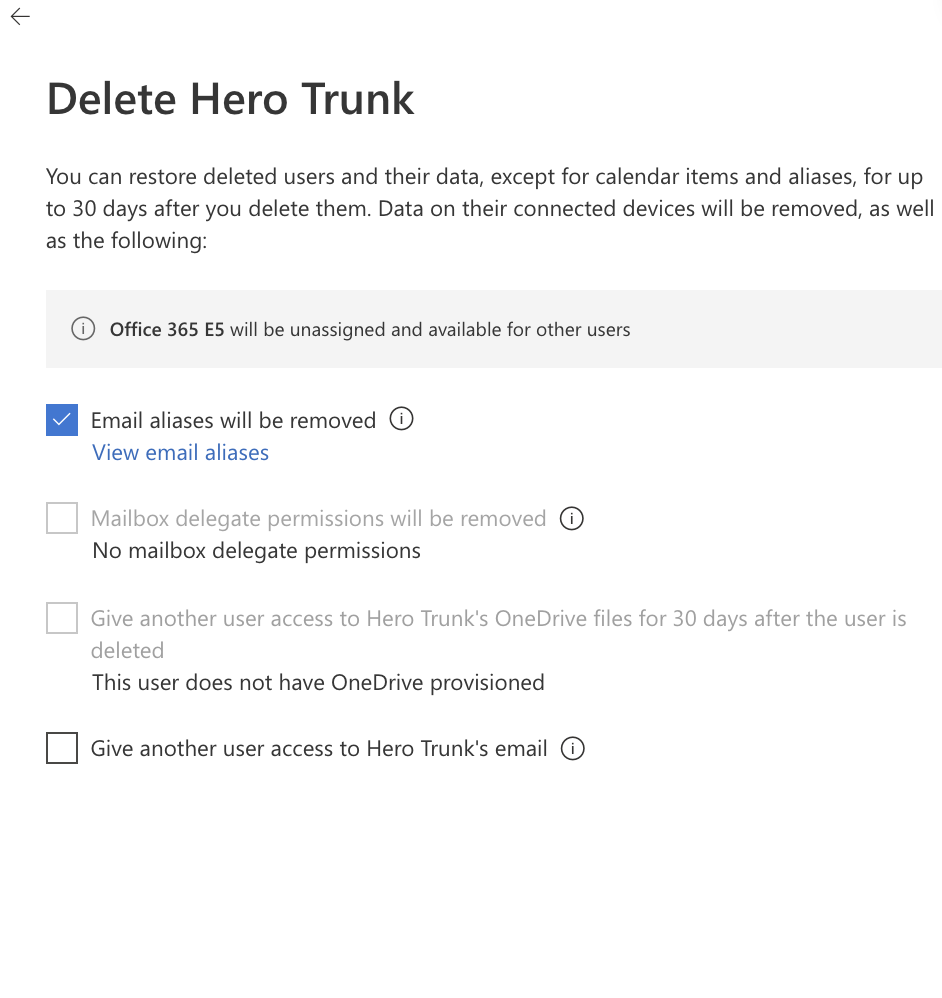
Step 71 - You can now delete the 'Temporary User' we setup in Step 40 to connect the Hero Trunk as this is no longer required. Select it in your Active Users page in Admin Center
Step 72 - Confirm Deletion of the Hero Trunk user
Step 73 - You should receive confirmation that your Trunk user is now deleted
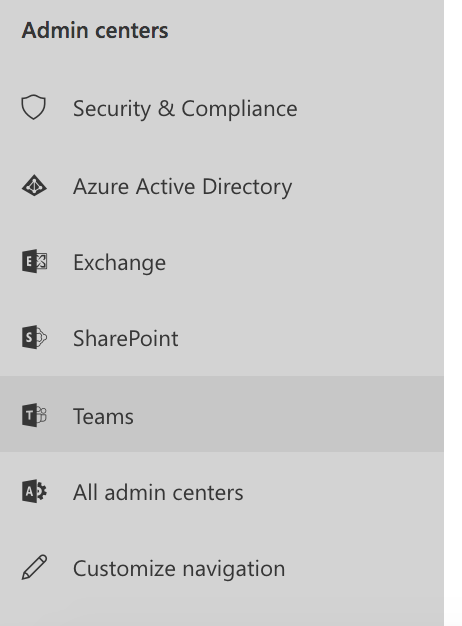
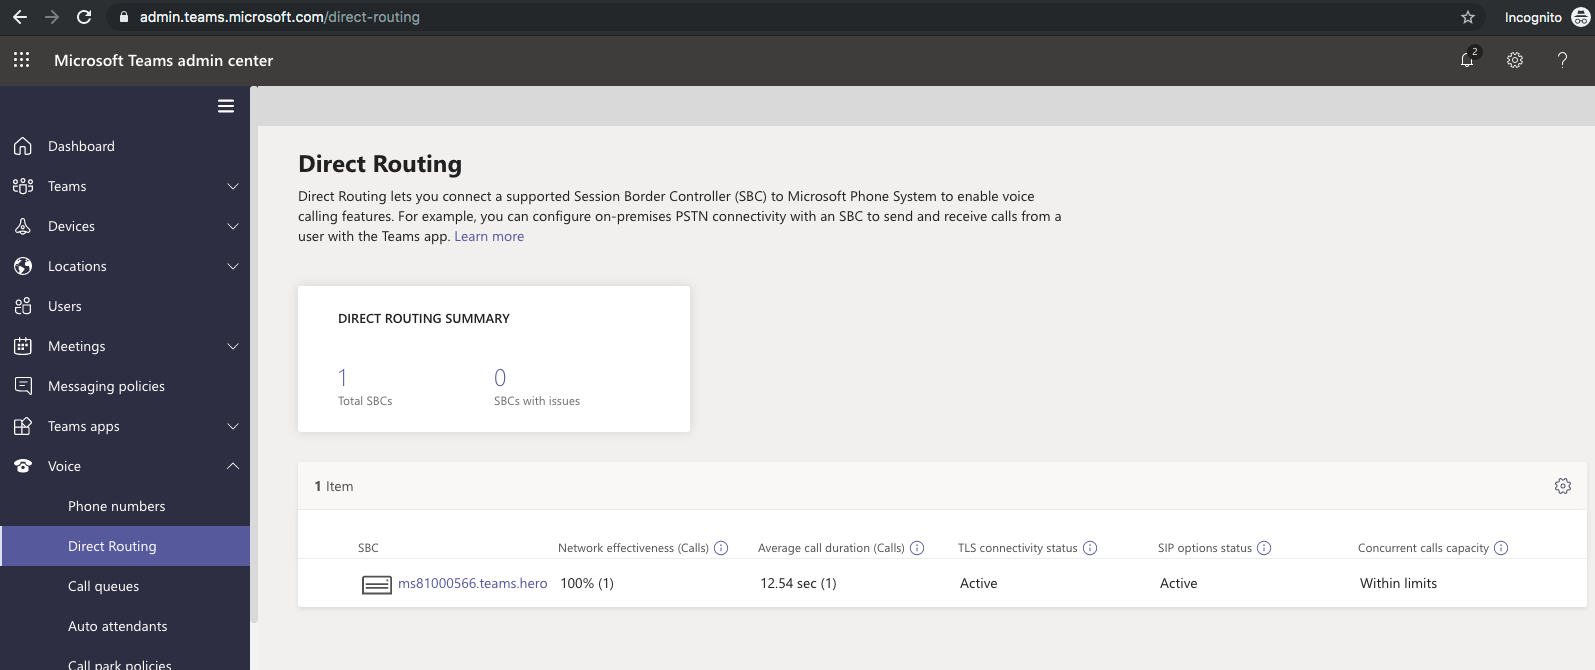
Step 74 - Incoming calls may take 15+ minutes to start working into your numbers as this delay is in Microsoft's provisioning. You can check the status of your trunk by going into the Teams menu in Admin Center and clicking on Teams
Step 75 - Next Click on the sub-menu option 'Direct Routing'
Step 76 - Once your trunk is ready you should see 'Active' in the TLS Connectivity and SIP OPTIONS columns
Step 77 - Repeat the process for all of your users and you are now setup with Hero's Teams integration and can receive calls in Microsoft Teams!